Carbon GT mono

Urs

Supporter
Re: Carbon GT mono >>> Materialfrage ???

Hallo Urs,

von deinem beitrag bin ich absolut begeistert. :thumbsup: wobei es mir nicht so sehr um den gt40 an sich, sondern um die fertigungstechnik geht.
ich beabsichtige auch ein historisches (renn)fahrzeug zu reproduzieren & befinde mich derzeit erst im stadium der visualisierung am/im pc.
weiters bin auch ich gelernter tischlermeister mit absolutem hang zu fahrzeugen aller art ( ein albtraum ) :veryangry:
während des gesamten beitrags versuchen die mitglieder hier herauszufinden wie genau der aufbau der carbonteile funktioniert, so auch ich :laugh:
kannst du die genaue bezeichnung der verwendeten materialien, Hartschaumplatten sowie carbonfaser preisgeben, oder handelt es sich um ein *betriebsgeheimnis* ?
derzeit fertige ich lediglich kleinteile für meine rennmaschine aus gfk, anfertigen einer positivform aus polystyrol + abspachteln ect.

ich wünsche weiterhin gutes gelingen und freue mich auf neue beiträge von dir, mfg:2thumbsup:

Hallo
Sorry für die spähte Antwort.
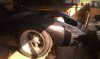
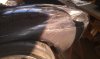
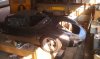
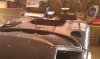
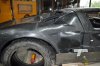
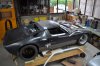
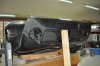
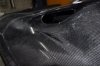
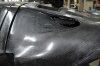
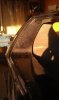
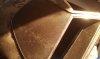
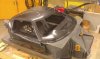
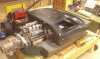
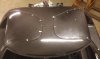
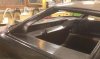
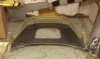
Die Sandwichplatten bestehen aus einem 10mm PVC Kern und sind beidseitig mit 2 Lagen CFK belegt.
Die Verbindungen und Ecken werden dann je nachdem wie stark sie dann belastet werden mit mehreren immer breiter werdenden Lagen verstärkt.
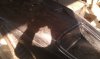
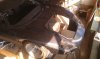
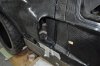
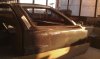
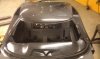
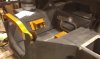
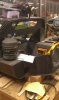
Bei den Hardpoints habe ich zusätzlich Presssperrholz eingelegt für eine lochleibungsverstärkung. An gewissen Orten habe ich noch CFK Roving Stränge oder Kevlar Stränge eingelegt, wie zum Beispiel beim Horizontal Stegwo die Gurten angehängt sind.
Es ist schwierig das ganze zu beschreiben.
Gruess Urs
 

Urs

Supporter
Hello Together.

I have a question.

Is there someone who knows, does the ZF cableshifter also fit on a ZFQ gearbox?

Greetings from switzerland
 

Urs

Supporter
Here some pics of the first outer doorshell full carbon.

Radiator and Pedals are on the way from RCR thank you Fran :)
 

Attachments

  • IMAG0213_1024x612.jpg
    IMAG0213_1024x612.jpg
    168 KB · Views: 1,501
  • IMAG0215_459x768.jpg
    IMAG0215_459x768.jpg
    148.1 KB · Views: 1,107
  • IMAG0214_1024x612.jpg
    IMAG0214_1024x612.jpg
    223.5 KB · Views: 1,112
On the door skin ans an example, how many layers of cloth have you used a what weight of cloth? Also is it just carbon cloth or is a carbon Kevlar mix?
I understand that kevlar takes impacts better than carbon so I was wondering if you would use a mix for the skin.
 

Urs

Supporter
The door has now 4 layers of carbon .on the inner side we do a horizontal wave. construction in carbon kevlar to take the impact.
 
hi Urs. great to see you are making progress on your project.
i have been looking through the whole thread over again, and i have a potentially stupid question to ask, if that is ok, because i realise there is something i dont fully understand about the way you have built this.

in the very early shots, you show the front portion of the chassis made out of pieces of plywood. e.g. the front bulkhead, footwell, chassis mounting points. then they have been replaced with CF parts. i think you are making them out of plywood to get the dimensions right, then taking it apart, and cutting these pieces out of flat CF panel you have made. then putting them back in place and laminating them together.

i suppose the flat pieces have only a few layers on them, but most of the layers are added after the basic structure is in place.

is that right, or have i missed something important? sorry for the silly question!

alexander
sydney, oz.
 

Urs

Supporter
here some new pics

I put the inner and outer shell of the doors together and also the dashboard, but i think about to do a new Dashboard, because it has to much bubbles.
Now we screwing in the engine on place.
Thanks to RCR for the nice radiator and Pedals :)

Greetings from switzerland.
 

Attachments

  • IMAG0343.jpg
    IMAG0343.jpg
    137.1 KB · Views: 1,330
  • IMAG0344.jpg
    IMAG0344.jpg
    137 KB · Views: 2,322
  • IMAG0346.jpg
    IMAG0346.jpg
    165 KB · Views: 2,196
  • IMAG0347.jpg
    IMAG0347.jpg
    220.9 KB · Views: 1,257
  • IMAG0348.jpg
    IMAG0348.jpg
    172.8 KB · Views: 1,175

Urs

Supporter
Hello
Now we fitted the dry sump on the engine and started the oil lining.
I also start to laminate the nose.
here some pics.
 

Attachments

  • IMAG0422.jpg
    IMAG0422.jpg
    107.9 KB · Views: 967
  • IMAG0423.jpg
    IMAG0423.jpg
    111 KB · Views: 1,010
  • IMAG0424.jpg
    IMAG0424.jpg
    111.9 KB · Views: 1,272
  • IMAG0426.jpg
    IMAG0426.jpg
    79.9 KB · Views: 1,132

Urs

Supporter
Today we took out the Nose :stunned::blank:
here some pics
 

Attachments

  • IMAG0431_1024x612.jpg
    IMAG0431_1024x612.jpg
    183.9 KB · Views: 1,066
  • IMAG0433_1024x612.jpg
    IMAG0433_1024x612.jpg
    188.8 KB · Views: 1,058
  • IMAG0434_1024x612.jpg
    IMAG0434_1024x612.jpg
    193 KB · Views: 904
  • IMAG0435_1024x612.jpg
    IMAG0435_1024x612.jpg
    162.1 KB · Views: 871
  • IMAG0436_1024x612.jpg
    IMAG0436_1024x612.jpg
    168 KB · Views: 849
  • IMAG0437_1024x612.jpg
    IMAG0437_1024x612.jpg
    165.9 KB · Views: 847

Urs

Supporter
Hello Together
last friday we took the rear shell out of the molds .
Now it slowly looks like a real car ;)
 

Attachments

  • DSC_0575_1024x680.JPG
    DSC_0575_1024x680.JPG
    223.1 KB · Views: 969
  • DSC_0576_1024x680.JPG
    DSC_0576_1024x680.JPG
    228 KB · Views: 860
  • DSC_0582_1024x680.JPG
    DSC_0582_1024x680.JPG
    207.1 KB · Views: 1,227
  • DSC_0592_1024x680.JPG
    DSC_0592_1024x680.JPG
    176 KB · Views: 865
  • DSC_0577_1024x680.JPG
    DSC_0577_1024x680.JPG
    213.6 KB · Views: 777
  • DSC_0579_1024x680.JPG
    DSC_0579_1024x680.JPG
    233.2 KB · Views: 815

Randy V

Moderator-Admin
Staff member
Admin
Lifetime Supporter
Simply amazing.... What a lightweight this one will be!!!
 
what a painstakingly lot of work must that have been till now...
and still lots of work to be done.
what color are you planning to give the car?
 
Back
Top