Hi Ed
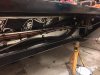
Mine are attached directly to the frame in that location (OK - clecos only at the moment, but planning on rivetting them permanently this weekend)

Cheers,
Ed
thanks looks like your doing a lovely neat job on your panels by the way looks great

Hi Ed
Mine are attached directly to the frame in that location (OK - clecos only at the moment, but planning on rivetting them permanently this weekend)
Cheers,
Ed
It’s a good question and I really don’t know the answer? I just went as per the design and used the angle bits so my panels end short, can’t see any real reason though???
View attachment 102266
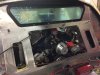
Think it will make it easier to mount the rad without riveting right up to the chassis rail thanks for the picPerhap this will shed some light
regards mark
awesome very exciting look forward to that a little while before paint for me i think hahaI’m 500 miles beyond good luck
Booking it in for paint on Sunday...
thanks for the pics very helpfulPerhaps this gives you an idea... thus moving the rad just alittle more forward and getting more room to run the AC hoses. Pic from SGT in their workshop.
The other old pics are from one of my SGT’s
I hardmounted mine on inside chassisrail with alu panel all the way, drilled out the rivetheads where the rad came.
In hindsight, I will alter my fixing onto brackets and rubber mount the radiator on outside vertical rail to reduce the risk of any core issues in the future.
Good luck
Morten
")
I’ve left out many panels, still waiting with front bulkhead, widened the rear bulkhead hole for engine access and fuel/brakeline runs.
I wish I’d fitted the loom before quarterpanels, and actually every panel and fiberglass where the AC and looms go through.
 but will be good for me to look back in the build log in the future so thought I would be quite detailed )
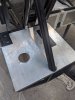
I found these panels a bit annoying as there is no backing plate behind them so I shaped them around the weld but think it looks a bit messy that they aren't simmetrical but doing that would leave hole between the panel and the tube/weld but sure it will all blend in nicely once I have had the panels powder coated if anyone is wondering I cut the shape out roughly on the band saw then used a Dremel with a sanding but to shape around the tube (several to be honest haha
I think that your eye is drawn to them at the moment, partly because you have been concentrating on profiling that panel around the weld bead, and partly because the engine bay is empty. Once it's full of Ford v8, fuel pumps, header tank, four x Webers and a convoluted exhaust manifold neither you nor anyone else is going to be looking at the way those two panels are carefully fitted to the chassis. Particularly if the engine is running! Keep it up.
I am doing powder coated panels so was thinking about just smoothing it out with the black sealant thanksI’ve used “aluminum” colored RTV to fill gaps and seal out dirt / moisture..
Yeh sure your right just hard not to notice at the moment and like everyone on here I want to get it as good as possible
Yeh don't think it always helps spent a good few hours trying to get the back section where the suspension arm goes though to fit neatly the other day and was fiddling and after about 4-5 hours think I made it worse hahaI'm in exactly the same position as you, and discovered the obsession with perfection was actually stopping me from making any progress at all! In fact, I still haven't finished / rivetted those same panels you're working on...!
oh well I'm sure it won't be noticeable when I have finnishedI tryed out quite a few paints and decided to get it all powder coated in the end bit of a thicker coating seemed like it would hold up better in the long run and really happy how the floor pan came out so going to get the rest done to match but thanks for the advice was considering itNot sure your budget, but maybe etch prime and then 2K polyurethane your ally panels yourself instead of paying for powdercoating? The durability of 2K is about the same and a stone is going to chip anything at 70mph anyway!
Look out for a 3M Accuspray Gun going cheap on ebay, they are not expensive and the design means you don't have to worry about cleaning the gun as it's a disposable nozzle (you can clean if you want a few uses out of one nozzle though).
")