Chuck and Ryan's Carbon Cub Build Blog

Hi Chuck,

Glad to see you are having fun with this!

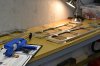
I remember back in 1981 learning wood, rag, and dope in A&P school.

The materials and processes sure have come a long way.

Does the new "dope" give off a nice vapor like the old school butyl does?:D:D

Don't know if you've given it any thought but there may be an examiner near you that would give you credit for this project towards an "A" certificate if you had an airframe mechanic guide you.

Just a thought.

If you need any professional opinions on something you get stuck on just call.

Cheers,
Scott
 

Chuck

Supporter
Scott

Yea the Poly Fiber system is rather stinky. My first whiff reminded of the model airplane dope I used in the sixties to cover Guillow balsa model planes. MEK is the primary solvent used in the process. Good ventilation is required.

The Stewart system, on the other hand, is water based and virtually odor free. I would prefer it in all respects except the final paint coat. Too finicky.

Interesting thought on the AP.

Chuck
 

Chuck

Supporter
The Hanger

Moved the GT40 and Mustang out of the garage.

Added a peg board and an additional work bench a month ago.

Built the saw horses a couple of weeks ago.

The Avery Carbon Cub tool kit arrived yesterday.

Sent a big check to Carbon Cub today.

The kit should be in the “hanger” in about two weeks.

I am ready.

Before and after pictures:
 

Attachments

  • Garage2.jpg
    Garage2.jpg
    166.4 KB · Views: 589
  • Garage5.jpg
    Garage5.jpg
    141.2 KB · Views: 581

Randy V

Moderator-Admin
Staff member
Admin
Lifetime Supporter
((Rubbing palms together and warming up my mouse))

Bring it on guys!!!! :)
 

Chuck

Supporter
Cub en route.

Mitch at Cub Crafters reported that the Cub was shipped out this past week. He was kind enough to send along some pictures of the parts being loaded into the 18 foot long crate.

What I found impressive is that the shipping date was within a couple of business days of what was predicted when the order was placed 12 weeks ago.
 

Attachments

  • CrateComp.jpg
    CrateComp.jpg
    225.7 KB · Views: 502
  • Loaded, comp.jpg
    Loaded, comp.jpg
    246.3 KB · Views: 615

Chuck

Supporter
Cub arrives

The Cub arrived on Monday, March 10. Getting it off of a semi tractor trailer and onto a flat bed tilt trailer and then into the garage was quite a challenge. It would have made a great You Tube video.

The first thing built is the left wing. The spars are firmly fastened to the bottom of the crate. So most of the contents of the crate must be removed to get to the spars. The only items opened for now are those needed for the left wing.

Cub Crafters really does an impressive job packaging everything. Boxes are all clearly marked.
 

Attachments

  • IMG_3884.jpg
    IMG_3884.jpg
    191.8 KB · Views: 491
  • OnFlatbed.jpg
    OnFlatbed.jpg
    237 KB · Views: 499
  • Unpacked1.jpg
    Unpacked1.jpg
    174.1 KB · Views: 565
Cub arrives

The Cub arrived on Monday, March 10. Getting it off of a semi tractor trailer and onto a flat bed tilt trailer and then into the garage was quite a challenge. It would have made a great You Tube video.

The first thing built is the left wing. The spars are firmly fastened to the bottom of the crate. So most of the contents of the crate must be removed to get to the spars. The only items opened for now are those needed for the left wing.

Cub Crafters really does an impressive job packaging everything. Boxes are all clearly marked.

Are those tubes on the fuse carbon?

It's gonna be a nice plane to build, and fly!
 

Chuck

Supporter
First assembly

The first step in the assembly of the wings was to install CNC billet aluminum fittings on the spars. Nice pieces, perfectly formed and glossy smooth finish.

The instructions emphasis the importance of the holes being reamed straight and true. So the initial holes were reamed on a drill press, set up so it would make only one pass, pulling the reamer upward through the hole.

Avery provided a cutting lubricant called Boelube, which is used by Boeing, as the name suggests. It is a wax like substance which seems to work well. It is being used for all reaming and drilling, dipping the pit in it with each use.

By the end of the first evening the inboard hinge fittings were in place.
 

Attachments

  • DSC_0008.jpg
    DSC_0008.jpg
    123.7 KB · Views: 522
  • DSC_0045.jpg
    DSC_0045.jpg
    107.6 KB · Views: 496
  • DSC_0009.jpg
    DSC_0009.jpg
    91.8 KB · Views: 516
Hey Chuck,
That Boelube is good stuff. I also use it in the liquid form.

BTW, if you're looking for aircraft tools, check out the The Yard (http://www.yardstore.com/) for some good deals, new or used...

Good luck with the build!

Tom
 

Chuck

Supporter
Hey Chuck,
That Boelube is good stuff. I also use it in the liquid form.

BTW, if you're looking for aircraft tools, check out the The Yard (http://www.yardstore.com/) for some good deals, new or used...

Good luck with the build!

Tom

Thanks for the tip. I picked up a number of tools specific to this plane from Avery. Small family operation and quality stuff.
 

Chuck

Supporter
Wings

The directions call for gluing six ribs together, creating “double” ribs. Methacrylate is used, a industrial adhesive with which I was not previously familiar. The directions clearly state that one should wear a respirator to avoid immediate and long term organ damage, as well as gloves and protective clothing, in a well ventilated place. Sounds like a lot of fun. I dutifully followed the directions and glued the halves together in the garage with the door open wearing gloves and a 3M respirator. Never caught a whiff of anything offensive. It really did not seem to be that obnoxious.

When finished, I pulled off the gloves and removed the respirator. Then it hit me. That stuff really does stink.

After a couple of days work, the wings are well on their way. Since Carbon Cubs don’t leave a lot of room for creative engineering and since their construction is well documented in other places, I won’t dwell on the details.
 

Attachments

  • DSC_0017.jpg
    DSC_0017.jpg
    157.3 KB · Views: 543
  • DSC_0050.jpg
    DSC_0050.jpg
    117.3 KB · Views: 580

Chuck

Supporter
More Wing Progress

Aft and forward ribs in place. Aft false spars in place.

The drag rods are installed and adjusted, which was an interesting process. A digital fish scale was used to measure a half inch deflection at the midpoint of each drag rod, while at the same time assuring the front spar remained perfectly parallel to a string line connecting the first and last ribs. Ended up with 14 pounds of tension on each section.

Test fitted the aileron. Dimensions came out exactly to spec. A string line between the left and right supports ran nearly dead center through the center support.

The wing is essentially done except for the front skins and the carbon fiber tip. We are awaiting a set of blocks used to tighten down the skins and shared among CC builders. So we have set the left wing aside and the right wing is now under way.
 

Attachments

  • DSC_0072.jpg
    DSC_0072.jpg
    132.6 KB · Views: 502
  • DSC_0055.jpg
    DSC_0055.jpg
    66.3 KB · Views: 475
  • DSC_0076.jpg
    DSC_0076.jpg
    128.8 KB · Views: 525
  • DSC_0092.jpg
    DSC_0092.jpg
    93.7 KB · Views: 467
  • DSC_0102.jpg
    DSC_0102.jpg
    165.1 KB · Views: 493
Hi Chuck....looks real good.

Don't know if CC wants you to use any anti corrosive compound where steel meets ally, but if you want some real good stuff, just say so. I have a couple of date exp. tubes of mastinox. We can't use it on a Part 135 aircraft but it's fine, just a legality thing. I'd be happy to send you a tube if you want. LMK.

Scott
 
Are the parts coated with some kind of corrosion coating? it seem strange to do that much assembly before applying a Zinc chromate or alodine conversion coating. all the aluminum I have used in aircraft have been coated before assembly to prevent corrosion between the parts
 
Back
Top