
You are using an out of date browser. It may not display this or other websites correctly.
You should upgrade or use an alternative browser.
You should upgrade or use an alternative browser.
Chuck and Ryan's RCR Build
- Thread starter CESLAW
- Start date
Fran:
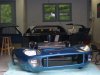
The original plan was the Essex paint scheme, like Chris Martino. But Ryan preferred a darker color, hence the Guardsman Blue. Still like the Essex white and red. Planned paint schemes probably change more than any other build plans. Glad that decision is behind us now.
Look forward to you 'personal' inspection in October.
Chuck
Interior Done!
It has been more than six months since we pulled the GT out of the garage, lit up the 302, and took it for its first test drive. But much more needed to be done. The interior is finally done.
The remote oil filter, the speedometer sensor, and a few other items had not been tested since our first test drive. Our February test drive came to a rather abrupt end when a coolant hose slipped off and dumped the anti freeze on the driveway. I suspect a hose clamp was not tightened, but regardless we decided to double clamp all the coolant hoses under the car, just like the through hulls on a boat.
The interior is finally completed. Time to make sure the dang thing still runs.
Ryan poured five gallons of fuel into the starboard tank. The starter button was pushed with the ignition off so the engine would turn over without firing to get the oil moving. (I really like being able to do that). After a few moments we noted we had oil pressure, so presumably we hooked up the remote oil filter correctly. The right fuel pump was turned on. It took about thirty seconds to get a prime and show two and a half pounds of pressure on the fuel pressure gauge. So we were ready to go.
The car was rolled out of the garage. Ignition on. Pushed the starter button. Not more than five seconds of cranking and varoooooom! That thing fired off. It lit up so quickly it caught me off guard. I could not see the tach, since I was along side manipulating the pedals. Ryan said it zipped right up to 5000 RPM before I realized what was happening and let it settle down. Within about two minutes it was idling smoothly at 750 RPM. The oil pressure was solid and the water temperature gradually came up to about 175 degrees.
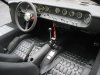
We hopped in and took the chassis for a ride. The speedometer works! Going down the street in our subdivision it was reading 30 to 40 MPH. I am sure we were not going that fast, so adjustment of those pesky DIP switches on the back side will be needed, but the needle was steady and constant. So the pick up located on the front wheel should work well.
The carbs need some adjustment, but for reasons I can’t explain they seem to be running better than in February; a bit less backfires and spitting from the carbs. The warm and humid air perhaps???? There is a small leak at the thermostat which needs to be addressed as well.
With a chassis that is pretty much done, interior that is insulated and carpeted, electrical systems that work, it is time to get that body on, get it licensed, and head to Run and Gun.
It has been more than six months since we pulled the GT out of the garage, lit up the 302, and took it for its first test drive. But much more needed to be done. The interior is finally done.
The remote oil filter, the speedometer sensor, and a few other items had not been tested since our first test drive. Our February test drive came to a rather abrupt end when a coolant hose slipped off and dumped the anti freeze on the driveway. I suspect a hose clamp was not tightened, but regardless we decided to double clamp all the coolant hoses under the car, just like the through hulls on a boat.
The interior is finally completed. Time to make sure the dang thing still runs.
Ryan poured five gallons of fuel into the starboard tank. The starter button was pushed with the ignition off so the engine would turn over without firing to get the oil moving. (I really like being able to do that). After a few moments we noted we had oil pressure, so presumably we hooked up the remote oil filter correctly. The right fuel pump was turned on. It took about thirty seconds to get a prime and show two and a half pounds of pressure on the fuel pressure gauge. So we were ready to go.
The car was rolled out of the garage. Ignition on. Pushed the starter button. Not more than five seconds of cranking and varoooooom! That thing fired off. It lit up so quickly it caught me off guard. I could not see the tach, since I was along side manipulating the pedals. Ryan said it zipped right up to 5000 RPM before I realized what was happening and let it settle down. Within about two minutes it was idling smoothly at 750 RPM. The oil pressure was solid and the water temperature gradually came up to about 175 degrees.
We hopped in and took the chassis for a ride. The speedometer works! Going down the street in our subdivision it was reading 30 to 40 MPH. I am sure we were not going that fast, so adjustment of those pesky DIP switches on the back side will be needed, but the needle was steady and constant. So the pick up located on the front wheel should work well.
The carbs need some adjustment, but for reasons I can’t explain they seem to be running better than in February; a bit less backfires and spitting from the carbs. The warm and humid air perhaps???? There is a small leak at the thermostat which needs to be addressed as well.
With a chassis that is pretty much done, interior that is insulated and carpeted, electrical systems that work, it is time to get that body on, get it licensed, and head to Run and Gun.
Attachments
Looks good! Let me know if you need the dip switch settings.
Ron McCall
Supporter
Looking GREAT Chuck!!!
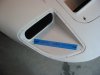
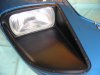
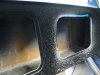
Headlight Drain
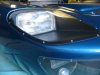
It would seem likely that water will find its way under the headlight covers. Removing the covers to rid the water would be a nuisance. So a couple of holes were drilled to drain off any water that might accumulate. Two eighth inch holes were drilled on each side, since the low points were slightly different from one side to the other. A countersink was used to add a slight taper. When painted, the drain holes are barely visible.
It would seem likely that water will find its way under the headlight covers. Removing the covers to rid the water would be a nuisance. So a couple of holes were drilled to drain off any water that might accumulate. Two eighth inch holes were drilled on each side, since the low points were slightly different from one side to the other. A countersink was used to add a slight taper. When painted, the drain holes are barely visible.
Attachments
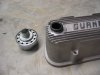
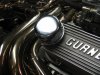
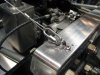
Details, oil filler cap
The Gurney Weslake valve covers came with an oil filler tube that was about three inches long. With a cap on it would not clear the rear clip. We pulled out the aluminum filler tube, cut it, and reinstalled it so that it was about a quarter inch above the surface. A standard GM oil cap grommet fit snugly in the tube. A generic oil filler cap was used. When the rear clip is closed there is now about a half inch of clearance
The Gurney Weslake valve covers came with an oil filler tube that was about three inches long. With a cap on it would not clear the rear clip. We pulled out the aluminum filler tube, cut it, and reinstalled it so that it was about a quarter inch above the surface. A standard GM oil cap grommet fit snugly in the tube. A generic oil filler cap was used. When the rear clip is closed there is now about a half inch of clearance
Attachments
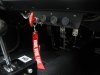
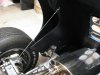
Rear Clip Support
A bit of cable and some parts from the West Marine store and we had our rear clip cables installed. This design is patterned after a GT we saw at the Shelby museum in Boulder. A twist of one end of the cable before clipping it in place will make it lay properly and prevent it from getting into the tire when the clip is closed.
If the lengths are carefully adjusted side to side the two cables will resonate nicely together when plucked.
Attachments
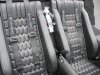
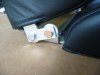
Seat Extensions
I have no problem fitting into the GT. Ryan, on the other hand, had problems. We needed a way to extend the seat slightly forward but keep the seat back as close to the fire wall as possible to increase the head room and lower his butt. We hit upon a very simple solution.
Brackets were fabricated from flat aluminum stock to extend the connection between the seat bottom and seat back about an inch. This simple modification puts one’s bottom further back and thus lower, increasing the head room. But here is the neat part. You can flip the lower portion of the seat back either forward or backward. For Ryan, who needs the extra height, we set it backwards. For those a bit more vertically challenged, we set it in the forward position. In the rearward position the seat back sets just under and even with the horizontal roll cage bar. In the forward position the seat back sets just in front of the roll cage. This effectively give one an easily adjustable seat for different drivers.
This is such a simple modification which works well. Ryan now fits fine. Just make sure the final location of the seat is carefully planned so that it can be flipped to either position without interference from the rollcage.
Attachments
Chris Kouba
Supporter
Gents-
You've clearly picked up the body already. Where are the pics? It's not like you guys to not get something done in short order. Any assembled shots yet?
You've clearly picked up the body already. Where are the pics? It's not like you guys to not get something done in short order. Any assembled shots yet?
Chris:
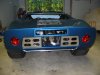
You noticed. I was not intending to post any full body shots until the body is completly installed. Only the door strikers are standing in the way of completion. So, just for your eyes only, I am attaching a few progress pics.
Chuck
You noticed. I was not intending to post any full body shots until the body is completly installed. Only the door strikers are standing in the way of completion. So, just for your eyes only, I am attaching a few progress pics.
Chuck
Attachments
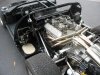
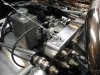
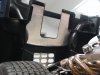
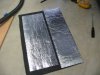
Insulation, Rear Clip
Two areas were insulated. First, a small section of aluminum, 11 inches x 6 inches, was screwed in place just aft of the rear clip top vent, using the same screws that hold the aluminum panel in place. The aluminum was folded with a 3/8" lip to give it a bit more strength. When the clip is opened and the engine running, the exhaust will hit the plate protecting the clip.
Second, aluminized heat barrier, from Cool It, was placed on the clip to protect it from the heat from the headers. Just aft of the engine the headers come within an inch or two of the fiberglass. A pattern was made and the material cut in two sections. It adheres tightly. This is the same material used on the engine side of the fire wall.
Attachments
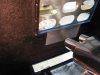
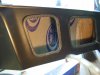
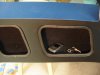
Inside Doors
The doors were finished in a manner that is simple and maximizes storage space. The openings were trimmed so that weather stripping would fit evenly within the lip that surounds each opening. McMaster-Carr, ¼” edge was used. The size of the bulb does not matter, since it was removed. This was press fit into place, cutting it a bit long to assure a tight fit.
Inside the door a section of Cool It acoustical mat was placed. No attempt was made to cover the entire door, just a nice sized section to deaden vibration.
Recall we cut the floor carpet so that the sections under the seats were not used. Now it is time to use them. Each was trimmed to fit inside the door, covering the bottom and the outside surfaces. The carpet sections were too short to cover all the exposed surfaces, so black paint was brushed on the remaining exposed surfaces.
Sections of mat insulation were glued with contact cement to the back of the carpet sections, using two separate pieces: one for the bottom and one for the side. The side piece was cut about an inch under sized all around, so adhesive could be applied to hold it in place. There is no need to use adhesive on the lower section of carpet
The advantage of this approach is (1) it’s simple, (2) the door hardware remains accessible, (3) there is maximum storage space, and (4) no extra handle is needed to pull the door closed. Just pull the center section.
Once the door stiker plate is installed, the spider will go and the body will (hopefully) be complete.
Attachments
Chuck, for the opening of the rear clip, your cables look vintage but I would still think about something that actively holds the clip open, especially for those windy days. Maybe an unobtrusive prop rod or tailgate lift cylinder, something to "lock" it in the up position. You guys have thought of everything so far but I thought I'd just mention it.
")
Similar threads
- Replies
- 0
- Views
- 537
- Replies
- 1
- Views
- 458