Chuck and Ryan's RCR Build

Chuck

Supporter
Run and Gun, 2008

Took some pics on the track. Drove a few slow laps, but cannot really comment much since there are some engine issues that need to be sorted out before we push it hard and the chassis needs to be aligned. Just wasn't enough time to get it all done. Next year . . . .

One of the new BDR GT's pulled up while we were on the track, so took a pic. Good comparison of the profiles of the BDR and RCR in the last pic.

Ryan got a lot of track time in the Cobra. The 427 ran like a champ all week.
 

Attachments

  • RG08GTd.jpg
    RG08GTd.jpg
    53.3 KB · Views: 850
  • RGGT08k.jpg
    RGGT08k.jpg
    61.8 KB · Views: 863
  • RGGT08t.jpg
    RGGT08t.jpg
    32.3 KB · Views: 836
  • RGGT08o.jpg
    RGGT08o.jpg
    30.1 KB · Views: 710
  • RGGT08l.jpg
    RGGT08l.jpg
    63.9 KB · Views: 795
  • RGGT08q.jpg
    RGGT08q.jpg
    35.4 KB · Views: 739
  • RGGTBDR08a.jpg
    RGGTBDR08a.jpg
    51 KB · Views: 1,074

Chuck

Supporter
Shaken, not stirred

Our foray to Run and Gun was the first time we had an opportunity to seriously drive the GT. The first couple of laps around the track revealed a significant vibration around 2500 to 3000 RPM which essentially sidelined the car the rest of the week. The consensus was a balance problem, which seemed odd, since we carefully confirmed the balance before ordering the Flywheel from Kennedy Engineering..

The engine builder originally specified a 28 ounce balance. The Monday following Run and Gun we reconfirmed this spec and learned it was wrong. It should have been zero balanced with the forged internals we had ordered. Work commitments kept me out of the garage for a couple of weeks, but Ryan and I finally found a couple of hours time to remove the tranny and flywheel two weekends ago.

We sent the flywheel back to Kennedy Engineering to rebalance it. They promptly performed this task and we had it back within a week. Cost: $30. We have had excellent service from Kennedy throughout this project. They added balancing holes on the opposite side, visible in the picture. This was much less costly than replacing the entire flywheel.

Saturday, November 15, Ryan and I reassembled it. It was dark, cold and wet outdoors, but Ryan was insistent we try it out. Our first night time drive through the subdivision, although only a mile long, was a success. The vibration problem seems to have been resolved.

Now we need to get to work on tuning those carbs!
 

Attachments

  • FlywheelBackside.jpg
    FlywheelBackside.jpg
    27.2 KB · Views: 818
  • TranReinstall111608.jpg
    TranReinstall111608.jpg
    65.4 KB · Views: 948

Rob

Lifetime Supporter
Chuck,
Great news.
Re the carbs, give me a call sometime. Points to discuss:
- cleaning idle circuit
- jetting (low/high speed circuits)
- filters
- etc
 
Chuck,
Kennedy is such a pleasure to work with. They sent me the 28 oz. as well when it was supposed to be neutral. I caught it on arrival. they paid for the shipping and exchanged it at no cost. You should consider yourself ahead of everyone else that has the Kennedy flywheel. You not only got a balanced flywheel, but you got a lighter one as well. Something no one else can claim. Should help in the revs department, hurt in the torque dept. A great trade off for our cars. They don't need all that torque anyway. Not bad at all.

Bill
 
Chuck - Just so I understand this correctly;was this T and L's fault that they sent you a zero balance motor but told you in the delivered spec that it was a 28oz balance?This would not have been Kennedy's fault and I'm glad to see they fixed it so quickly(I'm going to be using their set-up).It does however add to the TandL saga which has been covered on this AND other forums. A.J.
 

Chuck

Supporter
Al:

This was definitely not Kennedy's problem. They originally sent me exactly what I ordered: a 28 ounce flywheel. When we discovered the problem, the resolved it promptly.

This issue cost us a bit of time and only a few bucks, so I am not going to be too critical of any misinformation given along the way. If after a few thousand miles the drivetrain proves to be solid and reliable this little hiccup will be forgotten.

Chuck
 

Chuck

Supporter
Rob: thanks for the offer. I am buried in work again but when things loosen up and I get some to fiddle with the Webers I will give you a call.

Bill: Not sure how much difference lightening the flywheel with those holes will actually affect the revs, but like you say, it can't hurt.
 

Chuck

Supporter
Mud Flaps

This is a little tiny detail, but one worth adding. There is gap between the forward lower edge of the rear wheel wells and the chassis. If that gap is left open dirt and water will be sprayed onto the chassis by the spinning rear wheels. A flat piece of rubber, about four inches high and as wide as the wheel well will prevent this from happening. It was held in place with three screws and lock nuts and a half inch wide strip of aluminum along the back side.
 

Attachments

  • MudFlap.JPG
    MudFlap.JPG
    142.8 KB · Views: 910

Chuck

Supporter
Too Much Detail

This may come under the category of too much detail. Here is an addition that no one will see. It is simple and cheap. To most it is probably superfluous. But if one is a bit anal about the way things line up, this detail is for you.

The forward end of the door handles tend to set in a bit from the body surface. By placing a ¾ inch self stick bumper within the handle opening, one can make the handle set perfectly flush with the door handle opening.

The self adhesive clear rubber bumpers are available from most any hardware store. They are typically used on the bottom of stereo components to keep them from moving.
 

Attachments

  • DoorHandleStop2.JPG
    DoorHandleStop2.JPG
    123.3 KB · Views: 825
  • DoorHandleStop1.JPG
    DoorHandleStop1.JPG
    109.7 KB · Views: 653
  • DoorHandleStop3.jpg
    DoorHandleStop3.jpg
    32.5 KB · Views: 776

Keith

Lifetime Supporter
Great Idea! I have been thinking about how to keep the handle flush with the door.

I still have not come up with a spring arrangement that makes the handle "feel right".

Do you have any driving impressions of your car yet?

Keith
 

Chuck

Supporter
Keith:

Don't yet have any real driving impressions to report. We are working on the bump steer, and hope to get the fittings in place this weekend. Been a bit preocuppied with trials the last couple of months. But by the end of the holiday season, weather permitting, should be able to give a meaningful report.

By the way using the door hardware supplied with the kit resulted in a nice 'feel' on the handle. The handle pulls into place and stays put when the door is closed. One has to carefully adjust the 'loop' between the handle and the latch to get it right, otherwise the handle won't stay flush. When closing the doors they have a proper 'clunk' as the latch grabs. We did not add any additional springs to the handle to keep it flush with the body, wasn't necessary.
 

Keith

Lifetime Supporter
Chuck,
Okay I am lost here.........Door hardware supplied with the kit. All I got was the door latches, striker bolts and the stainless steel door handles. Was there supposed to be more?
Thanks, Keith
 

Chuck

Supporter
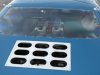
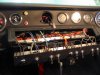
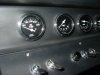
Oil Temperature Gauge

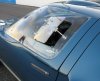
The GT came with a clock instead of an oil temp gauge. We requested a gauge to replace the clock. When visiting Fran in early December he provided us with the awaited gauge. Now it was time to do the swap, which we feared would be a challenge in a nearly complete car.

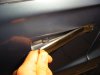
When the dash was originally wired on the dining room table one year ago, it was pre wired with the necessary connections for the oil temp gauge. At that time six inches of slack were left in each of the wires connected to the switches, since the plan was to access the back side of the gauges from the switch panel opening. Now we would see how well this plan would work, since removing the entire dash was not really an option.

The clock bracket was held in place with a couple of nylon knurled nuts, so removing the clock was easy. The connections for the oil temp gauge, including the light, ground, and sensor wire were already present and easily installed. Securing the bracket was a bit tricky, since it was done solely by feel, but after some frustrating moments it was finally tightly in place.

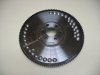
The temperature sending unit was temporarily connected to the sender wire, a ground connection added, and dropped into a cup of hot water. It was reassuring to see the oil temp gauge climb to an indicated temp of around 160 degrees.

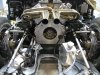
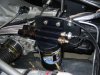
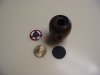
As noted in a previous post, the Canton oil filter bracket has four half inch NPT fittings. Two are used for the braided oil lines. One is used for the oil pressure warning light sensor, noted in a prior post. That left one to be used for the oil temperature fitting.

A half inch to quarter inch NPT reducer was needed to install the temperature sensor. Russell makes an endura finish fitting which is available from Summit as well as other suppliers. Alternatively Classis Instruments sells sensors in different sizes, including a half inch NPT. A bit of die electric grease was used on the threads to assure a good electrical ground.

If there is a lesson in all this, it is to build with future serviceability in mind. Had the oil temp gauge not been pre wired and slack not been left in the switch wires swapping out the clock for the temp gauge would not have been possible.

If anyone is interested, I will make them a really great deal on an official RCR dash clock. Only slightly used. Keeps perfect time.
 

Attachments

  • OilTemp1.JPG
    OilTemp1.JPG
    163.1 KB · Views: 742
  • OilFittings2.JPG
    OilFittings2.JPG
    174.9 KB · Views: 649
  • OilGauge3.JPG
    OilGauge3.JPG
    160.9 KB · Views: 649

Chuck

Supporter
Shift Knob

Now this is really important. A GT with a round plastic shift knob just isn’t complete. The original, after all, had a nice wooden knob. We searched long and hard (that means about thirty minutes of internet time) to find a suitable walnut knob. Tony Branda Mustang Parts, 800-458-3477, sells a walnut knob that is threaded to match the shifter in the RCR GT perfectly. It is described as a Cobra Walnut 4 Speed Shift Knob to fit Ford Shifters.

But there is a problem. On top of the knob is a “Shelby Cobra” logo. It popped off easily leaving a recessed space. Something was needed to fill that space.

There are several options. A dollar coin is a close fit. (I would recommend a Thomas Jefferson rather than Susan B. Anthony or Sacagawea coin). One could paint over the Shelby Cobra logo and reinstall it. Perhaps one’s family crest on a gold medallion would work. The shift pattern marked on an index card with a ball point pen cut to fit and glued in place might be useful. Or a piece of leather matching the seats, glued to a thin piece of cardstock to make it flush, could be used. We opted for the last option.

As soon as a small scrap of walnut can be found our plan is to replace the leather insert, sand the entire knob, and refinish it with a clear Tung Oil finish. But that project is at the bottom of the “B” list for now.
 

Attachments

  • ShiftKnob2.JPG
    ShiftKnob2.JPG
    79.8 KB · Views: 669
  • ShiftKnob1.JPG
    ShiftKnob1.JPG
    132.4 KB · Views: 785
Hi Chuck,

very nice ! Always when i look at your dash i love the very clean look of it. What is your plan on lettering the switches ?

TOM
 

Chuck

Supporter
Hey Tom:

Lettering the switches? That would spoil the fun! I like to keep the driver guessing.

Actually we don't plan to letter the switches. There are few, and the functions are intuitive.

To the right of the steering wheel is the horn button and turn indicator, which are obvious from their shape and location. Next, clustered in a pair, are the wipers and the windshield washer. Next, clusted in a group of three are the push button to activate the brake lights (see earlier post for more details), four way flasher, and radiator fan override. To the far right, under the fuel level gauges, are the corresponding fuel pump switches.

To the left of the steering column are the light switches. On the far left is the parking / headlight switch. In the middle, directly below the blue indicator is the high beam switch, and to the right of that, in the least conspicous position, is the driving / fog light switch.

Simple, intuitive.

Original Cobra's had only some markings on their switches, and their layout was not what I would call logical.

I also figure a would-be thief might be discouraged not knowing what the switches are for, although now that I have posted that secret here I guess I better start pocketing the key.

The original style "DYNO" labels just don't seem to cut it. Anything else would be less than original.

Frankly I think some labels would be nice, but Ryan keeps vetoing the idea.

Long answer to short question. Sorry.

By the way have a great Christmas!!

Chuck
 
HI Chuck,

I almost had to laugh loudly when reading your description. It is so easy and logical. Just great :thumbsup:

What is your profession ;-):thumbsup:

I also wish you and your family a merry christmas ( may santa claus drop you a RCR 917 through the chimney) and a happy new year ( although i´m sure we will hear from each other before.

Thanks
TOM
 
Back
Top