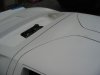
Chuck and Ryan's RCR Build

Chuck

Supporter
Gurney Bubble

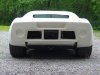
Business took me to Detroit a couple of weeks ago, so a trip to visit Fran became a part of the agenda. The new RCR Facility is impressive. Fran gave me a tour and was a gracious host, as usual. There were several GT 40s in the works, the 917, several Super Lite coupes and various and sundry other goodies. The Superlite does indeed look even better in three dimensions than in photos. The fiberglass finish on the black color car was excellent. This is an impressive car, although I remain partial to the reproductions like the GT and 917.

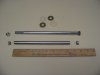
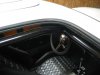
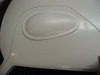
During my visit with Fran, I noted that Ryan had grown another inch or two, or so it seemed, since we started the project and that we may need a Gurney bubble. No sooner said than done, and out pops a bubble. “There are no problems, only solutions.” So a Gurney bubble, along with a few other bits, accompanied me on the 10 hour drive home.

Now the dilemma. We are considering two possible installation options and need some guidance.

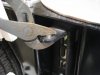
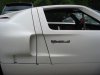
1. The “race car” look: This would involve trimming the flat surface around the perimeter of the bubble but leaving about a half inch rim and then glassing it in place. The edge of the rim would remain (although smoothed and rounded slightly to look professional). Faux rivets or stainless button head screws would be added around the perimeter of the rim to create the illusion of it being held in place with rivets. The edge of the rim would remain visible.

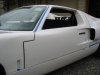
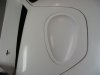
2. The ‘refined’ look. This would involve cutting out the bubble and carefully fitting and glassing it in place so it blends in with the roof without any rims or edges showing. No faux rivets.

I am looking for some thoughts, comments or suggestions. I am leaning a bit toward the ‘race car look.’
 

Attachments

  • GuernyBubble1.JPG
    GuernyBubble1.JPG
    78.2 KB · Views: 655
  • GuernyBubble2.JPG
    GuernyBubble2.JPG
    78.8 KB · Views: 622

Randy V

Moderator-Admin
Staff member
Admin
Lifetime Supporter
You gotta take the milk away from that guy before he gets any taller!!! :)

Actually - I recall Fran saying that he's had people that were 6'6" tall in these cars. I'm better than 6'3" and I fit fine in mine..

That said - If you're going to replicate a racecar - rivet it in place. If not, and you are doing other "nice" things for esthetics then I would blend it..
 

Chuck

Supporter
Randy:

Ryan will fit fine without a helmut - and he is over six feet. Problem is when we are at the track and the helmut is required.
 

Chuck

Supporter
Door Hinges

The RCR uses two half inch diameter bolts on each door. Although this system works fine, reaching inside the door to install and remove the bolts is cumbersome. A way to secure the doors with a single bolt was sought to simplify removal and installation.

A length of ½” O.D stainless tubing and a 7/16” x 10” bolt were used for each door. The bolt was a very snug fit inside the tubing and indeed some careful filing of the bolt at the top end was needed to make it fit. But a snug fit is the key to a smooth operating door, so this worked out well.

A length of stainless steel tubing was cut to fit the door. It was cut fractionally shorter than the distance from the outside top to outside bottom of the mounting plates so that the tube would not interfere with the nylon spacer/washers. The openings in the hinge plates had to be lightly filed to persuade the stainless to fit, but a snug fit was desired, so this was a good thing. Once gently pressed into place the tube was secure. Two short quarter inch lengths of stainless steel tubing were cut and used as inserts on the chassis bracket. Once again this was a tight fit and a pliers was used to gently press the insert in place.

Eighth inch thick nylon washers for a 7/16” diameter bolt were placed on the top and bottom of the door. By sizing the washer to the bolt, the stainless steel inserts cannot go anywhere. Steel washers were placed on the top and bottom of the chassis bracket. The 10” bolt was slid into place. A lock nut on the bottom secured the bolt. Do not over tighten the bolt. A bit of space was left between the nylon washers and the top chassis bracket so the door can move slightly upward when closed against the weather seal.

A bit of white grease was squirted into the stainless steel tube before the bolt was inserted.

The door easily swings. Once the lock nut is secured to the bottom of the bolt, there is virtually no flex in the hinge assembly. If the hinge bolt wears over time (which I doubt) the bolt can be easily replaced.

One could, perhaps, use a ½” x 10” long bolt and forget about the liner, but for some reason the use of the stainless steel insert seemed like a more elegant solution befitting the stature of the RCR GT. Further, without the liner one would have to reach inside the door to guide the bolt through the lower hole, making door replacement a bit more cumbersome.

Here is a thought. Why not buy a second set of doors from Fran and remove the window frames? With doors that can be easily removed, one could have the option of a targa style car for cruising around on those moderate sunny days: a bit of open air motoring in a GT 40!
 

Attachments

  • DoorHinge1.JPG
    DoorHinge1.JPG
    80.4 KB · Views: 811
  • DoorHinge3.JPG
    DoorHinge3.JPG
    124.4 KB · Views: 985
  • DoorHinge4.JPG
    DoorHinge4.JPG
    125 KB · Views: 898
  • DoorHingeRight1.JPG
    DoorHingeRight1.JPG
    86.3 KB · Views: 961

Chuck

Supporter
Weather Stripping

As has been noted by several on this web site, when fitting the doors it is critical that the weather stripping be in place. One can achieve a ‘perfect’ alignment of the doors without the seal – then when the weather stripping is added they are badly skewed out of position. It is more of a challenge adjusting the doors with the weather stripping in place, but it is the only way to do it.

The RCR directions recommend weather stripping from J. C. Whitney, part # ZX132560. (On the left side in the photo.) This stripping sets about ¾” above the lip, about even with the top of the spider. It is foam rubber material. One has to tilt the doors on the hinges inward with spacers on the lower bolts so the tops of the doors will compress the stripping enough to align properly. It took a pretty good push to get the doors to close. It did not seem like a very elegant approach, although as tight as it is I suspect it provides a good seal.

At Dean Lampe’s suggestion, we experimented with weather stripping from McMaster-Carr, part number 1120A421, which has a 7/16” bulb. (On the right side in the photo.) We found it to be a bit too loose. Fortunately they make a slightly larger type. The weather stripping which was finally settled upon came from McMaster-Carr, part number 1120A431. It has a 5/8” round bulb. It provides a snug fit and minimum distortion of the door top. (In the middle in the photo.) www.mcmaster.com


Years ago when I was rolling out pizzas to get through school, the boss taught us to check the refrigerator door alignment by taking a one dollar bill and sliding it along the door seal. If it moved, the door needed to be adjusted. If it stayed in place, the seal was good. We performed the same test on the GT, but due to inflation a one dollar bill will no longer work. Once must use a $100 bill. We had a good seal around the perimeter of the door using this test technique. Ben Franklin did not want to move unless he was pulled smartly.

The same weather stripping can also be used around the rear clip.

One needs seven feet for each door and nine feet for the rear clip. Order twenty five feet and you should have plenty.

If anyone comes up with a better door seal, let us know.
 

Attachments

  • WeatherStrip3.JPG
    WeatherStrip3.JPG
    82 KB · Views: 894
  • WeatherStrip2.JPG
    WeatherStrip2.JPG
    111.6 KB · Views: 981
  • WeatherStrip1.JPG
    WeatherStrip1.JPG
    100.7 KB · Views: 962
Chuck,
Good thing you had a Ben Franklin laying around, you could still be out shopping for weather stripping! :laugh:

Great information! :thumbsup: You guys are good!

Cheers,
Howard
________________________________________
RCR40 in the oven
Parnelli Jones 302 as a garage mate
 
Chuck,

Excellent assessment on the weatherstripping required. I have aligned my doors with spacers and am now looking for the right size weather stripping to match the spacers. I'll give the 5/8" a try and let you know how it goes. Thanks.
 

Randy V

Moderator-Admin
Staff member
Admin
Lifetime Supporter
We performed the same test on the GT, but due to inflation a one dollar bill will no longer work. Once must use a $100 bill.

I'll have to see if my car will take a Check.. I haven't seen a hundred dollar bill in years! :stunned:

Nice write-up!
:thumbsup:
 
Chuck,

Thanks for the door hanging mods. Actually, I have ordered two sets of doors for my car (regular and window free), so I will be looking to make the door swap as simple as possible!

Best,

-J.

BTW, I vote for the race-car look on the bubble, if you are still deciding.
 
Last edited:

Chuck

Supporter
Body Panels

Sunday, May 11, 2008. The body panels are finally all in place and aligned to our satisfaction.

In early March we set the body panels and doors, and then contemplated our next move. There were clearly some body panel alignment issues that needed to be addressed. Before we made any bad cuts, Tom (EGLITOM) from Germany happened to pay us a visit. Tom gives new meaning to the phrase ‘German precision.’ We spent several hours studying and analyzing the situation. With his thoughtful guidance, we realized by careful alignment and manipulation of the body panels one could realistically expect linear gaps around 3/16”. (Tom is striving for 1/8” gaps).

I am keeping a detailed log of hours spent on this build project, with the date, time and description of what was done. Looking back over the last eight weeks revealed that around 40 hours time had been spent setting the body panels in place and getting them properly aligned. This job requires patience, studying, and lots of experimentation to get a good fit. (At least for someone with no prior experience in such endeavors).

The fit one can obtain is quite impressive. The only area that was significantly sanded was the leading edge of the rear clip. None of the other panels have yet been sanded. Yet with the weather stripping in place we have fairly uniform gaps typically 3/16” wide. There are only a few surfaces which do not mate as well as they could, and those will be easily evened out with a bit of fiberglass.

I have drafted some detailed descriptions of how we fitted the various panels, but I won’t post them unless someone is interested.

The door panels have not yet been trimmed or sanded at all. The door gaps you see in the pictures are exactly as supplied by RCR.
 

Attachments

  • BodyPanelc.jpg
    BodyPanelc.jpg
    49.5 KB · Views: 982
  • BodyPanel1.JPG
    BodyPanel1.JPG
    101.3 KB · Views: 1,002
  • BodyPanel3.JPG
    BodyPanel3.JPG
    110.9 KB · Views: 914
  • BodyPanel2.JPG
    BodyPanel2.JPG
    85.3 KB · Views: 897
  • BodyPanel5.JPG
    BodyPanel5.JPG
    173 KB · Views: 843
Chuck in picture 2 it looks like you might what to cut down the shim under the spider to get the line of the door and rear clip even with the body line of the spider, but I must say she is looking good.
 

Chuck

Supporter
Rich:

Sharp eye! Actually the rear of the door needs to go up about a sixteenth to an eighth inch (a slight hinge adjustment) and the bottom edge of the door will need to be evened out a bit. But these pics were taken before any trimming was done. Thanks for the observation.

It always amazes me how things that may be overlooked "in the flesh" pop out when studying a picture of the same thing.

Chuck
 

Rob

Lifetime Supporter
Chuck,
Your build log continues to be the benchmark the rest of us are measured to. Very nice.

Great job with the body alignment. Looks great. I agree with your assessment, if you take the time, you can achieve impressive alignment and gaps. Heck...almost like it was all meant to come together that way....:laugh:
 
Chuck I have gift of picking out details but I cant turn a screw driver to save my life. I did notice that in your third picture that the door window post starts a about 1/2 in and tappers to 0 at the roof line. I saw this on Mark's GT and pointed it out to Ron. Some how it got it even but I couldn't tell you how.
 
Chuck and Ryan,

perfect work. I enjoyed the discussion with you and have to say, after visiting frans shop and all the other RCR cars ( Robs, Deans, Yours, Ray´s, Chris´s) i knew that a good body fit is within the supplied kit. One just have to give oneself enought time to toy around with it, perceiving it as a challenge and find it. I for myself took all the panels of the car when i came home and started all over again. No i´m realy happy with it and it fits as perfect as yours.

TOM
 

Chuck

Supporter
Rich: You are quite right about the descrepancy on the A pillar - door seam. Actually it is about an 3/16" off on the drivers side and about an 1/8" on the passenger side at the bottom, tapering to no descrepancy at the top. The blue along that seam tape marks that area that will need some work. I will build that up a bit with fiberglass and taper it appropriately, which should be easily accomplished.

One can dial out that little descrepancy, but then the roof sets too high or uneven.

The picture is deceptive: it is not as great as it looks.

Thanks for the eagle - eye observation. Let me know if you see anything else!

Chuck
 
Back
Top