You are using an out of date browser. It may not display this or other websites correctly.
You should upgrade or use an alternative browser.
You should upgrade or use an alternative browser.
Classic Car Developments Chassis #3
- Thread starter brianstewart
- Start date

Looking amazing Brian, I was in Dave's shop about 6 months ago and saw yours sitting there waiting for parts and assembly.
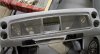
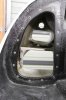
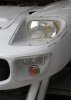
Got the panels that cover the rear of the headlight/driving light recess cut out last night and fitted them using rivnuts. Looks a bit rough at first glance, but that is the plastic coating on the aluminium....
Attachments
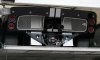
Good question Keith. The way the hinge points are mounted is different on the MKI and MKII, with the MKI points being mounted on the rear subframe that also carries the undertray. On the MKII the hinge points are mounted either side of a small subframe, that also has the quick-lift jack points on it, bolted aft of the transaxle (see picture). Mine will have have the MKI rear subframe, but also the MKII subframe with jacking points (yeah, I know - unnecessary weight....). So, in theory the MKI and MKII clips will be interchangeable.
Attachments

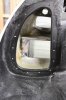
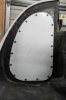
Cut out and drilled the rear window last weekend - nervous times drilling and countersinking the holes. Drilled holes in the bodywork and trial mounted today.
We all get nervous Brian
You are getting through all the painfull stuff.
Nice work.
Jim
Jim Rosenthal
Supporter
Looks dreadful, you'll have to do it all over again.
LOL actually it looks fine. I remember that part and the associated anxiety. Lots of that.
When's the sea trial, or road trial, whatever?
LOL actually it looks fine. I remember that part and the associated anxiety. Lots of that.
When's the sea trial, or road trial, whatever?
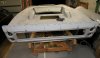
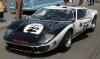
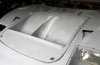
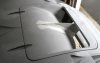
Been pottering away on the bodywork over the last few weekends. Lights all fitted now and light covers all trimmed to size, drilled and countersunk. Since I'm going for the early MKII look, as in the white car pictured, I made and fitted a divider for the single nostril and fitted hinges to the nostril panel with Dzus fasteners at the front. Some gapping to do, but coming together...
Attachments
Last edited:
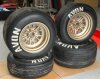
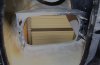
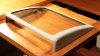
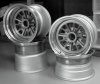
Hi Dave. They are three piece wheels from Image Wheels in the UK. However, I wasn't keen on the standard look of the Image wheels, with a noticable gap between the centre and the rim and a pretty flat centre (see picture). To get a more original look I had some rings laser cut from 20mm aluminium plate, glued them in using aircraft grade epoxy, then had a sloping profile machined. Paint is a Land Rover colour - Maya Gold metallic, code GAN. Tyres are Avon CR6ZZs - 215/60VR15 fronts and 295/50VR15 rears.
Attachments
Looking awesome Brian keep up the good work, cant wait to see the finished build.