Clive's Scratchbuild

Clive,
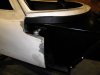
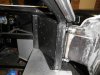
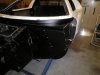
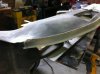
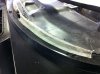
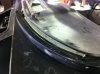
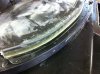
I have used J B Weld in other settings, and it is a good product. I think you will have to go further with the process than just roughen up the surface. The bonding agent needs to have contact with the metal. In a shear situation it will let go and you will see the powder coat on the bottom surface of the weld material. You have to take it down to the metal to get a true bond. After getting both surfaces clean and roughened up. clean them with acetone to get all the impurities out of the way. Put a bead on the surface and spread it around with a small disposable brush. Place the objects together and if possible clamp it in place for a few minutes til bonding starts. Small gaps are preferable. It usually takes 24 hours to setup good. There are several agents that will give you good results from bonding. 3M 8115 and MA 300 Plexus should do well.They are two part adhesives and decent setup times. Both come in small sizes for small projects, and can be found on Amazon for around $40. Should last you through several small projects.

Bill
 
A win.

Sought out some structural adhesive merchants, who sold me Sikaflex 252. From the various languages on the tube, it appears to be available internationally.

They also sold me a bottle of xylene, with instructions to wipe over the powdercoat where it was to be bonded, prior to applying the adhesive. The finish on the powdercoat immediately went to a flat appearance.

Did a little test bond, and the Sikaflex ended up bonding better to the powdercoat than the mill finish alloy I used for the test. It would NOT let go of the powdercoat.

Clive
 
Have been continuing the install of the internal panelling, and wondering if I will ever get there.

A comment from one of our Kiwi friends on another scratchbuild thread explained the various stages of scratchbuilt items. He is SO right - It should be rule No1 for idiots like myself.

The majority of panels have been straightforward, but on arriving at the door hinge/spider/front clip area, the whole thing went pear shaped. There are only about 6 individual alloy panels involved per side, but I am convinced that in the time I have taken to get these right I could have totally panelled 2 Clubmen replicas :cry:.

Had it looking really smart last Sunday week, so decided to offer up the doors to see how the hinge adjustment worked. Really well - but I couldn't open the &$#@ doors. This weekend was spent redesigning/rebuilding the panels in question.

About to fix the spider into its final resting place. Have a misalignment of about 10mm, but I think I can live with that.

Clive
 

Attachments

  • P7120079.JPG
    P7120079.JPG
    102.5 KB · Views: 539
  • P7120080.JPG
    P7120080.JPG
    99.5 KB · Views: 563
  • P7120081.JPG
    P7120081.JPG
    106 KB · Views: 580
Slow progress recently, fitting the dash moulding.

Cut the outer ends of the dash so I can slide the dash in and out without snaring on the roll cage. The offcut bits were not at all pleasant, so I remade them in alloy. This allowed me to use 'H' section joiners, covering the joints.

I had to come up with a method of supporting the leading edge of the dash mould to prevent movement. The attached piccies show the glass "L" sections I made, which were glassed to the leading edge of the dash moulding. Then made up alloy (Z?) retaining sections which the lower edge of the "L" engages. Slips in and out easily, and as strong as.

Now able to bolt the spider into place, and will be able to adjust the rest of the body panels. A major forward step.

Clive
 

Attachments

  • IMG_0023.JPG
    IMG_0023.JPG
    108.1 KB · Views: 493
  • IMG_0025.JPG
    IMG_0025.JPG
    107.7 KB · Views: 457
  • IMG_0027.JPG
    IMG_0027.JPG
    102.5 KB · Views: 440
  • IMG_0028.JPG
    IMG_0028.JPG
    98 KB · Views: 467
Slow progress. A bloke has to be mad to build one of these from scratch.

The suspension is all now in place and happiness. Working on the myriad other systems to make this thing fly. Working on plumbing, gear change, cockpit heating/cooling.

Have sort of set an October (this year) deadline, to get the second son to his wedding on time. Expect to have the mechanicals/technicals pretty good, but the body getting a quick straighten out and a jam job.

Time will tell.
 

Attachments

  • P4060027.JPG
    P4060027.JPG
    117.2 KB · Views: 535
  • P4060028.JPG
    P4060028.JPG
    103.7 KB · Views: 475
  • P4060029.JPG
    P4060029.JPG
    135.4 KB · Views: 477
  • P4060033.JPG
    P4060033.JPG
    108.6 KB · Views: 527
  • P4060035.JPG
    P4060035.JPG
    125.3 KB · Views: 552

Dimi Terleckyj

Lifetime Supporter
A win.

Sought out some structural adhesive merchants, who sold me Sikaflex 252. From the various languages on the tube, it appears to be available internationally.

They also sold me a bottle of xylene, with instructions to wipe over the powdercoat where it was to be bonded, prior to applying the adhesive. The finish on the powdercoat immediately went to a flat appearance.

Did a little test bond, and the Sikaflex ended up bonding better to the powdercoat than the mill finish alloy I used for the test. It would NOT let go of the powdercoat.

Clive

Hi Clive

My only concern with bonding to a part that is powder coated is that it may be well bonded to the powder coating but if you get any corrosion under the powder coating it will creep between the part and the coating and let go.

The strength is only as good as the bond of the powder coat to the chassis, etc.

Personally I would bond to metal rather than a painted coating.

Dimi.
 
Hi Dimi,

I don't have too many worries in that respect, as the frame was sandblasted immediately before powder coating (in the same shed).

If sh$t happens, I will advise :worried:.

Clive
 
It has been a while since updating, but the economic climate in Canberra has been under a cloud for the last couple of years, courtesy of a politician promising to decimate the local workforce. It has made progress slow, as the dollars have been hard to find.

However, I had been attempting to source a one-piece input shaft for the UN1 tranny. Long story short, a conversation with a race car engineer has convinced me that I need not worry about the small diameters on the original. Apparently Hewlands run even smaller shafts with comparable horsepower/torque inputs. It's to do with gearbox multiplication factors apparently.

I was still left with the problem of lack of room in the bellhousing for a clutch throwout bearing. Decided that a 32mm spacer plate would give me room for a small concentric bearing, so machined up the required spacer. Nothing ever being easy, this required a relocated gearbox/chassis mount, and many indignities to be performed on the bellhousing to get it to fit in the chassis and also let the engine turn.

I now need to accurately measure the length required for the front input shaft, and have a lengthened splined sleeve made up to replace the original, and Bob's your uncle.

A couple of piccies.
 

Attachments

  • spacer1.JPG
    spacer1.JPG
    101.1 KB · Views: 484
  • spacer2.JPG
    spacer2.JPG
    106.2 KB · Views: 457
  • spacer3.JPG
    spacer3.JPG
    103.7 KB · Views: 418
  • spacer4.JPG
    spacer4.JPG
    100.3 KB · Views: 428
  • spacer5.JPG
    spacer5.JPG
    115.5 KB · Views: 544
Been a long time between drinks. 4 years since moving house. Now built a decent garage/workshop to continue progress. Getting older, so hope to get to finish/drive the toy.
 

Attachments

  • Hoist9.jpg
    Hoist9.jpg
    103.7 KB · Views: 371
  • Hoist10.jpg
    Hoist10.jpg
    98.6 KB · Views: 324
  • garage31.jpg
    garage31.jpg
    99.1 KB · Views: 343
  • garage32.jpg
    garage32.jpg
    101.6 KB · Views: 360
Last edited:

Randy V

Moderator-Admin
Staff member
Admin
Lifetime Supporter
Sometimes life just gets in the way Clive...
I make notes of where I am and left off on my projects now - they help get me back on track again...
Hang in there!
 
This rather flash garage/workshop will be home to a very scaled down version of my sign business, but also the large number of machines one needs to build a scratchbuild.


Soooo looking forward to the next month or so.


Clive
 
Back
Top