Subscribed...

You are using an out of date browser. It may not display this or other websites correctly.
You should upgrade or use an alternative browser.
You should upgrade or use an alternative browser.
Duncans GT-Forte Scratch Build
- Thread starter Duncan
- Start date
Slight pause in progress due doing the front drive and going on holiday. Back on it now!
Been working on some of the panelling around the firewall and stripping down the engine.
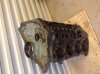
Tried to measure the bores with telescopic bore gauge and mic. Looks like little wear since last rebuild so hopefully can be honed and keep it at +030 since they seem to be at around 4.028 at the moment.
Been working on some of the panelling around the firewall and stripping down the engine.
Tried to measure the bores with telescopic bore gauge and mic. Looks like little wear since last rebuild so hopefully can be honed and keep it at +030 since they seem to be at around 4.028 at the moment.
Attachments
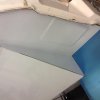
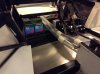
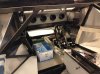
Still plodding on with sheet metal. Been working on the firewall area. Used the bead roller to step the panel where the door catch reinforcement plate sits ontop of the steel frame. It was either that or pack it out behind, but think this is a neater solution. Fit to the firewall panel atill needs finalising, awaiting a q-max punch for the belt points to get the firewall into final position first. There will eventually be a cap piece over the external corner to give the correct radius.
Had good news on the engine, been honed out by the machine shop to .030 over, rods good and crank journals polished and good to go. Need to get my pistons, then have it decked before collecting though.
Had good news on the engine, been honed out by the machine shop to .030 over, rods good and crank journals polished and good to go. Need to get my pistons, then have it decked before collecting though.
Attachments
Block and crank back from the machine shop. Honed out, dipped, journals polished etc. All ready to start ordering parts, hopefully picking some up next US work trip. Going to hold off on some stuff until the exchange rate improves though!
Block will be decked once i have the pistons, then a final clean before assembly.
Spent the afternoon chasing threads. Quite relaxing!
Block will be decked once i have the pistons, then a final clean before assembly.
Spent the afternoon chasing threads. Quite relaxing!
Attachments

Thanks Bob!
MJA Automotive in Bromsgrove as they were local. However Martin certainly knows his engines, knew all the expected tolerances off of the top of his head and did the extras like chamfering the top of the cylinders after they were honed. They are busy though so you might have to wait a couple of weeks.
MJA Automotive in Bromsgrove as they were local. However Martin certainly knows his engines, knew all the expected tolerances off of the top of his head and did the extras like chamfering the top of the cylinders after they were honed. They are busy though so you might have to wait a couple of weeks.
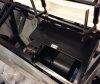
Some minor progress after a lot of time away working on the house... Bulkhead panel beaded and cut out for engine access panel. I used the home made rolling tool again to recess the lip so the engine cover will sit flush. Hopefully back up to full speed soon!
Attachments
Some minor progress after a lot of time away working on the house... Bulkhead panel beaded and cut out for engine access panel. I used the home made rolling tool again to recess the lip so the engine cover will sit flush. Hopefully back up to full speed soon!
Good stuff Duncan, nice to see your thread up and progress being made. ;-)
Hi DuncanI’ve finally gotten round to starting a build thread! After over a year of research into GT40’s (and several years of looking into other projects before that…) I’ve finally started on the GT40 build. I’ve gone with the chassis tube kit from GT-Forte which I’ve had for a few weeks - though progress has been fairly slow due to work commitments
The current plan is to keep things fairly simple and follow the well trodden path where possible. I figure a GT40 build is tough enough without making things even harder for myself! To that end I’m going Ford small block and 01E. I’ll be dropping the floor pans and bolting the seat direct to the floor to gain some head height, other than that not much has been decided. I still can’t decide Mk1 or Mk2 - availability of the correct Corvair lamps for the MK2 is a concern with that one. The build isn’t going to be particularly quick, I’m probably looking at 5 years or so.
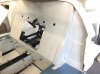
Couple of pictures attached of current progress – The main “core” of the chassis has been tacked together, though progress is slowing as I’m still waiting for a lot of parts from GT-Forte. The chassis kit does go together very well though, and with the laser cut parts it’s possible to work to a high level of precision. Would like to thank some of the other GT-Forte builders for their help so far, it's really appreciated - especially Nick, David, Andrew, Darrin, Jayson and Lee.
You mentioned the Corvair lamps in your post, let me know I have three Corvairs and can point you in the right direction of a US Supplier that has Corvair parts like I have never seen before, alternatively contact Clarks Corvair. Hats off to your work, hoping to start my chassis soon. Clark's Corvair Parts - Clark's Corvair - Online Catalogs - All catalogs are copyright protected
Regards Henty
Another...
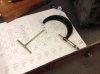
Hi Duncan, I am looking at your steering column mounts which look similar to mine but given the angle I cannot judge there positioning within the drivers cockpit. Have you offered up the dashboard to see if the column aligns as the positions were out on my chassis. I will have to move them. I'm not sure if your chassis revision is later or earlier than mine.
Lastly, could you take a pic of the mounts and provide a measurement as to how far along the horizontal top square tube they are from some reference point ?
Thanks.
Nick.
Hi Ryan,Duncan, what have you done to stop the block rusting?
I'm probably going to have to find something to use in my chassis to build around, just concerned about it sitting there unused for so long and it rusting up.
loving the rest of it though bloke.
Ryan
Block has been acid etched and cleaned/pressure washed as far as I can. I'm then going to paint the block with POR15 engine paint. Bores have been protected until that happens with WD40. It will be built up soon with Assembly lube, which is designed to last a while when you build up an engine. I'll keep it turned over every couple of months as well. Just waiting for next US trip to get parts for the build, that or the exchange rate to get better. Unlikely given the present fun and games!
Hi Duncan, I am looking at your steering column mounts which look similar to mine but given the angle I cannot judge there positioning within the drivers cockpit. Have you offered up the dashboard to see if the column aligns as the positions were out on my chassis. I will have to move them. I'm not sure if your chassis revision is later or earlier than mine.
Lastly, could you take a pic of the mounts and provide a measurement as to how far along the horizontal top square tube they are from some reference point ?
Thanks.
Nick.
Hi Nick, thanks for your concern! It was a couple of years ago, but I think we caught that one at the time, I remember messages on the group. I'll try to measure and check though. I don't have a dash yet, I didn't buy Darrens.