Dusty's SLC Build

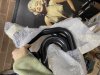
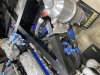
I use some 2 1/2 inch silicone hose slices To help locate the oil colors as seen in the picture.
385074E8-8094-4481-864A-EF1CCFA5F810.jpeg

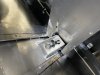
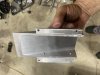
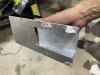
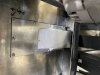
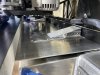
I just got one of these metal bandsaw’s from grizzly and I can’t understand how I survived without one for all these years. It made this aluminum work so much easier. I am using a 1 inch bandsaw blade and this machine has adjustable blade speed. I think I’m hooked on this project. A mill and a nice 3-D printer are on the way.
 
F87BCECD-9A35-4043-AA56-91D25998E706.jpeg

A big shout out to Earl. Although I’m not going to be using his amazing hand built headers, I simply could not stand watching them rust here in storage so I had them sandblasted and ceramic coated. They are a work of art.

Now that I have put the oil coolers in the rear diffuser I am truly all in for the eight in one exhaust.
 

Attachments

  • 339B4F2E-0652-4E9C-85BE-204CF435264C.jpeg
    339B4F2E-0652-4E9C-85BE-204CF435264C.jpeg
    567.1 KB · Views: 299

Joel K

Supporter
Very nice fabrication work Dusty, those coolers in the diffuser looks so good. I here you on the band saw, I spend so much time cutting and then machinig the ends straight. It would have saved me a ton of time.
 

Scott

Lifetime Supporter
Dusty, nice work on the brackets. You're going to love that bandsaw.

Joel, I think the two best power tools to have for fabrication are a bandsaw and a bench sander. A full-size bandsaw like Dusty's is ideal, but they take space. I have a table from SWAG Offroad (SWAG Portaband Tables (swagoffroad.com) ) and they are incredibly useful. I have the free standing version, but they also have vice mount version if you don't want to dedicate any space to it. They accept a variety of hand-held bandsaws which canbe picked up on Craigslist and can be easily resold after the car is built. Even when I cut something in Abe's professional-grade horizontal bandsaw I end up cleaning up the edges on a sander, mill or lathe...
 
936547C3-4BED-4298-BCEE-A3931A9E4919.jpeg
529E975E-481D-47C5-BEE7-813E220BB1FA.jpeg
4F95705C-285A-4CC3-B61F-F4AC4515F77B.jpeg

For the money the swag bandsaw is amazing. Here are some pictures from last week. I use the bandsaw to cut coconuts in half for my Boy Scout troop. We then drank the blood from the coconuts And roasted their meat over the fire. Tomorrow the boys are going to paint the coconuts to make jewelry holders for Mother’s Day for their moms.
F0549C9F-A99A-4122-9870-91666D432182.jpeg
 

Mark B.

Supporter
Love the bandsaw -- agree it's one of those things you can't live without once you have it! I bought a cheap one at Harbor freight which works fine for aluminum and wood, but no adjustable speed so I can't use it for stainless (too fast).
 
Dusty
Somehow I managed not to engage your thread, nice to see Earl's car in good hands. I have not had a chance to catch up on all the reading but did want to mention I located a tight 90 degree thermo housing if you still need a reference. Also, are you using the ePowersteering unit? As much as I hate to hear myself think it ....probably going down the ePower road myself. Really don't want to pull the dash and rewire for all that BUT, the car would be more enjoyable with PS and then a quicker rack would be a realistic consideration.

i have a thermo housing for the transaxle that is temp controlled but im using a manual controlled oil cooler thermostat as shown in my thread. I suspect that most of the time i will leave it closed. ill monitor temps and make the decision based on the temps.

Yes im using the e powersteering unit. I used the same company for a power steering mod to my sons dune buggy and it works amazingly well. I home I have a similar experience with the SLC. I do wish i had a little quicker rack but wont be tearing the front apart at this point to add it.
 
Dusty
Somehow I managed not to engage your thread, nice to see Earl's car in good hands. I have not had a chance to catch up on all the reading but did want to mention I located a tight 90 degree thermo housing if you still need a reference. Also, are you using the ePowersteering unit? As much as I hate to hear myself think it ....probably going down the ePower road myself. Really don't want to pull the dash and rewire for all that BUT, the car would be more enjoyable with PS and then a quicker rack would be a realistic consideration.

i have a thermo housing for the transaxle that is temp controlled but im using a manual controlled oil cooler thermostat as shown in my thread. I suspect that most of the time i will leave it closed. ill monitor temps and make the decision based on the temps.
 
BB0B4254-C2AD-4F03-A4DF-53141B87D6F5.jpeg

I tested my furl tank. The panel that I glued on didn’t leak but the fuel sender did. Fixed it with some fuel rated gasket sealer
 

Attachments

  • 1B572402-559B-456A-8316-D25C053B0CAE.jpeg
    1B572402-559B-456A-8316-D25C053B0CAE.jpeg
    452.5 KB · Views: 255
F036D7AA-A969-4688-B43D-1311934BA5C9.jpeg
15626826-629D-4A2B-BDFA-A9D5D0817455.jpeg
E2F945E5-DAD2-4EB4-B3A3-5E87FB2CDB8D.jpeg

Made some bracket extensions for the transmission mounts as seen in the picture. I’m trying to put the I am joy attachments in double shear. This is just a quarter inch aluminum. And it was fun to make them with the bandsaw but they just don’t seem strong enough. I’ll probably need to make new brackets.

No I have a question. Are there any discussions on the firewall panel that goes between the fuel tank and the engine bay? I see different ones posted here but I can’t find a thread on that. Perhaps there isn’t one.
 

Joel K

Supporter
Hi Dusty, I haven’t found a specific thread on the fuel tank close out panel. Seems like they are embedded in various build threads.
 
the close out panel has been difficult issue for me. we want a shield that restricts heat and sound without adding too much weight. It must hold back fire. I would like a shield that is easily removable so it can be cleaned and serviced.

When i look at my newer diesel truck i note that the firewall is basically a stiff fiber based mat one inch thick. it is not glued on-it is fastened to the firewall. the underside of the hood has a similar construction.

has anyone tried this versus all of these stick on products?
 

Joel K

Supporter
Dusty,

take a look at Stephan’s Build Thread. His screws are accessible from the engine bay.

Joel
 
Last edited:
Dusty,

Are you referring to something like this? Heat insulation which goes between the engine and the hood.


Yes
that is perfect. thanks! that is what i have been searching for. im ordering it.

here is the issue as i see it...I know i may need to attach things to the firewall (s). I know i will likely be servicing this car as i tinker with it. it would be nice if i didnt have to work around messy sound deadening materials. i know i will need to use that stick on rubber stuff throughout the cab but it would be nice to use a thick removable insulating "blanket" against the firewall between the engine and the back of the cab
 
This car is always on the back of my mind but so many family things to do first. But I’ve got some more work done. I purchased this fine car from Earl. I really like the way that he set up the fuel tank mounts. The tank mounts solidly via four attachment points with poly mounts at each of the 4 attachment points.

This causes one dilemma though. Attachment points need to go through the firewall or the firewall needs to be on the rear most side of this large rectangular crossmember. I want the firewall to be on the front side of the horizontal crossmember so that I could use that extra space in the gap to put insulation and wiring etc.

Because of that decision I had to make these removable panels to help cover up the lower fuel tank attachment points. After the fuel tank is bolted into place up against the firewall I have to screw these little cover pieces on. It took a while to put them together but they work great
2741CA1C-D145-4B09-BCBA-F2DF80156710.jpeg
 

Attachments

  • 2E920240-3CB5-49C5-8763-2E5AE2FDE077.jpeg
    2E920240-3CB5-49C5-8763-2E5AE2FDE077.jpeg
    355.9 KB · Views: 170
  • 3C95C1AD-E06C-40B8-9D71-11CB1BF6A1C9.jpeg
    3C95C1AD-E06C-40B8-9D71-11CB1BF6A1C9.jpeg
    283.1 KB · Views: 166
  • 93ADAFDC-C848-4810-A870-427C553BE6AB.jpeg
    93ADAFDC-C848-4810-A870-427C553BE6AB.jpeg
    331.2 KB · Views: 148
  • 2D7C7137-5CC0-4ADF-80C0-2674F6C9587D.jpeg
    2D7C7137-5CC0-4ADF-80C0-2674F6C9587D.jpeg
    403.3 KB · Views: 159
  • 3943697D-5F03-47B1-84AA-332EF763272B.jpeg
    3943697D-5F03-47B1-84AA-332EF763272B.jpeg
    409.2 KB · Views: 168

Johan

Supporter
Dusty, hard to say from your pics but you really need some kind of vibration damper to the tank. I have mine laying on 10 mm of foam/rubber and the same on every mount. It’s not advisable to just screw it to the frame. You will most likely have have a leak.
 
Back
Top