The red stuff is the 518. The 517 is a purple color. Before I applied the sealant I first sprayed the surfaces with the gasket maker primer spray. From Loctite. With the first assembly I sprayed both half‘s of the case and the sealant stuck very well. On the second try After which I also had to disassemble because of the missed Gear, I applied the primer spray to only one surface as directed in the instructions. This made cleanup much easier the second time because the surface that did not have the primer did not harden into a plastic like film yet.

- Forums
- GT40 Replica Manufacturers' Corner
- RCR Forum - RCR40/SLC/917/Superlite Aero
- The SLC Clubhouse
You are using an out of date browser. It may not display this or other websites correctly.
You should upgrade or use an alternative browser.
You should upgrade or use an alternative browser.
Dusty's SLC Build
- Thread starter Dusty
- Start date
Dusty, I used the Audi/volkswagen sealing paste. The Audi dealer had it in stock and it was cheap, at least compared to the damn nuts.
Part no. AMV-188-001-02. It doesn’t dry or harden it’s still tacky.
the 515 and 518 sealants are also anaerobic. they don't harden unless the air is gone.
I think these products from locktite are very similar but if I do this again I will use the audi stuff.
Dusty could i get a measurment from the face of bellhousing to the centerline of axle on the trans ,my son is building a mid engine car and needs so info that he cant find on the net thanks hope all is well Earl
Dusty could i get a measurment from the face of bellhousing to the centerline of axle on the trans ,my son is building a mid engine car and needs so info that he cant find on the net thanks hope all is well Earl
What car is your son building, Earl?
Not quite a car but a VW rabbit pickup also known as a ''caddy mk1'' with a toyota v12What car is your son building, Earl?
Ah, So! Thank you, Earl.Not quite a car but a VW rabbit pickup also known as a ''caddy mk1'' with a toyota v12
HCF - John
Gearbox / Brake Systems
Dusty could i get a measurment from the face of bellhousing to the centerline of axle on the trans ,my son is building a mid engine car and needs so info that he cant find on the net thanks hope all is well Earl
Earl - roughly 7 1/8"

I am back on the Slc. I have all four sides assembled with regard to the suspension components. I cut down the bolts to the proper lengths and I torqued everything down. I do have a question though. These aluminum hub assemblies could be assembled with Loctite. Are people using Loctite? Specifically some of the keyed parts on these beautifully machined billet suspension components could be assembled with locktight. Are you all doing that?
I am also looking at these coil overs and although they all seem pretty tight there is a very small amount of clunk to some of them due to the Heim joints on the shock towers. I imagine there’s going to be clunking which is standard with Heim joints versus bushings. Are you guys doing anything to remedy this or do you just live with it?
The clutch assembly is all in place now and so I can drop the motor in the chassis. Then I can take the car to the builder so that he can work on the eight into one exhaust which is going to go over the top of the motor which is going to cause all kinds of problems that need to be resolved
Joel K
Supporter
Dusty, I used Red 3M Scotch Weld TL62. Heavy duty, but removable with some heat and not crusty like the Loctite brand.
My post #139 documents how I assembled the uprights.
My post #139 documents how I assembled the uprights.
Joel’s SL-C Build Thread
A bunch of us increased the air flow by opening the holes as shown in the picture Joel. Good time to consider it before mounting it for the last time. Thanks Ken, I missed that mod. Appreciate the heads up.
www.gt40s.com
I refer to this form all the time as I am building my car. I don’t have a lot to contribute although I’ve been working a fair deal on the car. I probably get 5 to 7 hours a week done on the car. I’m feeling a little bit guilty because I haven’t had anything so here are a few bits
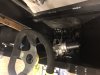
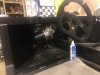
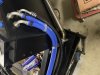
Power steering turned out great. The bracket that holds it is solid and the F1 steering wheel disconnect It’s by far the tightest disconnect I have ever played with. Absolutely no movement.
The motor is back in the chassis for now
I have put so many hours into the water lines, heater lines, and air-conditioning lines and they are almost done. I will post them up soon
Attachments
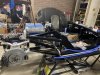
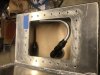
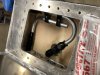
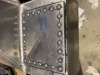
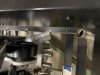
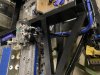
I did finish up the fuel tank. In the picture you can see that the holly Hydro Matt is now connected to the outside of the tank. And the tube that runs parallel to it does not carry fuel it is simply a bracket to help support the Hydro matt line.
Are used in aircraft wing fuel access type apoxy to close the tank access. I haven’t tested it yet so I’m hoping it doesn’t leak. I single tube of this stuff was 60 something bucks
Are used in aircraft wing fuel access type apoxy to close the tank access. I haven’t tested it yet so I’m hoping it doesn’t leak. I single tube of this stuff was 60 something bucks
Attachments
I played with the steering wheel while tell I found work will likely be the best place for me. It’s not adjustable so if it doesn’t work it will be a hassle to build a new bracket.
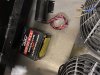
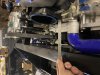
I’m going to use another one of these lightweight batteries. I use them in my rock racer and they are phenomenal.
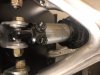
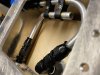
A question about this water pump thermostat housing fitting. I cannot find a low profile part that comes off at 90°. I purchased one online that has an adjustable swivel mount but it does not come off at 90° and it sticks out too far. Does anyone know where you can get one of these thermostat outlets that fit tight at 90°? Or do you have to fabricate your own?
I’m going to use another one of these lightweight batteries. I use them in my rock racer and they are phenomenal.
A question about this water pump thermostat housing fitting. I cannot find a low profile part that comes off at 90°. I purchased one online that has an adjustable swivel mount but it does not come off at 90° and it sticks out too far. Does anyone know where you can get one of these thermostat outlets that fit tight at 90°? Or do you have to fabricate your own?
Attachments

Joel K
Supporter
Dusty, how about this swivel one?
 www.holley.com
Mr. Gasket 2670BK Mr. Gasket GM LS Water Neck - Swivel - 30 Degree Angle - Black
Mr. Gasket Swivel Water Necks are great for engine conversion applications where engine/radiator inlet and outlet ports may be in different locations versus original equipment. The outlet rotates 360 degrees and has a 30 degree angle for versatility. Die-cast aluminum construction is strong, and...
www.holley.com
Amazon.com: Mr Gasket 2670NA Water Neck Swivel 30 Degree Angle Polished Aluminum Finish Incl. Mounting Bolts/Gaskets Water Neck: Automotive
Buy Mr Gasket 2670NA Water Neck Swivel 30 Degree Angle Polished Aluminum Finish Incl. Mounting Bolts/Gaskets Water Neck: Thermostat Housings - Amazon.com ✓ FREE DELIVERY possible on eligible purchases
www.amazon.com
good call. that fits in much tighter to the motor.
just ordered one. I also ordered a 1.5" aluminum hose nipple to weld to the swivel neck so I can get the water neck to line up to the stainless water pipe coming from the radiator

I’m really liking these crimper tools. They make the air conditioning lines easy to assemble.
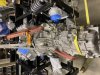
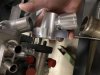
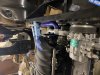
I have a problem. I’m going to be running the eight into one exhaust and so I need my air filter to be running towards the front of the car. But as shown in this picture I only have 4 inches from the inlet to the intake manifold to the bulkhead wall. The solution that I can see is to fab an elbow right at the inlet to the intake manifold and mount the throttle body remotely. There is not enough room to put the throttlebody on the intake manifold and still turn 90°
I have a problem. I’m going to be running the eight into one exhaust and so I need my air filter to be running towards the front of the car. But as shown in this picture I only have 4 inches from the inlet to the intake manifold to the bulkhead wall. The solution that I can see is to fab an elbow right at the inlet to the intake manifold and mount the throttle body remotely. There is not enough room to put the throttlebody on the intake manifold and still turn 90°
Attachments
Similar threads
- Replies
- 36
- Views
- 8K
- Replies
- 26
- Views
- 8K
- Replies
- 7
- Views
- 6K
- Replies
- 64
- Views
- 18K