
- Forums
- GT40 Replica Manufacturers' Corner
- RCR Forum - RCR40/SLC/917/Superlite Aero
- The SLC Clubhouse
You are using an out of date browser. It may not display this or other websites correctly.
You should upgrade or use an alternative browser.
You should upgrade or use an alternative browser.
Dusty's SLC Build
- Thread starter Dusty
- Start date
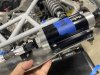
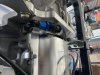
I’m starting to get Oil plumbing done. I have nothing but good things to say about this
Goodridge G-Line XF 910 hose. Although it takes some muscle to get the fittings on they go on nice with I clean finished. No fancy tools needed.
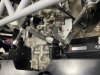
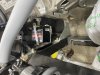
I have started to plumb this pair of Oil coolers with a plan for parallel oil flow. It’s a little more complicated so that’s the downside to this parallel arrangement. I’m assuming that it would work better at cooling then just running in the series. Running them in series would certainly be simpler. I’m wondering if I should just forget this parallel idea and run them and series. What is the thought of the team?
Goodridge G-Line XF 910 hose. Although it takes some muscle to get the fittings on they go on nice with I clean finished. No fancy tools needed.
I have started to plumb this pair of Oil coolers with a plan for parallel oil flow. It’s a little more complicated so that’s the downside to this parallel arrangement. I’m assuming that it would work better at cooling then just running in the series. Running them in series would certainly be simpler. I’m wondering if I should just forget this parallel idea and run them and series. What is the thought of the team?
Attachments
-
 F9808BD9-6562-4670-AB26-FBA912CE1EE0.jpeg580.5 KB · Views: 419
 -
 7F54BD8D-1F81-465B-95CD-85FDF173CCCD.jpeg599.1 KB · Views: 412
 -
 E28E4896-92C0-439E-ACA9-02FF451667AA.jpeg372.4 KB · Views: 403
 -
 64F84404-9B31-49CE-97E9-BDAB073BEFE3.jpeg436 KB · Views: 382
 -
 589C6C95-A000-4759-B6A2-176FCF471EBF.png648.1 KB · Views: 406
Joel K
Supporter
Dusty, just some uneducated feedback. The series would probably do the job, I have twin intercoolers and thought about running them in parallel as well since you get the hottest liquid going through each of the coolers. The OEM setups I looked at on the ZR1, Hellcat, and ZL1 which have multiple radiators/intercoolers run them in series. I figure if it works in series great and If not I’ll plumb them in parallel afterwards.
From a sizing standpoint if one oil cooler will do the job, how about using the other for the transaxle? That is the way Stephan set it up.
From a sizing standpoint if one oil cooler will do the job, how about using the other for the transaxle? That is the way Stephan set it up.
I guesstimated that i needed 2 coolers based on cooler recommendations from the Pegasus racing website. Although i dont plan to track the car hardcore, im trying to build a "race car" to a standard for which i have no experience. In my mind im commited to 2 coolers for the oil. i was getting frustrated last night trying to fit this parallel system. ill take another look at it this eve and if i cant find a simple solution Ill go with the series flow. i wish i had just started with series...
and i still dont have a plan for the transaxle coolere
and i still dont have a plan for the transaxle coolere
Working on a mock up for the fuel system. Question for those gurus making these things-Is there any reason why I couldn’t place the fuel pressure regulator on the same plate or does the fuel pressure regulator need to be up higher? As in does the fuel pressure regulator need to be up above the fuel rails?
Well that’s what I came up with for the fuel pump and filter assembly. Used those isolation bushings on the fuel pump so hopefully it will send less vibration into the cab. I will runner manual cable to the fuel filter/valve so that I can shut off the fuel from inside the cab
I tried to put the fuel filter and pump as low as possible to minimize priming issues. This fuel design is simple-perhaps I will regret not having the conventional fuel pot. That said, I don’t think I’ll have any problems when the fuel tank is full but the question is how will this pump pull that last few gallons from the tank if the tank is getting empty or if she is turning for an extended time? Will this system be able prime itself if the tank pickup sucks up a little air…
I tried to put the fuel filter and pump as low as possible to minimize priming issues. This fuel design is simple-perhaps I will regret not having the conventional fuel pot. That said, I don’t think I’ll have any problems when the fuel tank is full but the question is how will this pump pull that last few gallons from the tank if the tank is getting empty or if she is turning for an extended time? Will this system be able prime itself if the tank pickup sucks up a little air…
Attachments
-
 08F9A5E8-F684-4E6E-8035-911AA06485AB.jpeg362.5 KB · Views: 359
 -
 3C40A6BF-C3F3-457B-95F7-F0DDF7641BAF.jpeg438.2 KB · Views: 329
 -
 CF815142-B259-4052-87F6-B1030C0FB5A1.jpeg412.3 KB · Views: 349
 -
 76857F53-858F-462C-BDFD-97514C8F0624.jpeg434.7 KB · Views: 338
 -
 451829AB-115A-4CB0-934C-1FBC156173DA.jpeg411.4 KB · Views: 352
I really do like these tillet seats. But I’m only five 8 and 170 pounds. I bought a few sets of brackets online and I settled on these aluminum brackets for Sparco seats
Yeah the handbrake was a bit of a challenge and I have doubts to its efficacy. I think if I had to do it over again I would’ve used one of those electric caliper kits now available from Wildwood
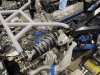
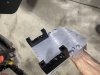
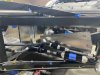
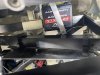
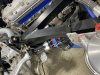
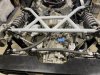
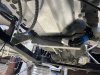
I finished the bulk of the oiling job. I did go ahead and abandon the parallel oil coolers routing in favor of this simplified series routing. You can see the fittings coming out of the dry sump pan. Not a lot of extra room there before the fitting hits a speed bump but at least the Crossmember is lower than the oil fitting
I finished the bulk of the oiling job. I did go ahead and abandon the parallel oil coolers routing in favor of this simplified series routing. You can see the fittings coming out of the dry sump pan. Not a lot of extra room there before the fitting hits a speed bump but at least the Crossmember is lower than the oil fitting
Attachments
A little bit of a dilemma with this shifter cable arrangement. This car originally came with the OEM shifter assembly and the associated cables. Now that I have the upgraded shifter these cables don’t seem to work. I suspect they don’t have enough throw. I measure only about 1 1/2 inches of throw and I don’t think that’s enough. If I’m wrong somebody let me know please. Besides that they are too long and really should be shortened to be less restricted in their movement
I need to give Fran a call. I suspect that there is a premade set of cables already prepared for this upgraded shifter. That would save the hassle of me measuring wrong again. Seems like every time I order my own custom parts I somehow end up with about three sets of everythings wrong before I get it right. I have enough of these expensive oil line fittings right now to build another car. Unfortunately they aren’t the fittings to build this car….
Joel K
Supporter
Slow and steady. Getting stuff done between job and family. Decided to go with one of these lithium ion batteries. This is a 720 amp battery and it’s the same one I use on my LS three rock racer. Made this little bracket with the band saw
Hi Dusty,
I saw your post on using a Lithium Battery, nice and compact. Is there any downside vs. using a conventional battery?
i had some doubts about these little lithium batteries until i started using them.
When My Ultra 4 car was built I had the builder install a pair of odyssey metal cased Gell batteries. After a couple of years of bashing the race car in the desert and on the rocks the gell batteries had some leakage. So I installed a pair of the exact same lithium batteries you see in my superlight into the ultra 4 car. I dont have a pic but 2 of the lithium batteries fit into one of the gel acid battery boxes. included is a pic of the gel batteries before i installed lithium. Note that after installing a pair of Li into a single battery box i was able to remove the 2nd battery box.
these lithium batteries have been in place for 4 years now (on a tender when not in use) and still work like new. I only use one of the 2 batteries in the U4 car during normal use (car also has a back up fuel pump with a separate fuel filter as seen in the pic). the 2nd battery is a spare and i can activate it with the rotatory switch you can see in the headliner of the U4 car. (or i can activate both batteries at the same time). The u4 car has a crate LS3 485 hp and one of these lithium batteries can crank it easy. At the same time as engine management, I have had no problem running lots of lights, a parker pumper, gps/nav, data logger, etc all on a single battery. I was worried that the small posts on the antigravity battery would be problematic but this has not been the case- I bounce the piss out of this brand lithium battery and they stay together tight.
Last edited:
Joel K
Supporter
i had some doubts about these little lithium batteries until i started using them.
When My Ultra 4 car was built I had the builder install a pair of odyssey metal cased Gell batteries. After a couple of years of bashing the race car in the desert and on the rocks the gell batteries had some leakage. So I installed a pair of the exact same lithium batteries you see in my superlight into the ultra 4 car. I dont have a pic but 2 of the lithium batteries fit into one of the gel acid battery boxes. included is a pic of the gel batteries before i installed lithium. Note that after installing a pair of Li into a single battery box i was able to remove the 2nd battery box.
these lithium batteries have been in place for 4 years now (on a tender when not in use) and still work like new. I only use one of the 2 batteries in the U4 car during normal use (car also has a back up fuel pump with a separate fuel filter as seen in the pic). the 2nd battery is a spare and i can activate it with the rotatory switch you can see in the headliner of the U4 car. (or i can activate both batteries at the same time). The u4 car has a crate LS3 485 hp and one of these lithium batteries can crank it easy. At the same time as engine management, I have had no problem running lots of lights, a parker pumper, gps/nav, data logger, etc all on a single battery. I was worried that the small posts on the antigravity battery would be problematic but this has not been the case- I bounce the piss out of this brand lithium battery and they stay together tight. View attachment 119076View attachment 119077View attachment 119078
Thanks Dusty, appreciate the info. I am going to give it a try. Saving some weight certainly helps, but saving the room is what I am really after.
Similar threads
- Replies
- 36
- Views
- 8K
- Replies
- 26
- Views
- 8K
- Replies
- 7
- Views
- 6K
- Replies
- 64
- Views
- 18K