
You are using an out of date browser. It may not display this or other websites correctly.
You should upgrade or use an alternative browser.
You should upgrade or use an alternative browser.
GTD40 Restoration
- Thread starter Skorpion
- Start date
Checked the clutch calculations and I measured a bore of 28 mm at the slave, a master 0.75 bore will not be a good match for AP racing Clutch. Assuming the AP racing clutch needs 12.5 mm travel (as per catalog) and guessing the force needed on the clutch spring is 180 kg.
There are 2 options in my view
A) Using a 1" master cylinder : gives 21 kg pedal force and 10,6 cm pedal travel.
B) Sleeve the Slave from 28 to 22 mm : gives a 19 kg Pedal force with 11,6 cm
Option B is a proven concept as I can read on this forum.
Any experience with option A ?
I guess not since I have trouble finding a 1" bore for a simple compact master cylinder.
Last edited:
Ian Anderson
Lifetime Supporter
Professional Motorsport Parts, Spares & Rally Equipment from Rally Design
Where I bought my master cylinders from
On the DAX I have 0.75 master and standard Renault slave, get about 19 mm movement at the slave
Ian
Where I bought my master cylinders from
On the DAX I have 0.75 master and standard Renault slave, get about 19 mm movement at the slave
Ian
Hi Ian,
Thanks for the link.
My brake lines and everything is setup for Wilwood Master Cylinder - Non Integral...the 1" is not in that range. Others kits indeed do have the 1" but it will ruin my current setup with tubing and I like to have all cylinders being the same look...the eye also wants symmetry. Gonna think/sleep over the options.
Tnx,
Now going to focus back on the brake master cylinders, see if I can determine the right bores so they are in the ball park to start with.
Mike Pass
Supporter
I have the AP Racing clutch on my car (from Mick Sollis). I found the best setup for movement and weight of operation was to use 1/4" pipe and a 0.75" master cylinder and a sleeved down slave cylinder from Chris Cole. I also used one of Chris's uprated release bearings and stronger metal bearing carriers. I removed the pin that holds the original pushrod and replaced it with a cut down and drilled HT bolt. To get the most movement with the minimum but necessary free play I made up a new pushrod from an HT bolt and cut it down gradually until the clearance was spot on. It has worked well now for a long time.
Cheers
Mike
Cheers
Mike
Hi Mike,
Thanks for the advice.
Red indeed on the forum about the bigger lines improving the operation of the cluth, just after I renewed the complete copper line and connections. :veryangry:
Gonna leave it for now, hope I do not regret the decision. I used a tube bender so I hope the line is less restricted in corners compared to people in the past - like me - using beer bottles to make bends in copper lines :thumbsup:
I have got Micks setup aswell for the clutch. The sleeving is probably the best option. To my calculations, I prefer sleeving it to 21 mm compared to 22 mm.
I trade in 1 kg force extra for 1 cm less travel.
Since I moved the complete pedal box 1" forward to give extra leg room, I have less pedal travel now as before. Life is give and take :laugh:
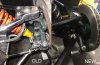
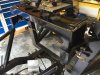
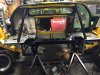
Mounted the front suspension, still needs alignment.
The brake disc is turned flat again (left is 31.2 mm) since it was attacked with a disc grinder, no idea why.
You can also see the new bracket with 3 positions instead of a sleeve. This will not move under hard braking.
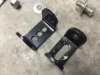
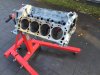
Also honed the engine (cylinders and lifterbores) with the flexhone.
It is really easy to DIY but the cleaning afterwards takes ages...used WD40 as lubricant and together with the abrasive flexhone material it becomes a sludge which goes everywhere in the oil galleys.
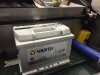
And found a strong battery which still fitted below the anti roll bar.
The brake disc is turned flat again (left is 31.2 mm) since it was attacked with a disc grinder, no idea why.
You can also see the new bracket with 3 positions instead of a sleeve. This will not move under hard braking.
Also honed the engine (cylinders and lifterbores) with the flexhone.
It is really easy to DIY but the cleaning afterwards takes ages...used WD40 as lubricant and together with the abrasive flexhone material it becomes a sludge which goes everywhere in the oil galleys.
And found a strong battery which still fitted below the anti roll bar.
Attachments


Mike Pass
Supporter
That higher position of the top link mounts should help to improve the rate of rear camber change.
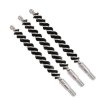
On the engine block don't forget to pull the plugs at the end of the oil galleys so you can get the long brushes in there to remove all the rubbish. It might also be a good idea to fit screw in plugs at the same time as they are much more secure than the push in ones.
You can get a set of engine oil galley cleaning brushes from here.
Engine Brush Cleaning Nylon Brushes Set | Frost Auto Restoration Techniques
Cheers
Mike
Hi Mike,
Thanks for the tips, the oil plugs were removed for cleaning.
Screwthreaded plugs are indeed more safe, gonna see if I have the right plugs in house.
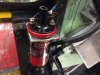
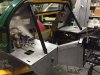
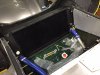
Trial mounted the water reservoir. Bit unusual angle but like to have the inlet/outlets under water and like to mount it to the chassisrail. The new rollbar puts the reservoir out of its normal position.
I checked the rear wheel bearings, to my feeling they are but hard to turn.
Guess I need a 40 mm tool to loosen up this bearing a bit.
Thanks for the tips, the oil plugs were removed for cleaning.
Screwthreaded plugs are indeed more safe, gonna see if I have the right plugs in house.
Trial mounted the water reservoir. Bit unusual angle but like to have the inlet/outlets under water and like to mount it to the chassisrail. The new rollbar puts the reservoir out of its normal position.
I checked the rear wheel bearings, to my feeling they are but hard to turn.
Guess I need a 40 mm tool to loosen up this bearing a bit.
Attachments
Mike Pass
Supporter
Granada Mk3 rear bearings.
If I remember correctly the nut size for the rear bearings is 41mm and they are LH and RH thread. I think they may be the same as the Sierra ones but not too hard to source anyway. The nuts need to be replaced if removed as they have have a nyloc type insert in them. They need to be tightened to 200 ft lbs - very tight. This can be done more easily once the wheel is fitted and on the ground to give enough friction to stop it turning. I use a big 3/4" torque wrench to do this.
If the bearings do not seem too good then replace them. They are fairly easy to source the kit with the grease seals. There should be no play at the wheel rim.
Cheers
Mike
Mike Pass
Supporter
Granada Mk3 Scorpio hub nuts
(Same as ford sierra/escort cosworth part)
Spanner size 41mm Thread size 22mm x 1.5mm
Right hand thread Ford UK Part number 6133688
Ford USA part numbers
LHT: E822078S100
RHT: E822077S100
6133688 (E822077 S100) O/S is Right hand thread
6133689 (E822078 S100) N/S is Left hand thread
Nut - hex.
M22 X 1.5MMRIGHT-HAND THREAD 1 8/82 - 12/86 6133688
E822077 S100
M22 X 1.5MMLEFT_HAND THREAD 1 8/82 - 12/86 6133689
E822078 S100
Cheers
Mike
Mike Pass
Supporter
eg. Ebay item
2x WHEEL BEARING KIT REAR LH + RH FORD SCORPIO MK 1 2 GRANADA 1.8-2.9 85-97 | eBay
Cheers
Mike
2x WHEEL BEARING KIT REAR LH + RH FORD SCORPIO MK 1 2 GRANADA 1.8-2.9 85-97 | eBay
Cheers
Mike
Im not sure all GTD's had mk3 bearings. I think early ones were mk2. Certainly my Tornado ones are mk2 and the nut is impossible to find (7/8 * 20tpi UNEF) and doesnt come with any bearing kit i have found so far.
Make sure you double check before ordering
Make sure you double check before ordering
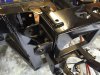
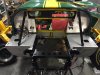
More hours than anticipated but the panels are finally done together with the rollbarsupport.
On the left, the white square just below the topmounting of the rollbarsupport is a template for the mounting holes for the waterreservoir. The waterreservoir mounting brackets needs to be rewelded - looking locally for an aluminium welder (looks like this skill is rare). I moved the reservoir to the left since the shape of the reservoir was more suitable for the left side and now able to mount it higher up. Most gt40 have it on the right...I know. Mine is hanging on the left :drunk:
The rear bulkhead wall is made of titanium sheets to reflect the heat.
Next on the action list is
Making progress :builder:
On the left, the white square just below the topmounting of the rollbarsupport is a template for the mounting holes for the waterreservoir. The waterreservoir mounting brackets needs to be rewelded - looking locally for an aluminium welder (looks like this skill is rare). I moved the reservoir to the left since the shape of the reservoir was more suitable for the left side and now able to mount it higher up. Most gt40 have it on the right...I know. Mine is hanging on the left :drunk:
The rear bulkhead wall is made of titanium sheets to reflect the heat.
Next on the action list is
- middle panel mounting
- remounting the rear suspension.
Making progress :builder:
Attachments
Similar threads
- Replies
- 4
- Views
- 1K
- Replies
- 11
- Views
- 1K