Homebuilt Mid-Engine Sports Racer

Neil

Supporter
A bit off topic-

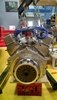
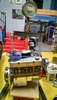
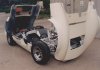
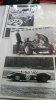
I found a 1974 photo of me driving a Sabel but it was before the body was mounted. It was the first car that I ever built, a steel tube chassis with a body designed and built by John Sabel of Rockville, MD. It was powered by a mid-engine
Sabel 1974 Neil Albaugh.jpg
140 hp Corvair driving a Porsche 914 transaxle. It weighed only about 950 lbs so driving it in an autocross was really fun. I sold the car to a fellow in Md who is doing a full restoration. It will be great to see it back on the road again.

Regards, Neil
 

Neil

Supporter
My engine is back together now with the exception of the right side valve cover. I ran out of Universal Blue Hylomar so it is just sitting in place until my order for more arrives. I timed the distributor for 12 degrees initial with a little circuit that I threw together. I use a Mallory Unilite distributor that triggers a Crane HI-6 ignition box. If anyone is interested I will draw the circuit of the Unilite timing circuit and post it.
This morning I installed the flywheel, KEP adapter, and clutch. All fasteners are now Loctite'd and torqued to spec. Next job is to bolt up the G50 transaxle and mounting cradle.
 

Attachments

  • IMG_20190610_135036763_HDR.jpg
    IMG_20190610_135036763_HDR.jpg
    239.3 KB · Views: 493

Neil

Supporter
Since it was fresh in my mind I decided to draw the circuit in case it would help anyone.
 

Attachments

  • Mallory Unilite Timing Light.pdf
    23.9 KB · Views: 482

Neil

Supporter
Thanks, Dave. If I have time today I will weigh the complete engine and post it. Keeping things lightweight really helps your power-to-weight ratio.
 

Neil

Supporter
Howard, I just weighed the complete engine (with flywheel, adapter, clutch disk, and pressure plate but minus carb & spark plugs) with my Chatillon weight scale. It reads 400 lbs. The small increments are 25 lbs so there is one division over the mark at 375, so it reads 375 +25 lbs. The aluminum block by itself is 100 lbs. I am using an unusually heavy crankshaft, a Lunati forged 4340 Pro with a 3.75" stroke. It alone weighs 52 lbs.
 

Attachments

  • IMG_20190611_193744242_HDR.jpg
    IMG_20190611_193744242_HDR.jpg
    222.6 KB · Views: 441
  • IMG_20190611_193717365.jpg
    IMG_20190611_193717365.jpg
    424.3 KB · Views: 428

Neil

Supporter
An aggravating day
:-P
For some reason my Porsche G50 transaxle input shaft is not mating up with my clutch. Try as I might, it just won't slip into place. I've tried turning the crank, turning the axle CV, juggling, pushing, swearing, nothing works. It goes on but there is about 3/4" until it is seated properly. I installed the clutch & pressure plate with an alignment tool so they should line up. I am beginning to suspect that the nose of the input shaft is not going into the flywheel pilot bearing. Strange, it did before.

Next I'll unbolt the pressure plate and remove the whole clutch. If it won't seat properly this time then it is not seating into the pilot bearing- a ball bearing. Arrggghhh.
 

Neil

Supporter
I give up for today. I've tried everything- without the clutch disk & pressure plate, the transaxle slides into place. With the PP but without the disk it slides into place. Install the disk and it won't go, tried many times to move the clutch disk a little this way and that- even tried to loosen the PP bolts so the disk could side sideways as the trans input shaft went in but there's virtually no adjustment between being so loose that the disk falls down and being so tight that it won't move at all. I've even gone from the new KEP 6-puck metallic disk back to the Sachs organic disk that I had in there before and even that won't go on. :mad:

I think the plastic alignment tool is not exactly concentric and its tolerances are not tight enough to line up the splines and pilot bearing. I'll try to find someone who has a cut-off G50 input shaft; that should work.

Regards, Neil Tucson, AZ
 

Randy V

Moderator-Admin
Staff member
Admin
Lifetime Supporter
Neil - if all you lack is 3/4”, the disc is not your problem unless you are running out of splines.
You may want to take a file to the end of the input shaft to add a slight chamfer.
Tip in using a dummy input shaft - don’t let gravity cause the shaft to droop. Lift the aft end of the shaft until you find the upper limit of its movement and then back that movement half way down to the lower limit of movement - then tighten the pressure plate bolts to lock the disc in place.
 

Neil

Supporter
Thanks, Randy- I've tried that. The plastic alignment tool is not concentric so finding the center turns out to be not the center. I'll check with a couple of Porsche shops today to see if they have a decent tool that I can borrow or rent.
 

Howard Jones

Supporter
Neil, If you can't get it then I'll send you my plastic mock up input shaft. You can send it back when you are done. I just used it on mine and it works.

Try just a film of light oil on the plastic deal and the splines in the clutch. Use a WD40 light type oil so it will evaporate when you are done. That's what works on mine.
 

Neil

Supporter
Thank you for your offer, Howard. I found an old "Sears Craftsman" universal clutch alignment tool in my tool box that I had forgotten about. I'll give it a try first.
 

Neil

Supporter
No one in Tucson that I talked to had anything but the plastic alignment that I’ve already been trying. Maybe theirs are more accurate than mine but I think I’ll be able to proceed now that I remembered an old Sears Craftsman “Universal” alignment tool that was in the bottom of my tool box. See photos. It had a screw-on 15mm pilot already installed so I’m betting that it was what I used to install the clutch a few years ago. It fits the flywheel pilot bearing snugly and the 1” shoulder doesn’t quite go into the disk splines but it does center the disk, I also tried the conical part and it worked even better- no rubberiness like the plastic tool. I’m so confident that it will go together now that I installed all nine socket head cap screws in the pressure plate with blue Loctite and torqued them to 29ft-lbs per KEP specs. I also put a light coat of ARP moly on the splines and nose of the G50 input shaft.

I’m crossing my fingers.
 

Attachments

  • Clutch Alignment Tool- Plastic.jpg
    Clutch Alignment Tool- Plastic.jpg
    170.5 KB · Views: 399
  • Clutch Alignment Tool.jpg
    Clutch Alignment Tool.jpg
    298.6 KB · Views: 433
  • Clutch Alignment Tool In Place.jpg
    Clutch Alignment Tool In Place.jpg
    185.8 KB · Views: 391
  • Clutch Alignment Tool In Place 2.jpg
    Clutch Alignment Tool In Place 2.jpg
    286.5 KB · Views: 384
  • Clutch Alignment Tool In Disk.jpg
    Clutch Alignment Tool In Disk.jpg
    286.2 KB · Views: 419
Hi Neil,

Love the picture you shared of the Sabel you built. I have a 1963 Sutter Special Can Am which has a Sabel body on it. Jim Sutter and John Sabel had auto shops in the same complex in MD that was referred to as Gasoline Alley. There is a book about it. Anyways, I would love to get in touch with the guy you sold the car to so we could compare notes. There are not many of these cars around. Mine is the only V8 Sabel. Originally, Jim installed a Chevrolet 289 with 3 Rochesters and then fuel injection and then he swapped it out with a 289 and webers which is what it has now. I will attach a pic of it. Thank you for your time, Chris
 

Attachments

  • 63 Sutter 001.jpg
    63 Sutter 001.jpg
    188.3 KB · Views: 432
  • June 22nd 038.jpeg
    June 22nd 038.jpeg
    150.3 KB · Views: 413
  • June 22nd 041.jpeg
    June 22nd 041.jpeg
    152.1 KB · Views: 409
  • June 22nd 060.jpeg
    June 22nd 060.jpeg
    187.2 KB · Views: 415

Neil

Supporter
Chris;

Thanks for the information about your Sutter. I did not know anything about it before. The place John Sabel , and Jim Sutter too, had their shop was in Rockville, MD. I visited there a few times and went racing with John once or twice. I sold my Sabel Mark III to a local guy but another fellow contacted me and since he sounded like someone who was far more likely to actually restore the car, I put him in contact with the new owner and he bought it from him. Dick Morel now has the car and is finishing the restoration. I'll copy him on your post and my reply so he can contact you if he wishes.

What was the book you mentioned?
 
Back
Top