
You are using an out of date browser. It may not display this or other websites correctly.
You should upgrade or use an alternative browser.
You should upgrade or use an alternative browser.
James' GT-Forté scratch build GT40 MkI
- Thread starter harvs
- Start date
I've been working in Mexico so haven't done a huge amount recently. But back now and it's great to be in the garage again ") .
.
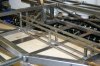
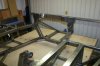
I've got the tunnel in. Welded the top joints and will weld the other sides when the chassis is next turned over.
Started cutting out the sections for the horseshoe too...
.I've got the tunnel in. Welded the top joints and will weld the other sides when the chassis is next turned over.
Started cutting out the sections for the horseshoe too...
Attachments
Looking good! I've been looking at harness mounting at the moment and I make it that the front one/two (depending on if 5 or 6 point harness) will want to go right in the middle of the gap between those two flat bars on the floor. I'm thinking I might weld in a 3rd just for the attachment points. You might only be intending on a 4-point in which case it's moot but worth thinking about now if thinking 5/6-point.
Also you might want to hold off on the welding up of the closure bar for the horseshoe until you have your engine/gearbox in place. The originals attached the gearbox to it and I see no reason why you couldn't do the same with the 01E but it would need a bit of a support bracket round the attachment points.
Also you might want to hold off on the welding up of the closure bar for the horseshoe until you have your engine/gearbox in place. The originals attached the gearbox to it and I see no reason why you couldn't do the same with the 01E but it would need a bit of a support bracket round the attachment points.
Cheers David
I had a discussion with Mrs harvs about seat belts the other day. Let's say I didn't really sell the idea of a 6 point harness too well, so the current plan is 4-point.
Will give the gearbox mounting some thought - thanks.
I had a discussion with Mrs harvs about seat belts the other day. Let's say I didn't really sell the idea of a 6 point harness too well, so the current plan is 4-point
.Will give the gearbox mounting some thought - thanks.
Still worth considering the attachments for 5/6, you can always leave the 5/6th belt(s) off and just run a 5/6 point as a 4 point. It's one of those things though that's far harder to sort later (although doable).
Also while I'm (nearly) on the subject have you considered seat rails or will the seat be fixed? I got a set of the 'low profile' 19mm ones from KDR Seating and they only overlap the steel bracing in the floor by about 10mm each end. You've gone with a wider brace at the back but so you might not have the same problem but again better to consider this problem now than when you've attached the floor!
Also while I'm (nearly) on the subject have you considered seat rails or will the seat be fixed? I got a set of the 'low profile' 19mm ones from KDR Seating and they only overlap the steel bracing in the floor by about 10mm each end. You've gone with a wider brace at the back but so you might not have the same problem but again better to consider this problem now than when you've attached the floor!
Cheers Dave. Yep, instantly seeing the result of your effort is great for motivation. Hope I can keep some motivation for the slower / less visible bits
David. Good idea - definitely easier to weld in some extra threaded tube now, rather than later. Current plan is to fix the seat directly to the floor. I'm not particularly tall (5'10") but being lower to the ground and having additional head room (especially with a roll bar) can only be a good thing. If anyone shorter drives it, I can supply a cushion!
David. Good idea - definitely easier to weld in some extra threaded tube now, rather than later. Current plan is to fix the seat directly to the floor. I'm not particularly tall (5'10") but being lower to the ground and having additional head room (especially with a roll bar) can only be a good thing. If anyone shorter drives it, I can supply a cushion!
I was thinking to stick the seat on rails to start with but in the end decided that while maybe not ideal for other drivers to not be able to adjust the seat I don't care.
The main advantage I can see to it is that it would make access to the rear hatch easier as otherwise will have to remove seats to gain access. If I ever sell and the next owner is short in the leg/arm they can always re-drill the seat pan.
Anyway, I've been thinking long and hard about the 5/6th mounting and in the end decided the only way to do it with the seat on the floor is to put the mounts on the front brace and add a bar where the seat angles up. Basically create a 'H' shaped piece to sit under the seat and they'd bolt in where there is plenty of space due to the front angle.
The belts would then go back and up round the bar, this was the only way I could think to get the seat as low as possible as otherwise the belts would bolt on above the seat pan! I suppose you could also mount them behind and run them forwards in the same way as well.

This guy's got the same engine as me...
[ame="http://www.youtube.com/watch?v=FZ7pPtqtkjQ"]Quickest "production engine" VW/Audi in the world [email protected] - YouTube[/ame]
Not sure if mine will be as fast though
[ame="http://www.youtube.com/watch?v=FZ7pPtqtkjQ"]Quickest "production engine" VW/Audi in the world [email protected] - YouTube[/ame]
Not sure if mine will be as fast though
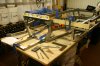
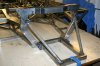
Just about got the horseshoe set up for tacking and welding. When I set out to build the chassis, I don't think I fully appreciated that welding would only amount to about 1% of the effort with 99% spent measuring, checking measurements, cutting, filing, checking measurements, setting out, measuring, checking measurements, bit of grinding, more measuring then a tiny bit of welding! Glad I can still remember pythagoras and trigonometry
Attachments
James:
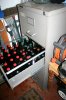
Very nice job on the horse collar...I reckon we would never get anything done with that wine rack in the room.
I was wondering how your gearbox will mount, and what your crossmember will look like on top.
Fabulous job...and I can seriously relate to the measuring, re-measuring, tacking, fitting, re-measuring etc. I would also add the do-overs but we chalk them up to experience.
I am enjoying watching your build, can't wait to see it with shoes on.
Cheers
Phil
Cheers Phil
Yep, I forgot to include all the time spent correcting, re-doing and 'improving'....!
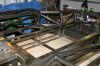
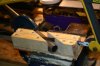
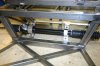
Gearbox mount. Darrin's got a good photo of this on his build log, post 143. I'll probably do something similar, maybe a mild steel bracket with a gusset for a little extra strength.
For the cross member, you can just about see this in the photo, left side of the table. I've got some angle iron temporarily bolted in to keep everything aligned during fabrication.
Shoes - yep, that moment will be a real milestone in the project and something I'm really excited about. Although the cost of some wheels makes my eyes water! Anyone got a spare set which need a new home?!
Yep, I forgot to include all the time spent correcting, re-doing and 'improving'....!
Gearbox mount. Darrin's got a good photo of this on his build log, post 143. I'll probably do something similar, maybe a mild steel bracket with a gusset for a little extra strength.
For the cross member, you can just about see this in the photo, left side of the table. I've got some angle iron temporarily bolted in to keep everything aligned during fabrication.
Shoes - yep, that moment will be a real milestone in the project and something I'm really excited about. Although the cost of some wheels makes my eyes water! Anyone got a spare set which need a new home?!
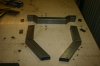
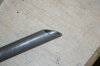
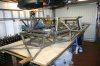
For part of the chassis there are a couple of tubes which have an angled cut at one end and an angled cut which joints another round tube at the other end.
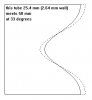
For the end joining another tube, there's a neat programme here which provides a template you can use to make the cut.
For the plain angled cut I build a little jig. Think I should have made it a bit shorter though as it's very tiring and I think I've worn the middle of the blade out!
For the end joining another tube, there's a neat programme here which provides a template you can use to make the cut.
For the plain angled cut I build a little jig. Think I should have made it a bit shorter though as it's very tiring and I think I've worn the middle of the blade out!
Attachments
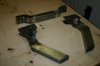
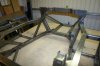
The horseshoe is all welded up now (just need to add a couple more cross braces to the engine area) and I've welded the steering rack mount in place. It was nice to (temporarily) install a component on the chassis after working with steel stock for so long!
Attachments
Last edited:

James,
All that heat from that welding can't be doing that wine any good!!:drunk:
Bill
All that heat from that welding can't be doing that wine any good!!:drunk:
Bill