McCopy mk 5

Terry Oxandale

Skinny Man
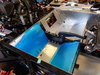
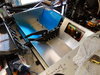
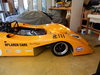
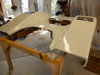
Thanks Russell. Yes, I will be doing the same thing in regard to laying the glasswork over the current surface to get a "glove fit", and then pop it off. BUT, I wish to make mine removeable if at all possible, which I assumed was what the team had as well with the fasteners visible in the photos I've seen. If indeed the team spoilers were bonded in place, then that is something I need to think about before proceeding further. As best as I can tell, the dimensions of the original spoiler are 2.13 m wide, and about 165mm diagonally tall, which is where I went. Unfortunately, it's a LOT of real-estate on this thing (which hopefully makes it aerodynamically effective), and I'm not sure I want it permanently affixed to the rear panel.

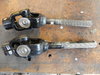
I had the same issues with my Holley EFI. Being an old carb guy, it was quite an experience learning about EFI, and constantly adjusting all the parameters of the system to finally get the idle and start-up right. I had to re-pin mine from an LS1 pinning, to an LS2 pinning. That's the kind of work you do at midnight when everybody is asleep, and you have NO distractions. Even one wrong wire is hell, and I was reverse-pinning a front engine harness to become a rear-engine harness, so I had to reverse image some of the coil and injector wiring.

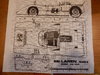
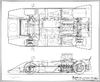
The bodywork is 80% scratch-built, (back in 2009-2015) like you did with your McCopy (or Leon is doing with his '20)...nothing new there. I used the drawing below, scaled it up (1mm = .8") to make the panels (and used plastic models of the "B" as well as hundreds of photos), and then added slightly enlarged "B" side scoops off of an "E" that I measured.
 

Attachments

  • McLaren_M8A_Chevrolet_Can_Am-TC0008-large.gif
    McLaren_M8A_Chevrolet_Can_Am-TC0008-large.gif
    51.6 KB · Views: 584
Last edited:
Terry,
I will dig out my M8B picture which was down loaded from a slot car site in 2005, well before I started on this process as it had profiles and that is what I used. As you say, its quite a process doing the buck.
Cheers
 
Terry
The only pic I can find at the moment is larger than A4 so have taken a picture....let me know if you want a more accurate file. As for attachment, there are some very nice cheese head cap screws that you could also use if you wanted it removable. I have towed the car on a trailer with the high wing fitted at over 100k`s without any hassles.
Cheers
Russell
 

Attachments

  • DSCN4921.JPG
    DSCN4921.JPG
    583 KB · Views: 568
Ignition blues.
I have a weak spark on no7 cylinder on my 1UZ Toyota V8, pretty sure we have swapped leads with the same results as we have done almost everything.Today I measured all my leads and the resistance varied from 4.5 on the short ones, 10 on the medium length ones and 16 on the long ones. So not knowing any better, went to Super cheap and measured all the leads, long and short and on the same scale, they were all around the 5 mark. So, are my leads crook or is that normal?
The only thing we have not checked is the rotor and they are a bitch to get at so last resort. This is surely a question for Jac.
 
John, very handy info... thanks for that. Those number work out along side my measurement as my longer leads were 16 and my shorter leads were 4.5. ...same as new ones. I will swap my leads again and recheck the resistance, then maybe look at the distributor cap after I have pulled it apart!
Different story...I was questioned on whether my steering parts were standard production and welding, it was suggested that I went to the wreckers, found a Corolla, took pictures of parts and car and that would suffice. Went one better at the local Toyota dealer. He went online, found the parts diagram and vehicle fitment list, copied to me and signed my picture of the parts. Very helpful. That should keep the cert system happy.
 

Attachments

  • DSCN4912.JPG
    DSCN4912.JPG
    607.4 KB · Views: 550
Got brave and pulled both distributors down....really simple once you got rid of the plastic covers. All terminals were heavily arced so cleaned them up ready for the next start up session. All along I have been working thru the 32 items the cert inspection threw up, 9 of them were for stuff that comes later like weight, wheel alignment report, VINN number only one thread showing on bolts and so on. Well I have knocked off almost 20 more including the biggie....wrong seat belt locations and its all powder coated!
After much anguish, I peeled off the inside skin and welded in new locations. The drivers side was easy...the passenger side had the fuel tank 40mm away and is not removable without major pain. After much thought, i put a large fan at the back of the car sucking air for an hour thru the side pod and past the tank, slipped in an aly sheet and a wet towel... said my prayers and struck an arc. So it all worked as I am writing about it. ( There was never any smell of petrol before). The other problem was the center belt mounts. I have run all my fluids, wiring, brake and clutch lines inside the center tunnel, neat and tidy but no good as far as the inspector went. All brake lines must be visible for inspection and clipped every 300mm which has been completed along the top of the tunnel. (The clutch line is ok inside)It was just not possible to remove all that stuff and fit doubler plates inside for the seat belt bolt. So I suggested that we do a saddle over the tunnel out of 3mm and press dimples in to accept some larger 7/16 UNF tapped plates. This pressed out then folded in a brake press. The finished job is just perfect with no sharp edges and is VERY strong being held into the car with 8 x 8mm cap screws. I took the liberty of combining the hand brake into this saddle...all neat and tidy. The drivers side skin was marked so a replacement one was fabricated and now that its all been fitted back together...you would never know the drama. All parts in question were crack tested and cleared A1. Next session will be with the body on and all lights running etc
 

Attachments

  • DSCN4930.JPG
    DSCN4930.JPG
    360.8 KB · Views: 504
  • DSCN4956.JPG
    DSCN4956.JPG
    358.2 KB · Views: 551
Neil, we have no choice....its that or drive a Toyota Corolla. I always have to have the end result in mind otherwise you would give up.
Cheers
 
Neil, i had started making fibre glass seat inserts that would get upholstered only to be told that they would need to be mounted with enough steel plates and bolts to hold the Titanic yet they would happily accept upholstered inserts that sat into alloy paneled seat forms. So that`s how we will proceed.
Its that time of year now where if you have not completed it then time is running out.....fast.
We will have a quiet Christmas with close family around, thankful that Carol is still in reasonably good health and still running the show. When you consider that it is now over 5 years since we were given the worst news you could wish for, we feel lucky to have had this extra time.
We have climbed numerous hurdles and faced some tough times but Carol always comes up smiling and positive with never a negative....there must be something in that.
We both want to wish everyone a happy Christmas and a prosperous new year, enjoy your time and relish your friends, isn't that what its all about. I turn 70 in a couple of weeks...where the heck did those years go?
Merry Christmas everyone.
 
Hi Russ and a very merry X Mass to you and Carol as well, and i hope you manage another year, car is looking great, did you get that popping sorted out, and was i close, i know from experience on the brabham and the Maca they are finicky bloody things so i bought a good balancer which made life so much easier.
Fran and i are fine , i start treatment after X Mass so all is good so far
cheers Mate, john and Fran
 
Thanks John, I have yet to find out. The idle adjustment bolts come up from below and are almost impossible to get at so am looking for 5mm .5 metric fine bolts to replace from the top down. I have started making a vacuum gauge out of an old Argon gauge ball float....just because I could and shed time will take a back seat for a few days to enjoy the festivities.
All the best to you and all your family and slay the dragon next year.
Cheers
 
Well a little more progress, because the road regs required massive steel attachments for a fibre glass seat, we have made aluminium profiles permanently fitted into the car. Whilst they look like back breakers, once the upholstered fibre glass shell goes in they will be fine...more than one way to skin a cat. Its still going to be a shit of a car to entry exit going to the pub in fancy cloths.....or just going for milk at the local dairy. Who cares when they see my grin.
Cheers
 

Attachments

  • DSCN5053.JPG
    DSCN5053.JPG
    187.4 KB · Views: 499
  • DSCN5054.JPG
    DSCN5054.JPG
    191.7 KB · Views: 559

Terry Oxandale

Skinny Man
I'm confused. Obviously I don't understand the modification, and it seems from what I think I understand, you're meeting the letter of the rules, but the rules don't seem to make it any better than what you had originally.
 
Terry, sometimes you just have to accept `rules` if they are an acceptable solution to the problem!
Had I used upholstered seats they would have required 3 mm doubler steel plates and extra brackets so I am very happy to use upholstered fiber glass seat liner inserts if that`s what they want. Their theory is that the `seat liner` is contained in the fabrication so I am happy.
Cheers
 
Look like something is about to happen...hopefully it will look like pic 3.
Have completed the aluminium seat work and made a mold for the fibre glass seat insert...and it fitted really neat.
Will do the chassis body work and doors first and move the car out for more space to paint the nose and tail clips.
Cheers
 

Attachments

  • DSCN5064.JPG
    DSCN5064.JPG
    182.9 KB · Views: 466
  • DSCN5065.JPG
    DSCN5065.JPG
    197.3 KB · Views: 446
  • DSCN0291.JPG
    DSCN0291.JPG
    888.4 KB · Views: 489
Terry, I would have to drive it to Wellington for that to happen. Got paint on the doors, side panels and rear clip. Will do the nose when I get back from holiday in 5 weeks. Did not have enough space to do them all. Couple of minor runs to cut out, with 5 to 6 coats, there should be plenty of paint to polish.
 

Attachments

  • DSCN5066.JPG
    DSCN5066.JPG
    184.5 KB · Views: 470
  • DSCN5067.JPG
    DSCN5067.JPG
    185.4 KB · Views: 411
Well after 5 weeks cruizin around the Sth Island, it was time to come home and put some epoxy undercoat on the nose clip, sure does make all those little pin holes come out to play. Not to bad so some spot filler, plenty of fine sanding then some etch primer under coat and we should be ready to spray some colour. The headlight boxes look like they are meant to be so let the light shine on....
 

Attachments

  • DSCN5784.JPG
    DSCN5784.JPG
    286.2 KB · Views: 350
  • DSCN5783.JPG
    DSCN5783.JPG
    346.6 KB · Views: 357
Back
Top