McLaren M20#73

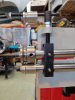
Turned up a couple of small diameter dyes for the bead roller for the 1.5” coolant tubes ends. I ended up having to use one of the larger diameter standard outer dyes as the bead shafts couldn’t close up enough.

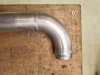
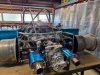
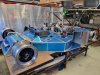
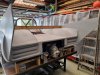
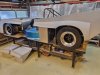
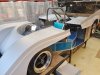
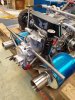
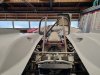
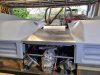
Mufflers all welded up and trans axle catch can mounted and plumbed.

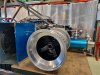
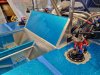
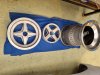
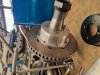
The rims are all done. The machinist spent 4 hours apiece on the rims recutting the centre taper, re indexing the drive pins, cutting new centre rings to centrically locate on the axles, and resurfacing the outer rims.
I spent a day wet sanding then buffing the outer surfaces.
Sprayed the inner rims a Satan black and the outer has a clear gloss.
Ran tap over all holes and bolted together. they’re spinning pretty good now.

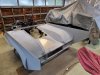
Next job, fold up the seat back rest and inserts.

Andrew.
 

Attachments

  • M20.bead dye.jpg
    M20.bead dye.jpg
    173 KB · Views: 631
  • M20.pipebead.jpg
    M20.pipebead.jpg
    418.9 KB · Views: 673
  • M20.mufflers.jpg
    M20.mufflers.jpg
    532.9 KB · Views: 595
  • M20.rear rim.jpg
    M20.rear rim.jpg
    462.8 KB · Views: 624
  • M20.front rim.jpg
    M20.front rim.jpg
    588.1 KB · Views: 640
Hi Andrew, as usual your attention to detail is first class and those wheels do look fantastic. My wheels have run on the dyno and on track now with no issues so I'm sure yours will be that much better. How have you got on with MSNZ and your roll bar homologation? The car is looking amazing and I'm so looking forward to seeing the body painted and mounted. I have had a word with the foundry and put the pressure on them for the spare wheels so now hoping a couple more weeks, they have been real busy with manifolds and trans cases for Holinger and Shelby but promiss me they will slot me a space next week.

Cheers Leon
 
Thanks Leon for following up on the ‘spare’ wheel centres. (Making a 3 piece lite weight wheel set)
I have held off applying for the roll bar homologation till after I have the body mounted. Incase anything needs altering. I’ve had the engineers report and application ready to go for some time.
Nearly completed the seat inserts and seat backrest. Still have to cut some seat belt slots and the bellmouth hole for the supercharger. Going to be in the passenger backrest.
Next, mounting the body and construct the wings.
 

Attachments

  • M20 backrest.jpg
    M20 backrest.jpg
    433.3 KB · Views: 561
Nearly completed the seat inserts and seat backrest. Still have to cut some seat belt slots and the bellmouth hole for the supercharger. Going to be in the passenger backrest.
Andy, are you going to put a pod filter on the compressor intake tube? Is it an option to turn the backrest into an airbox with filter in it, and hopefully get above atmospheric cold air rammed in from the front facing bellmouth? Looking awesome. Cheers, Andrew
 
The backrest would be a superb air filter box, but I'm going to use that space for the electrical equipment, ECU, relays, fuses, cabling etc, as it's central + nice and accessible.
Trying to keep things simple, so air tube will run straight forward to a bellmouth with wire mesh cover for a little added stone protection, Not going to run an air filter, the opening is in the cockpit area, so is reasonably protected. Don't see a need for any air ram as the procharger will produce more than enough positive pressure. (easy enough to revisit this if it's an issue)

Just assembled a Prusa i3 MK3S+ 3D printer that comes in kit form or built. In the coming months will learn how to use the Blender and Slicer software, so can custom make bellmouth, naca duct bucks etc. Rotor brake ducts, will probably make from Aluminium due to heat factor.
 
Not as much completed as hoped, a few other projects need completing first to keep the boss happy...
But got the body in approximately the right position so the wheels fill the arches evenly, a bit of cutting going on, a bit more required.
Andrew
 

Attachments

  • M20-127.jpg
    M20-127.jpg
    313.5 KB · Views: 447
  • M20-126.jpg
    M20-126.jpg
    320.2 KB · Views: 468
  • M20-124.jpg
    M20-124.jpg
    320.1 KB · Views: 485
  • M20-125.jpg
    M20-125.jpg
    268.3 KB · Views: 545
Yes you do seem to be doing a lot of cutting, not to be unexpected as I'm sure there is some suttle differences in our tub measurements. How are you going to do the front bracket? I glassed a tube in each side where the shaft for the front wing pivots on then made arms that come forward like the original with a "L" shaped slot so you drop the front down and slide it back. the rear is held with bonnet pins, simple and seems to work well.
I haven't forgotten the wheels, chased them up yesterday. They have had a hard time since Christmas with Albins and Hollinger orders and now Tom is off till next week with, you guessed it, COVID !! they have promissed to get onto them once Tom is back on deck.
 
Have another week of distractions then can get back into it.
Leon - body brackets will be similar to originals, don't want to reinvent the wheel. Front brake ducts will have similar placement as current M20#1 (Reveson car)

Thanks Russell. Will form simple molds from Aluminium sheet to remake body parts needed.
.....still amazed how wide this car is 2070mm
Andrew
 
They are wide alright!! wait until you have to put it on a trailer. I have been building one that is 2.1m inside the guards, its doable but only just and you have to have skinny tyre's on it.

Cheers
Leon
 
Hi Andy,
I was talking to Tom Morrison on Wednesday and he was telling how many castings they had to get out for Hollinger. They did 30 a couple of months back and now have another 35 to do starting next week (he's going to slip your wheel centre's in with that run) they have done a run of bronze alloy that they cast the selector forks from and there were literally dozens of them stacked up then there were stacks of bell housings. I'm amazed how much of this stuff is being sold and that not counting Albins there were just as many castings stacked up for them as well.

Cheers Leon
 
All good Leon, there's no urgency for them.
Still getting a couple of other projects out the way before I can get back to the M20.
 
Thought it about time for an update…she was slow going over the Winter months due to life’s little distractions... but back into it.
Made the rear clip tripod supports, and welded on muffler brackets. The Wing centre supports will slide on the ends and be held in place by an end pin that the rear clip will pivot on.
Rear lights still to be mounted..
Mounted and plumbed the Transaxle cooler and reposition the breather catch can.
The spare wheel centre castings have been made so will have to order inner and outer rim shells. The fronts have been cast with the outer rim but will most likely machine that off to get a lighter wheel. Thanks Leon..
So next is mount the rear clip.
A.
 

Attachments

  • Trans rear1.jpg
    Trans rear1.jpg
    277.9 KB · Views: 372
  • Trans rear2.jpg
    Trans rear2.jpg
    468.6 KB · Views: 368
  • Wheel centre.jpg
    Wheel centre.jpg
    502.9 KB · Views: 404
The quality of your build is impressive. I don't know that McLaren could have done it any better back in the day. Thanks for sharing this! So much engineering effort.
 
Hi Andrew, my build speeds been a bit pedestrian, summer wines have been too distracting....along with trial rides, walks, fishing etc.
Have a couple of weeks off now so will carry on with will body, there's a bit of work there to make it fit right. Just ordered some custom rear Brake hats with more offset through Coleman Racing.
Still dreaming of the first start and first drive.. just need to pull finger and get it done.
 
The custom coleman brake hats turned up 2 weeks from when I ordered them. Nicely made.
Been working on the rear clip. Made the rear brake naca ducts and glassed in. Glassed in the front of the rear clip. Skim coated the whole affair. Cleaned up the wheel arches and all edges, put 4 coats so far of high build primer and sanded and sanded.
Milled up some brackets that pivot the rear clip.
The centre naca duct for the trans cooler is next then rejoin the rear quarters. Then onto the Inner wheel arches which will incorporate the brake ducting.
Its diffinitely been slow going.
 

Attachments

  • 20230212_131042.jpg
    20230212_131042.jpg
    364.4 KB · Views: 203
  • 20230328_112254.jpg
    20230328_112254.jpg
    330.5 KB · Views: 214
  • 20230328_112212.jpg
    20230328_112212.jpg
    383.8 KB · Views: 208
  • 20230328_112140.jpg
    20230328_112140.jpg
    234 KB · Views: 242
Made a trek over to Melbourne for the F1 with the Fam.. Enjoyed the racing. F1, F2 F3, Super cars. Carrera Cup, even had some Historic sports cars do a demo race. M8F, T70’s, Jags and some Aussie specials.
So back home and back to the build, made the rear inner guard next as its easier to handle the rear quarters in smaller pieces. Using Aluminium as a mould as it parts easily from the fiberglass with just a bit of car polish as a release agent. Hot glue gunned the mould in place while glassing.
Got some 3” alu tube bends and flexible ducting hose to construct the rear brake ducting. Saw a Lola T70 design that I like.
Currently folding up the rear centre section mould which incorporates the engine cowling.
 

Attachments

  • 20230409_163401.jpg
    20230409_163401.jpg
    349.3 KB · Views: 169
  • 20230411_155847.jpg
    20230411_155847.jpg
    398.4 KB · Views: 178
  • 20230409_163505.jpg
    20230409_163505.jpg
    378.9 KB · Views: 192
Made the left rear brake ducting. The flexi tubing misses the rim by 1/2” so looks good. Onto the the right rear.
 

Attachments

  • 20230417_165720_resized.jpg
    20230417_165720_resized.jpg
    270.9 KB · Views: 147
  • 20230417_165253_resized.jpg
    20230417_165253_resized.jpg
    301.4 KB · Views: 142
  • 20230417_174130_resized.jpg
    20230417_174130_resized.jpg
    268.8 KB · Views: 139
Back
Top