Mclaren M8b replica (visual)

Hi There
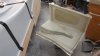
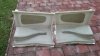
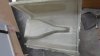
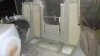
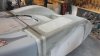
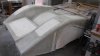
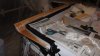
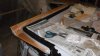
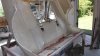
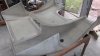
Well today was where all the hard work came to fruition, after 5 coats of Maguires maximum protection release wax ( and yes I still did a test strip) I had laid up the door skins yesterday and after a good 18 hours curing, the moment of truth came.....they both pulled out rather easier than I expected. My inside edges on the scoops are very tight so I had used dynel cloth strip around those areas and got only one small bubble so they will need very little work to mould the actual doors from.
Very happy, I will not be able to mould the body sections for a couple of days.
Cheers
 

Attachments

  • DSCF3074.jpg
    DSCF3074.jpg
    136.3 KB · Views: 345
  • DSCF3076.jpg
    DSCF3076.jpg
    236.3 KB · Views: 268
  • DSCF3075.jpg
    DSCF3075.jpg
    130.6 KB · Views: 251
Hi Russell,

Very impressed, can't wait to see the big parts come out.
Did you just wax the primer or is there a finish coat on there??

Cheers Leon
 

Terry Oxandale

Skinny Man
You're making all this look so easy. I can't figure out why the color difference on the sides of the mold, versus the rest of the mold.
 
Leon
5 polished coats of Mcguires Maximum protection wax applied and then polished off, with about an hour minimum between coats or over night as the case may have been. The polish was applied directly to the Duratec hi build which had been sanded to 1200 grit. Very happy with the release qualities how ever tomorrow will be the real test as I intend moulding the rear section. I did not go overboard sanding although I have a finish to be pleased with, all the work will go into the actual moulds themselves that I pull off.
Terry, its only easy because of a dogone stubborn just get it done attitude....there is no other way. The colour difference is due to the strengthening material moulded into the flat sides to prevent distortion. Basically the mould is one layer of tissue then 2 layers of 450gram chopped strand matt, 1 layer of strengthening material and a final layer of 450gram cloth, all areas with shape and curve do not have material insert. All edges get a 50mm wide strip for increased strength. We have been experiencing 28 to 30 deg c temps here so have not been wanting to do any moulding for a couple of days so Its up early tomorrow before the heat gets up and I will throw some resin around...watch this space.
Cheers
 
Brandon
Yes I will put a small frame around the front edge to support it during moulding and subsequent storage. The advantage of using the panel gusset / thickening is that the panels become very stable.
Cheers
 
Hello....very happy!
Well after a fair bit of huffing and puffing, off it came, to say that I was relieved is an understatement. Got a bit of touch up work around my very tight corners on the rear section otherwise you could just wax it and mould from it. Now I have to wait for a southerly wind as moulding during hot Northerlies fills the house with noxious fumes which did not go down well with the boss. Thursday is looking good for the nose section.
Then I will spend some time on the 4 components and make them as blemish free as poss.
Cheers
 

Attachments

  • DSCF3091.jpg
    DSCF3091.jpg
    126.1 KB · Views: 310
  • DSCF3092.jpg
    DSCF3092.jpg
    127.8 KB · Views: 251
Dave,
No, I will resurface them with Duratec once any defects have been corrected. These are not planned as high production moulds, I may end up selling 1or 2 to recover some costs, but are mainly for my repair
works if ever needed. The Curated high build sands to a fantastic surface and once waxed is almost perfect.
Cheers
 
Hey Russell, You are giving me hope as I watch how easy you are doing this that mine will be half as good and as easy, I guess I'll find out in a few months. My front clip is almost ready to put glass on and the doors just need some filler and primer. Can't wait to see the front clip come off, wonderful work.

Cheers Leon.
 
Leon
Moulded the front clip this morning, started at 7am to avoid the heat and 5 hours later its all done. Hand layup is slow and tedious so I will have look around at who could spray the finished moulds with a chopper gun to turn out my body shells. I am having to be careful and wait for southerly winds to avoid stinking the house out as its not a nice smell for Carol. Once this has had a good cure I will then put some braces and further stiffening on but am just about thru with this process.....never again.
Cheers Russell
 
Hi
I can relax a bit now, the nose mould is now cured and came off the buck with a bit of a tug once the wax let go it was easy. Very happy with the surface and with a bit more waxing we can mould directly from it.
I have also taken the liberty of moulding a removable rear spoiler whilst I had the buck available as I have no space to store it and have sold it on. When that's gone, I can then set back up and mould my body panels.
Cheers
 

Attachments

  • DSCF3095.jpg
    DSCF3095.jpg
    160 KB · Views: 276
  • DSCF3096.jpg
    DSCF3096.jpg
    122.6 KB · Views: 309
  • DSCF3093.jpg
    DSCF3093.jpg
    191.7 KB · Views: 296
Seems you did a very nice job with your lamination and will have a good start as moulds
Only one question ?
watching at this good work you are doing why you did not built before moulding some flanges in beetwen the different parts ( front ,doors, rear ) this would have help you a lot in the future ? not only in preventing moulds to twist but also in giving you some base to built on some returns around the parts?
Or may be you have in mind another process

Otherwise , again congratulations for your built !!! building a complete plug and molds is a hudge scope for "one man " project

Bravissimo et bon courage !!!!:thumbsup::thumbsup:
 
Again real nice job Russell. How thick do the molds need to be to keep their shape and you see no probs with putting in stiffeners later after you have removed from the buck?? the reason I ask is after watching you do this I am keener on making molds from my buck instead of making the body and then a mold later.
That rear spoiler will finish it off perfectly. Terry may get one off you.

Cheers Leon.
 

Terry Oxandale

Skinny Man
Great progress. Won't be long before finished panels come out of this. Just wondering what the total weight will finally be for just the finished body panels?

Yeah, I'm going to have to get back on the glasswork for the "A" spoiler when things warm up a bit more. Foam is still sitting were it was 6 months ago.
 
Michel, Leon
Never having done this process, its all been a learning curve.
Because I have made the buck in one piece, it is not possible to put returns on the panel edges. All sections are moulded with two initial layers of 450gram over tissue cloth which is very absorbent of resin, the first layer is very carefully rolled with a grooved roller to work out any bubble and ensure correct placement of cloth. The second layer is then applied and again rolled out, some thickening is then applied to any flat edges (2 x 450gram strips). All this is allowed to cure and loose any heat and then stiffening panels of 2 to 3mm `foam` are applied to any flat panel areas with the 3rd layer of 450gram cloth applied over them and well wetted with a thick paint roller, this final layer is not rolled with the grooved roller and is subsequently thicker than a rolled section. 3 layers of 450gram rolled out will give approx. 3 to 4mm panel thickness.
All the external sections of the mould do have 10 to 15mm returns, its only where the doors are that there is no initial moulded return. The components as moulded are very strong and easily self supporting but storage care is still needed. The advantage of this process is that when the panels are fitted to the car, any minor variations can easily adjusted and then door returns can then be added. If your doors are in a `fixed` shape, your stuck. When I mould my actual panels, I will probably run with the same 3 layers of 450gram cloth and some panels strengthened.
Leon
I don't mind admitting that this process was far bigger than I had estimated, I have now been at this for almost two months now and it has been every spare moment, having said that, its been quite exciting to go thru the process and in real terms its quite simple. Just take care, and go for the best surface that you can achieve, wax it well and go for it. You do need good ventilation and a good mask, I spent 5 hours straight laying up the nose. Very happy to share any knowledge.
The rear spoiler will only fit this car as its a custom fitted shape.(just going out now to flick it off the buck...)
Regards
Russell
 
Hello Russell
You are doing a big job for sure and learning by yourself this tuff world of "polyester world" but just to be informed doing a buck in one piece is the commun way to do for homebuilders and much more easier to get fluent and nice shapes ( and your plug was done really nicely) But this do not prevent to do flanges on the mold .
there are 2 mates (Fred and MrNoo) in this forum who did this usual process and if you are interested to watch what I mean just browse on their Threads
http://www.gt40s.com/forum/lola-t70-lounge/19604-canamsa-sa-stratch-build-18.html
sample on post 375 to 378
http://www.gt40s.com/forum/wings-wheels-keels/31673-917-scratch-build-3.html
Sample on post 59

Am just pointing this to show you that when flanges are done it is easiest to built quick wood down flanges bolted to those so when you flip up the molds you can have returns to mold contact areas where doors to bonnets have to be close and secured

As writen before Your lamination seems to be very nice and you will have a very nice car when done
keep on your good work !!:thumbsup:
Can wait to watch more progress
 
Last edited:
Hi
So you think you might want to make the body?
As I am approaching the final moulding stage, let me tell you that it is a huge undertaking....but in this case the only option, so I have had to just suck it and sand...sand and sand some more.
Its taken close on 3 months of most days putting time...lots of time.
The cost to make the buck and take the moulds from that has been around the $12 to $1300.00 dollars, I have used 24kg of chopped strand matt, 50kg of polyester resin, 4 ltrs of Acetone, shit loads of sand paper, a tub of release wax, rags and a box of rubber gloves. You could also take into account special mask`s and other incidentals.
This mould is a relatively simple one so complexities would up the time and costs. I coated the buck with a hi build polyester product called Duratec and was so impressed with its performance that I am going to coat my final moulds with the same product because it moulded so well. The best simple product was the Meguires maximum protection release wax, I had no hang ups at all and anything that landed on it just flicked off. Whilst I still had the buck available, I also moulded a small rear tail spoiler because I like the look of one attached. I plan on building a high wing anyway just for show.
I certainly have learnt a lot, no1 being that I should have used a gelcoat rather than the fine tissue and I may have not got as many bubbles in the vertical tail section, this was hard to mould in that position as you were fighting gravity. When I do the actual body, it will be in the jig that you can see as it will be almost flat with gravity being my friend.
There have been times when my shed has been 30+ deg and you question your sanity....but you just have to keep going and imagine the finished painted results.
Its been a journey so time for a break in March, we have hired a houseboat on the Murray River...part of the `bucket list`.
Cheers
 

Attachments

  • DSCF3094.jpg
    DSCF3094.jpg
    209.3 KB · Views: 217
  • DSCF3104.jpg
    DSCF3104.jpg
    183.7 KB · Views: 269
  • DSCF3100.jpg
    DSCF3100.jpg
    157.6 KB · Views: 274
  • DSCF3101.jpg
    DSCF3101.jpg
    120.6 KB · Views: 242
  • DSCF3099.jpg
    DSCF3099.jpg
    182.5 KB · Views: 354
Back
Top