McLaren replica build base on a Manta

Terry Oxandale

Skinny Man
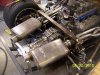
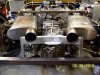
These TBs came on '95 - '97 LHS'. I used mostly driver-side ITBs due to the nature of their throttle shafts. The passenger-side ITB has the TPS blade at the end of the shaft, which makes it shorter and only usable on the end ITBs. Shafts were connected with McMaster shaft couplers that have a hard plastic spider that is tight enough to eliminate play, but flexible enough to allow about 1º of misalignment. The pinch-bolt type is the best to get, but more expensive. They allow infinite adjustment were a set-screw type may imprint on the shafts and prevent really small adjustments once the shaft has the set-screw indentation on it.

I've had so many request for information about these (especially from the SCCA Porsche guys), that I put a couple of vids out there for them (be kind; these are my very first set of videos, which just goes to show, an old dog can learn new tricks):

Slide show with audio
http://www.youtube.com/watch?v=uDCzR1mBG_E

And a video using my wife's camera
[URL]http://www.youtube.com/watch?v=BZHCTBkcNsM[/URL]
 
Last edited:
Hi Terry, I was just wondering with all the disscussion on adhesive on my log wheather you had come to any conclusion as to what you were going to use. Mickky3 has given me some good sites and has spoken to a guy who built Mono's back then and he used then what is Now Arallidite 420 I looked at it on the links he gave me and the workable time is much longer than a lot of the other products.
Your thoughs would be nice. BTW, your intake system is a real credit to you and I think you might start to see a few guys taking up what you have started.
Cheers Leonmac
 

Terry Oxandale

Skinny Man
Now you're putting me on the spot! I like both tape and adhesive, but for different parts of the car. Rationale?
1) Imperfect matches between two joining pieces negates the attributes of the ahesive transfer. This is great stuff, but for perfect applications.
2) The 15 mil tape can be used on side panels where no other parts are being hung on them or putting them in a static continual one-direction load. What I like about this is the combination of reasonable grip (if sufficient area is employed), and sealing capability.
3) The tray panel under the car will use adhesive (pre-drilled, clamped, and then riveted in the existing holes after clean-up). I've also got several aluminum to aluminum bonding areas (brake pedal assembly mounts and bosses) that will use adhesive and rivets.

If I was undertaking your much more adventuresome project, I'd have to go with adhesive unless it was a non-structural convenience.
 
Yes, I agree with you, and as much as the tape is so clean and easy I will be using an adhesive in pretty much the hole Tub, Mick also gave me a link to an aircraft repair site and it has shown a lot about riveting technque and lay outs so that has been very helpfull and I will be double row riveting a lot of what I originaly would have just singled. How far away from final assembly of your Chassis are you??
Cheers Leonmac.
 

Terry Oxandale

Skinny Man
How far away from final assembly of your Chassis are you??
Cheers Leonmac.

A long way off. Making notes of welding and structural changes as I add more of the bolt-on stuff. Little things like additional bracing, tabs for Adel clamps, and something that never crossed my mind until this past week, a bolt-on dash structure that will provide reinforcement for the sides of the tub over the top, and triangulated to the front suspension pick-up points. Bolt on, because always in the back of my mind is the old days when I was a contortionist and could wire instruments upside down on my back. No more!

So, on top of this framework (3/4" square tubing, 16 gauge) for the dash will be an arrangement for the DOT windshield (Hate this, but the windshield is pretty small, rounded and raked back pretty well, and I want this to be street legal here in AR) that sits on this framing and allows the windshield and surrounding body frame to be easily removed to give full access to the back of the dash. Unfortunately, it added another 15 lbs to the car, but maintenance (adjustment and R & R, or the brake cylinder assembly, steering column and rods) will be very easy, and at this stage in life, easy is good! I spend more time making sure I can easily work on this thing years down the road than I do in planning for the functional stuff.
 
Last edited:

Randy V

Moderator-Admin
Staff member
Admin
Lifetime Supporter
....... Bolt on, because always in the back of my mind is the old days when I was a contortionist and could wire instruments upside down on my back. No more!
......... I spend more time making sure I can easily work on this thing years down the road than I do in planning for the functional stuff.

Boy oh boy - can I relate to this or what? YES!!! And I am doing the very same on my project... Making a removable dashboard for the GT40 means to change part of the way the car is constructed. After building a roll-cage in it to boot - well, now we are totally on our own...

I feel your pain Terry and watch with eager anticipation.. You're doing an outstanding job with this car!
 

Terry Oxandale

Skinny Man
Well, I'm trying to keep from blowing a gasket!

Background; Spent $, hours, blood, and patience fabricating the SS coolant plumbing for the project, of which the most difficult (4 attempts for a successful piece) was the block outlet/inlet manifold.

As I've got my mind on many aspects of the car, one nagging sight that I finally chose to put full attention on, was some troubling rust spots on my SS tubing. So I place a magnet on it, and you guessed it, it's magnetic. But only on one or two sections. What really chaps my hide is the manifold has the same issues (some magnetic, other sections not). So, I wonder what the **** happened to this (wrong kind of tubing mixed with the right kind from the vendor, poor quality stainless....WHAT?.

Right now I want to crank the welder up and melt this stuff down to the iron ore that it came from and throw it out the back door! I'm certainly NOT going to redo the manifold, but the single section of the transfer tube may get replaced later on. JEEZ!
 
I purchased some SS bends and tubing to make up my coolant tubes from a local shop. Before I finished cutting, they rusted! Vendor said "That never happened before" Right! Wound up getting some aluminum pieces and used that...
 
Well, I'm trying to keep from blowing a gasket!

Background; Spent $, hours, blood, and patience fabricating the SS coolant plumbing for the project, of which the most difficult (4 attempts for a successful piece) was the block outlet/inlet manifold.

As I've got my mind on many aspects of the car, one nagging sight that I finally chose to put full attention on, was some troubling rust spots on my SS tubing. So I place a magnet on it, and you guessed it, it's magnetic. But only on one or two sections. What really chaps my hide is the manifold has the same issues (some magnetic, other sections not). So, I wonder what the **** happened to this (wrong kind of tubing mixed with the right kind from the vendor, poor quality stainless....WHAT?.

Right now I want to crank the welder up and melt this stuff down to the iron ore that it came from and throw it out the back door! I'm certainly NOT going to redo the manifold, but the single section of the transfer tube may get replaced later on. JEEZ!
don"t panic, some stainless is magnetic. the high chrome/ nickel 300 series alloys are mostly not magnetic but a few alloys are slightly magnatic. some of the car parts makers use 409 stainless and it is magnetic, not as corrosion resistant a the 300 series but ok for cooling lines . mostly used on turbos like 321 but not as expensive
if you want to keep the stainless from corroding after welding and polishing it needs to be passivated. this is done with an acid solution which desolves the iron from the surface and causes the chromium in the metal to form a chorinum oxide on the surface which helps prevent further corrosion.
http://www.iftworldwide.com/white_paper/passivation.pdf
if you want stainless that will not corrode, polish nice, and stay looking good on the outside use Type 304, which is the most common type used to make tubing.
also never use any tool, grinding wheel, saw blade or polishing wheel on the stainless that has been used on steel or it will deposit the iron in the steel on the stainless and the stainless will rust. if you weld stainless to hot or without a shield gas you will burn out some of the chrome in the alloy and it will be less corrosion resistant at the weld area.
 
Last edited:

Terry Oxandale

Skinny Man
Thanks Lynn. I think you've hit some of this right on target. I noticed on a couple of welds that the "magneticity" (if that's even a word) was more noticable than far away from the weld, so that bit of information helps (It's all supposed to be 304). The acid passivation note was interesting as well and I will investigate this further.

Thanks.
if it is 304 I am suprized it rusted. did you use fill rod om the welds? there are passavation processes that you can do your self using citric acid, it takes a little long but is is safe to do at home and Green. 10% citric acid in disstilled water for 30 minutes at 150 degree F

http://www.mmsonline.com/articles/how-to-passivate-stainless-steel-parts
 
Last edited:

Terry Oxandale

Skinny Man
This rusting was distributed over the entire length of the section. Not heavy rusting as seen on my header tubes, but then again, the coolant tubing was fabricated during the winter when I was not sweating saltwater all over the tubes. Anyway, I may just leave it alone. With proper antifreeze mix, it should hold up long enough to enjoy the car.
 
Learned that my stainless pieces were 304 and not 316 as I had paid for! Surface rust all over. Went to the aluminum tubing anyway. Try sanding and rubbing down with Ballistol. Should last for years..Great stuff.
 
This rusting was distributed over the entire length of the section. Not heavy rusting as seen on my header tubes, but then again, the coolant tubing was fabricated during the winter when I was not sweating saltwater all over the tubes. Anyway, I may just leave it alone. With proper antifreeze mix, it should hold up long enough to enjoy the car.

I was just look at some of your pics of the project and this is a great project keep up the good work.
the picture of the cooling system pipes show some color near and around the welds it looks like you cleaned the welds with a wire brush or wire wheel or maybe not cleaned at all. in either case the welds will rust. using a wire wheel will clean the color off the welds but leave a deposit of the metal wheel on the surface and with the mosture in the air you will see corrosion form between the stainless and the deposited wheel metal even if the wheel is of the same alloy as the tubing. a steel wire brush or wheel is a big no no. also the grinding dust in a shop where you are cutting or grinding steel can cause the stainless to form a coating of rust on the surface. you live in Arkansas where there is a lot of humidity in the air and as the pipes cool down after the heat of the day they will condense some of that humidity on the surface and you will get rust. clean the surface with a scotch brite pad or wheel and keep the steel dust off of them and they will last several lifetimes.
 

Terry Oxandale

Skinny Man
Well obviously you're hitting all the right points. In the end, I'm not concerned with the aesthics of a little (surface) rust. I am concerned about the internal integrity of the tubes, which may be fine based on the last few posts.
 
Well obviously you're hitting all the right points. In the end, I'm not concerned with the aesthics of a little (surface) rust. I am concerned about the internal integrity of the tubes, which may be fine based on the last few posts.

The inside is the least likely to be affected by corrosion it takes Oxygen to corrode stainless. the glycol keeps the oxygen from the surface of the tube. the outside is the most susceptable to corrosion even more if insulated. insulated stainless pipe should be cleaned and primed before insulation is installed. the insulation will hold moisture against the pipes surface and the corrosion will grow over time until it causes corrosion piting which will lead to stress cracking. every time you heat up and cool down stainless pipe it expands and contracts which is putting stress on the pipe. the same thing as bending it back and forth untill it breaks, stainless get worked hardened buy bending it or heating and cooling it and the cracks will start to form at the corrosion pits.
 
Terry and Leonmac,

Earlier in the thread you guys were talking about the use of adhesives. I wrote a paper for the GT 40 Club a while back on adhesives. They are a wonderful way to attach panels that you don't want to rivet/weld or they are too difficult to reach any other way. The products out there today are better than the ones I wrote about.
My painter uses them extensively in restoration work. He has been using them since the early 90's when he went to work for a dealership. They challenged him on his use of them in the work that they were going to issue warranties on. So he did a demonstration for them. He bonded two panels as he normally would. Let them cure overnight. Attached them to a frame straightening platform the next morning and tried to pull them apart. The panels tore at the attachment to the jig. The adhesives didn't budge. He uses a 3M product that I can't recall what it's name is. You just have to choose one with the curing/working time you think you need.
We are planning to use the adhesive to attach support clips to the B pillar and roof line around the windshield in my car. The front of the spider has been unsupported without a windshield for several years now and has started to droop a bit. It is a great way to go since my headliner is in and the cage is painted. We will peel the headliner back and attach the Z clips to the fiberglass(yes it will bond almost anything). Then sand a spot for the cage and attach them. If we use aluminum it will stay bare. If we use steel, it will be touched up with paint to match the frame. They will be nearly invisible. The key is to be meticulous in the prep. The metal will tear out before the bond releases.

Bill
 

Terry Oxandale

Skinny Man
I'll create a sticker on the center cover cautioning the passenger that "stress cracks due to pitting may be hazardous to passengers riding in this vehicle".

I feel better already!
 

Terry Oxandale

Skinny Man
Funny (strange funny, not humorous funny). I'm picking up the frame from the powdercoater first thing tomorrow morning. I'll send an update after I get it back home. This powdercoater business has had a sketchy history, but has switched ownership recently. The guy who bought it recently appears to have some good business sense, and has been in this business most of his adult life, really wants to turn the business around, so I rolled the dice and took it to him ("let me see how hungry he really is?"). Tomorrow I'll find out if that was a good choice or bad choice.

What is really cool about this was it took essentially eight hours to completely strip the frame of everything. Would take days on a normal car. Photos prior to the trip out of the garage with the newly added rear bottom tray under the engine and transaxle, some small SS mufflers (with a fabricated aluminum brace for them, and then off to the powdercoater:
 

Attachments

  • 100_5593.jpg
    100_5593.jpg
    58.7 KB · Views: 610
  • 100_5600.jpg
    100_5600.jpg
    60.5 KB · Views: 569
  • 100_5601.jpg
    100_5601.jpg
    44.5 KB · Views: 530
  • 100_5629.jpg
    100_5629.jpg
    76.8 KB · Views: 643
  • 100_5631.jpg
    100_5631.jpg
    64.1 KB · Views: 593
  • 100_5641.jpg
    100_5641.jpg
    72.9 KB · Views: 617
Back
Top