McLaren replica build base on a Manta

Terry Oxandale

Skinny Man
Thanks for the clarification Tom. Great spreadsheet. It would appear that once the physical characteristics of the suspension are inserted into the spreadsheet, I then manipulate the "Nominal" spring rate value until I achieve the desired wheel rate value?

Leon,
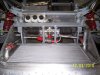
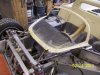
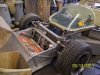
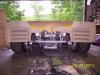
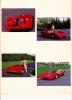
I replaced the previously fabricated tube arms with off-the-shelf parts from one of many suppliers of dirt track supplies. Its swedged (or swagged depending on who says it) .090 wall, 1" (1.25" is available in almost all the same lengths) diameter tube that has the knurling and plating on them as purchased. After seeing remnants (photos) of the latest GT40 (I'm embarrased to say I can't recall this well-known member's name) crash on the track, and the bent control arms, I decided I'd rather have a control arm that may bend rather than super-duper 1.25" .125" wall) arms that may spear me in the back because they didn't deform on an impact.

Ox
 
Last edited:
Thanks for the clarification Tom. Great spreadsheet. It would appear that once the physical characteristics of the suspension are inserted into the spreadsheet, I then manipulate the "Nominal" spring rate value until I achieve the desired wheel rate value?

Ox

exactly that´s the idea.
I choose the springrate depending on the total wheelrate, the one induced by the spring plus the one induced by the swaybar when cornering. For the swaybar one, i have choosen the value for the softest position.


TOM
 

Terry Oxandale

Skinny Man
A little bit of updating on the radiator box. I was quite surprised at the added rigidity of the vertical diffuser plates added to the horizontal floor and roof of the box.
 

Attachments

  • 100_5747.jpg
    100_5747.jpg
    48.8 KB · Views: 701
  • 100_5748.jpg
    100_5748.jpg
    51.2 KB · Views: 539
  • 100_5754.jpg
    100_5754.jpg
    39.5 KB · Views: 526
  • 100_5760.jpg
    100_5760.jpg
    51.9 KB · Views: 604
  • 100_5766.jpg
    100_5766.jpg
    58.7 KB · Views: 625
Terry, Happened to be reading an old ' Specialty Car ' kit car mag ( Aug 1994), with an article on your car or the sister of it perhaps, was owned by Humpy Wheeler of Charlotte Motor Speedway & used for demo laps etc @ the track-- apparently one of two at that time with 327 SBC & Corvair trans, Karmann Ghia front end- though who knows how many might have been built since- scanners not working @ moment, but will get your email sometime if you want & fwd to you.
 
Terry, I have an old colour brochure for a Manta, and while it looks quite dramatic, I must say your chassis and development are the Starship Enterprise compared to the old crude original.

Fascinating thread; keep up the engineering, building, and posting, thanks.
 

Terry Oxandale

Skinny Man
After enjoying the two years of mechanical fabrication, it's time to get to the body. The body I've got is a Manta Mirage body, which looks like a bastard between a Lola, a McLaren, and who knows what else. To get it closer to what I feel is a better match to my desires, I had to correct some fiberglass mold issues that caused a great deal of asymmetry (1st photo shows how the left side tire arch is tilted whereas the right side is not). Then I shortened the nose by five inches, which was tough given all the compound curves that where mucking up this whole process.

In essense, I'm cutting it up into smaller pieces, replacing some of those pieces with newly fabricated pieces, and then putting it all back together to a configuration that I'm hoping better immulates the McLaren bodywork. To reference it all, I started with the radiator ducting center cover as the new reference point (3rd photo shows it separated and moved back five inches), and then shortened the passenger side (4th photo) and then driver side "cones" (8th photo). The radiator outlet had to be fabricated with fiberglass to provide clearance for frame/master reservoirs. It's not the proper profile, but it is what it is (5 through 7). Wheels will need to be positioned in there correct location, but now the front body is more symmetrical (but not perfect) than it was prior to this endeavor.

Once I get all the pieces "patched" together, I'll flip it over and permanently bond everything from the bottom side, and then flip again and sand all the joints smooth and contour the body to remove the discontinuities between the compound curves that where "cut and spliced" together.
 

Attachments

  • 100_5780.jpg
    100_5780.jpg
    60.2 KB · Views: 609
  • 100_5807.jpg
    100_5807.jpg
    28 KB · Views: 568
  • 100_5801.jpg
    100_5801.jpg
    41.6 KB · Views: 558
  • 100_5804.jpg
    100_5804.jpg
    47.7 KB · Views: 547
  • 100_5814.jpg
    100_5814.jpg
    45.3 KB · Views: 530
  • 100_5817.jpg
    100_5817.jpg
    28.1 KB · Views: 488
  • 100_5825.jpg
    100_5825.jpg
    22.3 KB · Views: 549
  • 100_5827.jpg
    100_5827.jpg
    58.9 KB · Views: 573
  • 100_5837.jpg
    100_5837.jpg
    39.8 KB · Views: 559
  • 100_5841.jpg
    100_5841.jpg
    44.8 KB · Views: 583
Last edited:
Hi Terry. Looks like you have a good handle on what you are looking for in the end resault. Are you going to keep the roof or make it a open car?? Keep up the good work. Cheers Leonmac
 
Terry,

Do you have a Mirage or Montage. I know it's not the Randy Berry Mclaren version. Chris Arden did have those molds. Are you going to do new glass also and use those for a buck when you are done. Yours and my bodywork were made by Specialized Moldings out of the UK back in the day. Bucks were made from the first cars that had hand formed aluminum bodies. One of the reasons for some of the deformaties.
Dave
 
Last edited:

Terry Oxandale

Skinny Man
Leon, as bad as I want the open top, a closed one would be so much more practical, so I wont' commit until I get closer to the end.

Thanks for the interesting info Steve. Chris had the M6GT, but this is the Mirage.
 
I stumbled across your posting McLaren replica build base on a Manta. Very impressive. You are very ambitious and obviously have an engineering background and are quite skilled.
This thread couldn't have been better timing for my Manta project. Look forward to further bodywork mods. Mine has a Mustang II front suspension converted to coilovers. Was gonna redo it and decided that it would be a shame to cut up a perfectly good suspension. The rear was I think based off of a Chevette FWD. The a-arms were fabricated everything was frozen and funky and just had to go.
I got a LS4 and transaxle setup out of a 2004 Pontiac GTO with 10 miles on it, as well as a complete C5 Corvette (less 3rd member) rear suspension with it.
I have been trying to figure out how I was going to mount everything, what type of transaxle set-up I was going to use etc. The horizontal just wasn’t going to work. It would work, but it’s all of the accompanying modifications that killed that route.
I narrowed the C5 rear cradle with all of it’s suspension mounting, 12" drilled and slotted rotors, with integral emergency/parking brake and am building around a Mendeola 4e transaxle with 930 cv's. I have been into duning the last few years and own a long travel sandrail running a Nissan 300ZX Turbo with the same Mendeola 4e. (would make a sweet drivetrain option for one of these projects.) Time to focus on my other projects.
 
Last edited:

Terry Oxandale

Skinny Man
It's been a while since I've posted anything related to my project, but with a new position at work, I find much less time to work on the project, so when I do, I try to make it count.

The recent work has been pretty much all body workings. With the front overhang shortened by 5”, it looks a little bit more proportioned to the McLaren than to the Mirage. The Mirage does not provide a tilt front panel, so this was made by installing hinge-plates on the robust radiator framework, installing receivers in the glass nose corners, and then separating the windshield framing from the rest of the front body panel. The advantage is that within 20 minutes, I can remove the entire windshield and framing, and replace it with a McLaren type poly wind screen (for those special moments (like inspections and car shows), and still have a tilt front end.
 

Attachments

  • 100_5850.jpg
    100_5850.jpg
    116 KB · Views: 428
  • 100_5854.jpg
    100_5854.jpg
    147.4 KB · Views: 464
  • 100_5859.jpg
    100_5859.jpg
    106.7 KB · Views: 445
  • 100_5904.jpg
    100_5904.jpg
    169 KB · Views: 482
  • 100_5911.jpg
    100_5911.jpg
    117.4 KB · Views: 483
  • 100_5908.jpg
    100_5908.jpg
    168.7 KB · Views: 569
  • 100_5910.jpg
    100_5910.jpg
    175.6 KB · Views: 549
Last edited:

Terry Oxandale

Skinny Man
Next is the rear body panels. I finally made the big commitment and cut off the hard cover over the cockpit, with the goal of making the rear panel resemble the McLaren. So off with the top, create a panel in its place (rides about 3” over the length of the entire drive-train and exhaust hardware), and start bonding together. The first photo shows the OEM cover that was removed. Notice the "band" around the very rear of the care. This is a 3" splice to increase the length of the body to cover the 930 shift linkage without any protrusions. The next-to-last photo is no optical illusion. The vents really are tilted outward at the top on each side. This happened when I leveled out the tops of the tire arches, so these will need to be cut, raised up about 2", and re-attached in a horizontal configuration. The last photo is the severed top. Some day if and when I have time, I may make a removable hardtop using this piece and the doors that came with the car.
 

Attachments

  • 100_5965.jpg
    100_5965.jpg
    145.3 KB · Views: 522
  • 100_5978.jpg
    100_5978.jpg
    203 KB · Views: 472
  • 100_5991.jpg
    100_5991.jpg
    175 KB · Views: 470
  • 100_6000.jpg
    100_6000.jpg
    210.5 KB · Views: 449
  • 100_5998.jpg
    100_5998.jpg
    170.5 KB · Views: 494
  • 100_6005.jpg
    100_6005.jpg
    164.2 KB · Views: 439
  • 100_6010.jpg
    100_6010.jpg
    177.3 KB · Views: 458
  • 100_6016.jpg
    100_6016.jpg
    187.7 KB · Views: 484
  • 100_6033.jpg
    100_6033.jpg
    159.9 KB · Views: 508
  • 100_6041.jpg
    100_6041.jpg
    147.9 KB · Views: 474
  • 100_6045.jpg
    100_6045.jpg
    172.3 KB · Views: 520
  • 100_6044.jpg
    100_6044.jpg
    215 KB · Views: 508
  • 100_5992.jpg
    100_5992.jpg
    111.7 KB · Views: 456
Last edited:

Randy V

Moderator-Admin
Staff member
Admin
Lifetime Supporter
Ever closer Terry... Keep chipping away it is looking very good!!! :thumbsup:
 
Hey Terry, I don't care what you say, I can see an open car here mate, its looking really good and you seem to be getting further away from the Manta and closer to the M8A with each thing you do, great work. Can I ask (I know you will have an answer) where are the side mount oil coolers getting their Air from, are you going to put some ducts in the door tops. I will have to get onto My body soon you are setting quite the pace here mate. cheers Leon.
 

Terry Oxandale

Skinny Man
Leon,

I'll cut out the NACA ducts when I make the doors. I wanted to use the original doors, but I tilted the front end of the front clip down about 3", and the rear of the rear clip down about 3", so now the center looks "broke over" in the middle on the door gaps. Doing this made the bottom flat, and significantly reduced the gap between the tires and the wheel arches. Interestingly enough, the profile ended up much closer to the M8 profile after it was all done (scary how sometimes things acutally work out better than intended).
 
Last edited:
Back
Top