
You are using an out of date browser. It may not display this or other websites correctly.
You should upgrade or use an alternative browser.
You should upgrade or use an alternative browser.
Ozi 206 sp
- Thread starter Jim C
- Start date
Drawings are hard to get actually impossible, truth is 70% of people couldn't do anything with them. Lucky find Jim. Mine will be built from reference pictures and major measurements from my current 40.
Dave there is this app, I have seen it with my own eyes.
What it does is scales a photo.
You tell it what a known size is say a wheel, you then measure other objects in the photo and it gives you the dimension.
I have done it manually but if you have a lot to get through it is laborious.
Thanks John
Wheels on any original GT40 for example are a good basis since they are 15" dia, only thing is you have to allow for/ factor in parallax error but at least on any round item like a wheel there will be that known measurement on one plane, just have to measure any other items in that photo on that same plane, if you get my drift so to speak!")
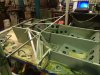
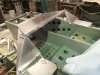
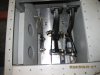
I am up to the structure under the dash.
All I have to go of is a tube on the drawings that the lower part of the dash mounts to.
So that is my datum and I am basically emulating the tube work location but in sheet.
To get the spot I user the overhead measuring gear, then used tube and flat bar to give me the lines to make patterns .
All I have to go of is a tube on the drawings that the lower part of the dash mounts to.
So that is my datum and I am basically emulating the tube work location but in sheet.
To get the spot I user the overhead measuring gear, then used tube and flat bar to give me the lines to make patterns .
Attachments
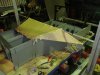

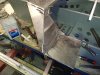
I started on the sides first, these are a pyramid when put together so they are pretty strong.
Then the top panel, I folded a U channel that is riveted in on the ridge.
As the column is attached at that point I wanted extra strength.
Corner gussets are to tie all the corners together.
Then the top panel, I folded a U channel that is riveted in on the ridge.
As the column is attached at that point I wanted extra strength.
Corner gussets are to tie all the corners together.
Attachments

Last edited:
Thanks Clayton
Yes I do burn the candle, the wife has been in the States for 6 weeks so I have been burying myself in the project as much as I can.
Hi Dave you got the DXF ok I gather.
By the way I have not had any hokey pokey for 6 weeks, I think Im clean.
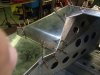
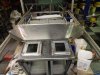
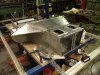
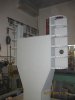
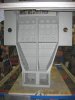
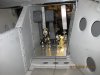
Some up dates the tub is finished, Funny I didnt have a completed photo but these are close enough.
In a bit of a hurry so I will wack up photos and brief description.
this is the tube nearing completion.
The last 2 are in the paint stage before the dash structure was fixed.
It made it easier to paint.
I decided on a very practical easy to maintain line on this car so the lot gets painted,latter on if it gets knocked around it will make touch ups easier.
Yes I do burn the candle, the wife has been in the States for 6 weeks so I have been burying myself in the project as much as I can.
Hi Dave you got the DXF ok I gather.
By the way I have not had any hokey pokey for 6 weeks, I think Im clean.
Some up dates the tub is finished, Funny I didnt have a completed photo but these are close enough.
In a bit of a hurry so I will wack up photos and brief description.
this is the tube nearing completion.
The last 2 are in the paint stage before the dash structure was fixed.
It made it easier to paint.
I decided on a very practical easy to maintain line on this car so the lot gets painted,latter on if it gets knocked around it will make touch ups easier.
Attachments
Last edited:
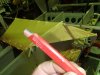
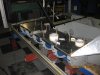
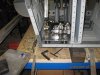
As the seats are fixed the pedals need to move so I put them on seat tracks.
I made the throttle pedal ,brake and clutch is wilwood, they are separate pedals.
They where to cheap to make and they are light.
I sorted all this out before fixing the top structure as it would have been a pain working through the inspection holes.
I made the throttle pedal ,brake and clutch is wilwood, they are separate pedals.
They where to cheap to make and they are light.
I sorted all this out before fixing the top structure as it would have been a pain working through the inspection holes.
Attachments
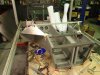
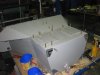
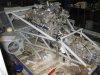
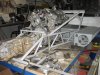
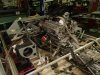
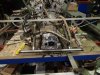
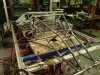
The rear frame I tried drawing twice and gave up because you need to do real life sometimes.
It will be 32mm and 25mm x 2 chrome moly, dont know what you guys pay but its $22 per meter.
So you dont want to start throwing it around.
My approach was 32 mm and 25mm electrical condute and a hot glue gun, condute $30.
I am glad I did because I did change my mind on a few things along the way.
I used the measuring table to get all the pick up points and I made them out of alloy sheet and glued them on as well.
It was well worth the days work as I resolved several issues before starting for real.
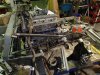
And yes guys it is a Subaru box, you remove the center diff and transfere gears out of the rear and bin them, you buy a splined sleeve and rear case that will loose about 200mm of the back.
link
Subarugears
The box cost me $250. You can buy diffs /gears/cv flanges ect ect.
The engine was $700.
I am going out off my way to be mean on this build.
Thats it, dosnt look much but it takes time.
Chassis weighed in at 56.2 kg.
jim
It will be 32mm and 25mm x 2 chrome moly, dont know what you guys pay but its $22 per meter.
So you dont want to start throwing it around.
My approach was 32 mm and 25mm electrical condute and a hot glue gun, condute $30.
I am glad I did because I did change my mind on a few things along the way.
I used the measuring table to get all the pick up points and I made them out of alloy sheet and glued them on as well.
It was well worth the days work as I resolved several issues before starting for real.
And yes guys it is a Subaru box, you remove the center diff and transfere gears out of the rear and bin them, you buy a splined sleeve and rear case that will loose about 200mm of the back.
link
Subarugears
The box cost me $250. You can buy diffs /gears/cv flanges ect ect.
The engine was $700.
I am going out off my way to be mean on this build.
Thats it, dosnt look much but it takes time.
Chassis weighed in at 56.2 kg.
jim
Attachments
Last edited:
Terry Oxandale
Skinny Man
Really enjoying your thread Jim!
Thanks guys.
Dave
The body I will gas weld on this car, it is easier to clean up after.
Lots of welding on utube look for Tinman.
You need good regulators, if they are old and worn out you will struggle to get the correct flame.
Buy blue lenses for your welding glasses.
Jim
Dave
The body I will gas weld on this car, it is easier to clean up after.
Lots of welding on utube look for Tinman.
You need good regulators, if they are old and worn out you will struggle to get the correct flame.
Buy blue lenses for your welding glasses.
Jim
Thanks Jimmy.
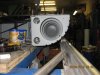
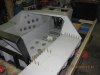
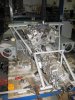
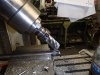
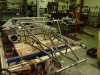
This is the rear frame in chrome moly tube.
The mounts that bolt to the chassis I machined out of 4130Cm solid bar,they have a 4mm thick floor and a 2mm wall, they are a cup.
This is all tacked up and ready to weld.
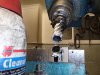
The machine tool is called an annular drill. it is a drill bit for magnetic drills for beam work.
They are cheap and work well.
The pic of the frame Is where I was at this week so I went in at 4am and got stuck in.
By 4 in the afternoon I had it ready to weld.
jim
This is the rear frame in chrome moly tube.
The mounts that bolt to the chassis I machined out of 4130Cm solid bar,they have a 4mm thick floor and a 2mm wall, they are a cup.
This is all tacked up and ready to weld.
The machine tool is called an annular drill. it is a drill bit for magnetic drills for beam work.
They are cheap and work well.
The pic of the frame Is where I was at this week so I went in at 4am and got stuck in.
By 4 in the afternoon I had it ready to weld.
jim
Attachments
Last edited:
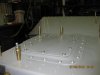
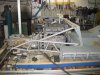
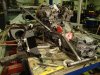
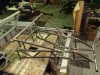
This was today's progress.
next stage is eng and suspension mounts.
Jim
next stage is eng and suspension mounts.
Jim
Attachments
Similar threads
- Replies
- 4
- Views
- 470
- Replies
- 8
- Views
- 1K
- Replies
- 17
- Views
- 2K