
You are using an out of date browser. It may not display this or other websites correctly.
You should upgrade or use an alternative browser.
You should upgrade or use an alternative browser.
Renato's GT40 MkI Coyote
- Thread starter nextstep
- Start date
-
- Tags
- ford coyote gt40 mk1
Renato
Lifetime Supporter
Suspension
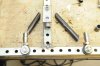
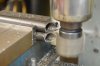
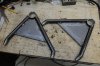
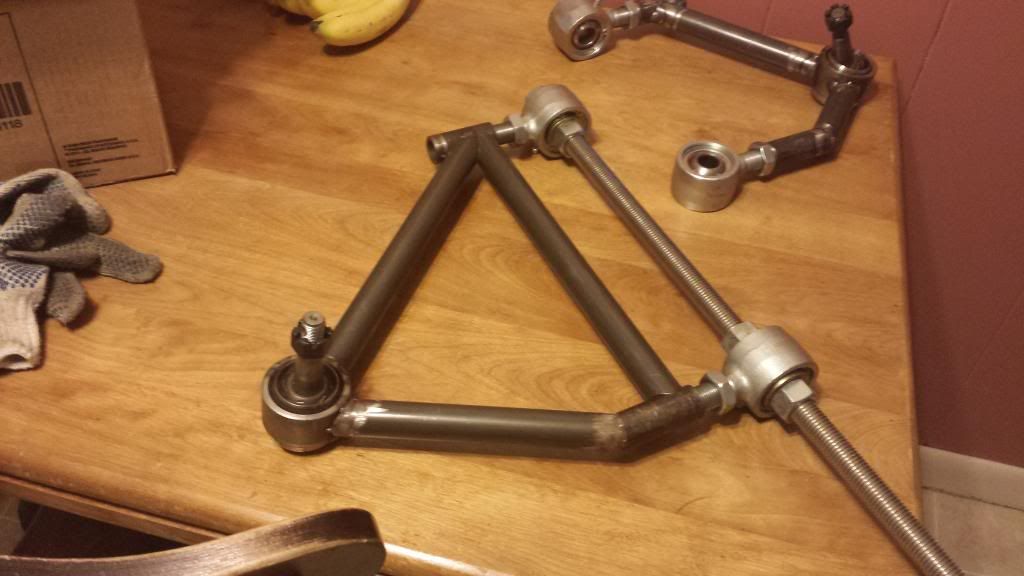
Fabricated components for front top wishbones. Similar setup as original but utilized rod ends in stead of poly bushings. Heim joints are 1/2 x 1/2-20 cromoly purchased from QS Components. Reasonable price and good quality. Tubing is 1" cromoly, 095 wall (2.5mm).
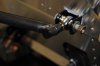
Had to enlarge holes from 7/16 to 1/2 on suspension mounting brackets and had a problem drilling a hole so close to the panel. Angle drill I have was too big. Came up with this contraption and it worked good. Regular 1/2 drill bit pressed in to a 3/8 drive socket and air ratchet.
Fitted the arm with cone spacers on both side. Thinking of changing to washers only if I need more adjustment.
Also stumbled across plastic caps that fit perfectly on the end of the threaded adapter to cover the hole.
Renato
Fabricated components for front top wishbones. Similar setup as original but utilized rod ends in stead of poly bushings. Heim joints are 1/2 x 1/2-20 cromoly purchased from QS Components. Reasonable price and good quality. Tubing is 1" cromoly, 095 wall (2.5mm).
Had to enlarge holes from 7/16 to 1/2 on suspension mounting brackets and had a problem drilling a hole so close to the panel. Angle drill I have was too big. Came up with this contraption and it worked good. Regular 1/2 drill bit pressed in to a 3/8 drive socket and air ratchet.
Fitted the arm with cone spacers on both side. Thinking of changing to washers only if I need more adjustment.
Also stumbled across plastic caps that fit perfectly on the end of the threaded adapter to cover the hole.
Renato
Attachments

Renato
Lifetime Supporter
Suspension
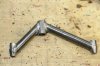
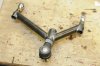
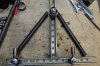
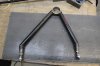
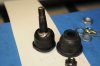
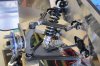
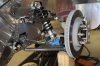
Been continuing work on front suspension parts. Fabricated lower wishbone. After a lot of head scratching found ball joint that I like and fits the upright, AFCO 20034. Had to cut about a 1/4" of thread because it was hitting the steering arm. Tubing is, like the top, cromoly 1" and plate is 1/4 thick 4130 cromoly.
Test fitted the wishbone but still didn't weld the shock mounting tab. Need to do a bit more calculation on suspension geometry.
Renato
Attachments
-
 Renato's GT40 222.jpg238.3 KB · Views: 724
 -
 Renato's GT40 224.jpg97.8 KB · Views: 683
 -
 Renato's GT40 226.jpg193.9 KB · Views: 636
 -
 Renato's GT40 230.jpg210.6 KB · Views: 711
 -
 Renato's GT40 234.jpg93.5 KB · Views: 635
 -
 Renato's GT40 232.jpg157.5 KB · Views: 1,211
 -
 Renato's GT40 241.jpg163.4 KB · Views: 819
Renato.. really nice work... just a comment on the bottom plate on the lower a-arm. you probably should put that on top of the tubes. otherwise the welds are going to be carrying all the reactive loads from the shocks.
what are you using for Uprights?
would still love to take a ride by.. maybe once my kids are done with soccer..
what are you using for Uprights?
would still love to take a ride by.. maybe once my kids are done with soccer..
Renato
Lifetime Supporter
Thanks Skip,
Yes, that crossed my mind. The reason I went with this configuration (after many) is that I can weld both sides of the plate to the tubes. If the plate is on the top it is harder to weld on the inside, probably it would have been strong enough either way.
My uprights are part of the kit. Front are aluminum and rear are fabricated. As you can see they are both adapted to fit common Mustang (2012) parts.
Stop by any time, just PM me...
Regards,
Renato
Engine
Here's how I did the reversal of the intake on the Coyote. The engine is from a 2012 Mustang and has the throttle body pointed to the front and in a mid-engine car that would be in to the cabin. I know it has been done so it is possible.
Here's a set of pictures showing how I did it. I used hi temp wire and soldered all connections. Double shrink tubing over that.
Not sure if I can reuse the cover or it will be in the way.
Renato
Part 1 pictures:
I saw another Coyote in a GT40 that had the cover pointing in reverse so it should work. I won't be using a cover as my intake (Cobra Jet) sits higher than stock.
Renato
Lifetime Supporter
Hi Dylan,
That is a good question. I don't know what the actual kingpin inclination is since I got the upright from the kit supplier, but it measures about 9-10 degrees. After suspension assembly I checked the angle on the ball joint under full droop and bump and is not binding but it is angled quite a bit. Good tip on tilting the cup, maybe on my next build :thumbsup:.
Regards,
Renato
Well, don't do it if you don't have to! It made my simple A-Arm weld fixture into a shimmed, clamped nightmare with lots of math. Also consider that if you replace the ball joints down the road, I saw those big chrysler ball joints with different lips, meaning that some had slightly less range of motion....so be sure to check bump/droop extremes after replacement too!
The design of that A-arm with what appears to be a butt-welded 45 is weak, IMO. If you must use welded A-arms, why not use the same kind of design as was used on the other side of the A-arm? It's stronger, and more importantly, easier to achieve a strong weld.
Also, I assume that since you are using CrMo, you know about the requirements for pre- and post-welding heat treatment?
If it were me, I'd get the arms X-rayed before I fit them to the car. Or better still, re-redesign the arm entirely to avoid the inherent design weakness.
Or maybe you could find a machine shop that could cut a set of well-designed billet arms?
Hi Will, I assume you are talking about the last pictures and not Renatos, since both of his are actually 45's. The arms are simply tacked together in that picture for geometry checks on the car. The tubes at the 45 intersection are actually beveled heavily before being welded. I didn't intersect both sides midway down the threaded pieces because I wanted a wider spread around the ball joint cup.
I'm aware of ChromeMoly req'ts, but for those that aren't, this is an important read:
TIG Welding Chrome-Moly Tubing
As the link in the information points out, when welding thinner tubing for A-arms, it isn't necessary to preheat and then heat treat post-weld, and it also means that the A-arms have a tendency to break and fail catastrophically when loaded, instead of bending.
Last edited:
Renato:
Looking good, if you look up Coleman Racing they have extra travel ball joints, and also you might be interested in a Mono bolt for the upper BJ..this will allow you to space up and down a bit to change roll center and virtual swingarm length. Just another option.
Home Page
Keep posting
Cheers
Phil
Looking good, if you look up Coleman Racing they have extra travel ball joints, and also you might be interested in a Mono bolt for the upper BJ..this will allow you to space up and down a bit to change roll center and virtual swingarm length. Just another option.
Home Page
Keep posting
Cheers
Phil
Renato
Lifetime Supporter
Hi Will, Dylan,
I am using 4130 Cromoly tubing, 1 inch diameter and 90 thou wall thickness. Been pretty much following Lincolns TIG welding procedure (Dylan's link) and using ER70S-2 filler rod. I'm no professional welder but I did a test weld and tried to brake it with a sledge hammer and it didn't budge. I know it is not very scientific, but it should do") .
.
Dylan, I like your heim joints on the suspension, what brand are they?
Phil, thanks for the link. I've purchased from them before and they have a nice assortment of products for a car builder.
Renato
I am using 4130 Cromoly tubing, 1 inch diameter and 90 thou wall thickness. Been pretty much following Lincolns TIG welding procedure (Dylan's link) and using ER70S-2 filler rod. I'm no professional welder but I did a test weld and tried to brake it with a sledge hammer and it didn't budge. I know it is not very scientific, but it should do
.Dylan, I like your heim joints on the suspension, what brand are they?
Phil, thanks for the link. I've purchased from them before and they have a nice assortment of products for a car builder.
Renato
They're Spohn Del-Spheres. They're not actually solid rod ends- they have a spherical bearing that rotates on a delrin bushing so they don't bind, and are rebuildable/greasable. People say they handle like solid rod ends but ride like poly. I wanted something that was going to last more than a few thousand street miles before turning my frontend into a clacking locomotive. They're much more bulky than a normal rod end, however!