Renato's GT40 MkI Coyote

Randy V

Moderator-Admin
Staff member
Admin
Lifetime Supporter
Randy,

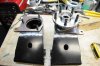
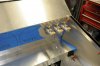
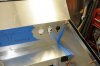
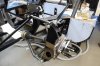
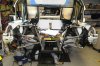
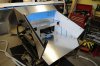
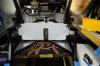
Nice work on the ducts. My first thought was to use mid NACA inlet for fresh air, but if I understood you correctly there is no room between body and chassis to make a water trap?
Your chassis is a bit different under the front clip but there is a good chance I can't make it work on mine either.

Regards,
Renato

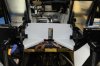
Hi Renato... Yes the rear of that center NACA duct is so close to the windshield, I don't know how I would accomplish putting a water trap in there.. Yours may be different but if your front clip was pulled from a mold off of an original as mine was supposed to be, then I think you'll have the same challenge..
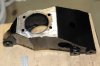
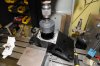
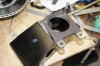
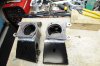
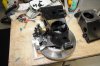
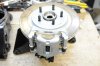
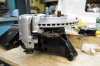
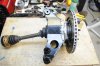
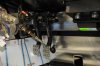
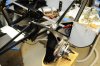
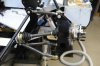
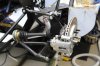
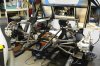
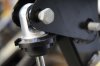
 

Renato

Lifetime Supporter
Hi Randy,

Thanks for the info. My front clip is off and can't really check the room under the middle NACA duct for now, but when the time comes it will save me some head scratching.

Renato
 

Renato

Lifetime Supporter
Chassis

Finished paneling the front area but didn't rivet yet. Still didn't make the decision on what to put inside the void. There has been a lot of great suggestions from everyone and just have to choose what works best for me.

Renato
 

Attachments

  • Renato's GT40 154.jpg
    Renato's GT40 154.jpg
    175.1 KB · Views: 743

Renato

Lifetime Supporter
Chassis

Paneling the engine bay.
Did the bottom of firewall and some of the sides.
A lot of head scratching trying to figure out the angles.

Renato
 

Attachments

  • Renato's GT40 158.jpg
    Renato's GT40 158.jpg
    152.1 KB · Views: 761
  • Renato's GT40 163.jpg
    Renato's GT40 163.jpg
    138.9 KB · Views: 727
Renato,
After looking at the last two post and the pics on this one , I had to ask,,,, how did you get that pattern on your paneling:shocked::laugh:

Bill
 
Apparently, I wasn't the only one who thought the last posts stomped on forum rule #1.

"In short, don’t berate, belittle, or ridicule your fellow forum member."

Renato, I for one, appreciated your innovative problem solving, and willingness to share and document your ideas with the rest of us.

Joe
 
Ian, you are correct. I'm sorry to say that it was me that mis-read what Bill said. I read his comment as, " how did you get that pattern for your paneling? Hence, my response above....Sorry.

Joe
 

Renato

Lifetime Supporter
Hi Everyone,

So, you guys don't like my carpet? :sad:

I was going to use it for the interior, but now...

Thank you all, for the support, humor and all... we have to introduce humor in to the build otherwise the welding fumes will make us mad... :laugh:


Sorry for lack of updates, I was out of the country for two months and now catching up with work and things around the house.
I did manage to put few things together and the updates will follow soon.

Renato
 

Renato

Lifetime Supporter
Suspension

The uprights were designed for Granada rear hubs (I think). Here in US they are really hard (impossible) to find. I found that Ford Aerostar (Yes, a minivan :stunned:) hubs have the Mustang bolt pattern are readily available for little money. Cut off mounting plate and fabricated new one from 1/2 stock. Cut the opening to fit bigger Aerostar hubs. Test fit after welding went well. Very tight fit. Only mod to hubs was to drill out mounting holes. Originally they were tapped and now they are 1/2 clearance holes. Fitted the rotor and rear mustang brake calipers. A bit tight fit for the parking brake cable but should be alright.


Renato
 

Attachments

  • Renato's GT40 167.jpg
    Renato's GT40 167.jpg
    104.8 KB · Views: 646
  • Renato's GT40 169.jpg
    Renato's GT40 169.jpg
    168.9 KB · Views: 565
  • Renato's GT40 170.jpg
    Renato's GT40 170.jpg
    136.8 KB · Views: 576
  • Renato's GT40 174.jpg
    Renato's GT40 174.jpg
    175 KB · Views: 687
  • Renato's GT40 178.jpg
    Renato's GT40 178.jpg
    158.7 KB · Views: 581
  • Renato's GT40 172.jpg
    Renato's GT40 172.jpg
    181.2 KB · Views: 563
  • Renato's GT40 179.jpg
    Renato's GT40 179.jpg
    126 KB · Views: 527
  • Renato's GT40 180.jpg
    Renato's GT40 180.jpg
    140.7 KB · Views: 570
  • Renato's GT40 182.jpg
    Renato's GT40 182.jpg
    168.1 KB · Views: 773

Renato

Lifetime Supporter
Brakes

A lot of head scratching about the brake pedals. The ones I got with the kit didn't look strong enough for the job. Purchased Wilwood pedal assembly with forward facing MC's. Finally I came up with the location and drilled through the bulkhead and temporary mounted the assembly. Installed MC's on the other side to check the fit.
Next is fabricating mounting bracket to the chassis. Right now for test fit, it's held by bulkhead only.

To boost or not to boost, the question is now!

Renato
 

Attachments

  • Renato's GT40 184.jpg
    Renato's GT40 184.jpg
    126.8 KB · Views: 560
  • Renato's GT40 185.jpg
    Renato's GT40 185.jpg
    102.1 KB · Views: 453
  • Renato's GT40 186.jpg
    Renato's GT40 186.jpg
    102.1 KB · Views: 455
  • Renato's GT40 187.jpg
    Renato's GT40 187.jpg
    110.1 KB · Views: 507

Renato

Lifetime Supporter
Suspension

Drew up rear suspension components and ready to fabricate.

You heard of saying: measure twice, cut ones?
I usually measure 400 times, CAD draw 100 times and cut ones... that is why it takes for ever. I guess the second one (GT40) will go together quicker...:laugh:

Maybe not...

Anyway, the components are cut and welded. Test fit both sides. Used correct hardware to make sure all is tight. I noticed that if I buy longer hardware and cut the threaded part the rod end fits better. In this case the rod end sits on unthreaded portion of the bolt. It's a pain to cut bolts but definitely worth it. Enlarged most hardware from 5/16 to 1/2 (overkill probably).
Have clearance issues on top mount for the shock. I'm thinking grinding off a 1/8 inch will correct the issue.

Next thing is to check that there is enough adjustment on rod ends to get suspension in check!

Test fitted the axles, looks like i might get lucky...

It's starting to look like a car! What a difference from endlessly paneling the chassis. Every part of the build is important and interesting but some do make you feel warm and fuzzy inside when you finish.


Renato
 

Attachments

  • Renato's GT40 188.jpg
    Renato's GT40 188.jpg
    72.3 KB · Views: 539
  • Renato's GT40 189.jpg
    Renato's GT40 189.jpg
    119.3 KB · Views: 504
  • Renato's GT40 190.jpg
    Renato's GT40 190.jpg
    152.6 KB · Views: 636
  • Renato's GT40 194.jpg
    Renato's GT40 194.jpg
    150.8 KB · Views: 556
  • Renato's GT40 195.jpg
    Renato's GT40 195.jpg
    140.8 KB · Views: 559
  • Renato's GT40 197.jpg
    Renato's GT40 197.jpg
    139.3 KB · Views: 605
  • Renato's GT40 198.jpg
    Renato's GT40 198.jpg
    134.8 KB · Views: 561
  • Renato's GT40 202.jpg
    Renato's GT40 202.jpg
    203.7 KB · Views: 666
  • Renato's GT40 205.jpg
    Renato's GT40 205.jpg
    210.7 KB · Views: 665
  • Renato's GT40 200.jpg
    Renato's GT40 200.jpg
    80.8 KB · Views: 536
Very nice Renato, I'm following your build with great interest. As you know I'm using Darrens chassis plans. I hope I can come up to your great standard of work. Richard
 

Renato

Lifetime Supporter
Hi Richard,

Thanks for the kind words.

I'm documenting all my fabrication work, mostly on CAD. If you need any drawings let me know.
Of course, if you are around NY area you're welcome to stop by and see the progress.

How is your build coming along?

Regards,
Renato
 
Renato,
Nice job on converting the up-rights and rear suspension. I had to buy my rears from DRB for my KVA so I could run stronger corvette parts. Keep posting, Scott
 
Hi Renato,

My build is not going very well I'm afraid. I got one of Darren's pre-cut chassis kits. It didn't go together as smoothly as I had hoped. The kit didn't come with all the pieces so I had to fabricate far more than I wanted to. Good thing I got his chassis plans to refer to. I'm at the paneling point... got one of his pre-cut panel kits. To speed things up and avoid a large shipping bill I arranged to have the panels cut locally. Unfortunately when Darren sent the CAD data he didn't tell them some of the parts needed copies (left side-right side). I paid for the full kit but now I'll have to pony up more $ to get the rest of the pieces or make them myself. You know how Darren is... several E-mails asking him to fix his screw up... no response. I started the paneling with what I have and just hope Darren mans-up before I need the missing pieces. With his lack of responding to E-mails, as our little group of GTFORTE customers knows, it' hard to see how he stays in business. Don't get me wrong...his products are good but the customer service sucks.

Other than that I'm having a great time building the car. It's been a long time since I put all these tools to use. I always check your build before I do anything to see how you have done it. You have many great ideas. Not only do you solve the problems you do it with elegance. I especially like the look of your suspension parts. Very well done, keep it up.

I'm over here just south of Seattle so no chance of popping in for a first hand look but when we are both finished perhaps a meeting at Darrin's in Texas would be possible. Richard
 
Last edited:

Renato

Lifetime Supporter
Hi Richard,

Unfortunately I understand your pain all too well. Very similar situation here also. I decided to go on my own rather than wait for answers. I cant deal with waiting weeks for an answer.

I'm very happy that my build is helping you in yours. Others on this forum helped me with ideas and that is what it's all about! Helping each other to a common goal - GT40.


Regards,
Renato
 
Back
Top