Renato's GT40 MkI Coyote

Renato

Lifetime Supporter
Engine

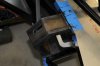
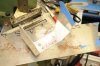
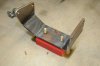
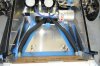
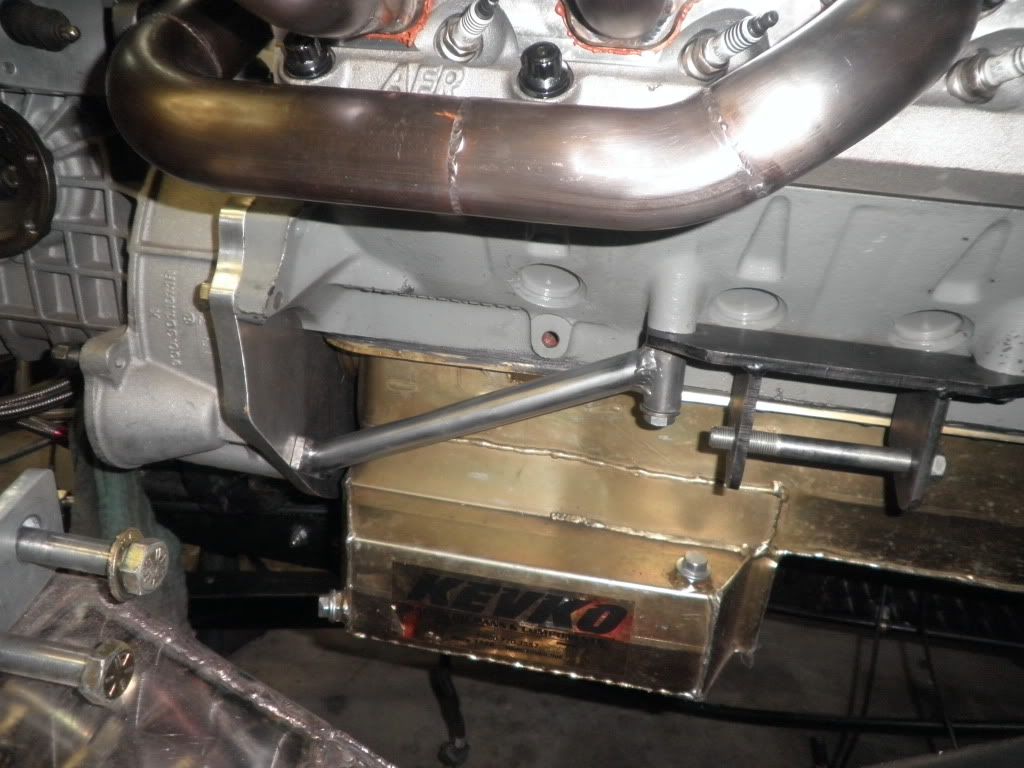
Did a test fit of the engine and made cardboard template for motor mounts. Since I didn't want to weld the mounts to the chassis decided to bolt them with thee bolts on top and three on bottom. Also I'll be putting plates on the other side of chassis tube. Material is 1/4 steel.
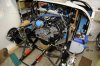
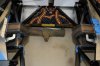
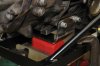
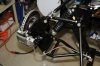
Engine fitted good, just needs to go forward about 1/4 inch. The bottom of the oil pan is flush with the car.
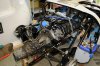
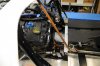
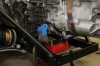
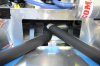
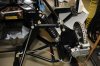
Mounted the adapter plate and transaxle to see how they fit. The shaft angle is not bad but I'm going to play with the engine/transaxle angle to get the shafts as level as possible.

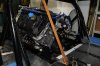
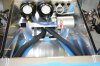
Big engine! Not a lot of room in the bay.

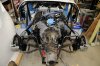
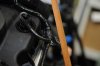
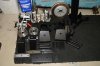
Next is transaxle mounts. It is going to need some serious cleaning...

Renato
 

Attachments

  • Renato's GT40 334.jpg
    Renato's GT40 334.jpg
    132.4 KB · Views: 574
  • Renato's GT40 336.jpg
    Renato's GT40 336.jpg
    94.2 KB · Views: 532
  • Renato's GT40 339.jpg
    Renato's GT40 339.jpg
    232.5 KB · Views: 1,047
  • Renato's GT40 342.jpg
    Renato's GT40 342.jpg
    220 KB · Views: 1,109
  • Renato's GT40 343.jpg
    Renato's GT40 343.jpg
    224.9 KB · Views: 809
Renato:
Nice progress...how is your up front spacing? Most of the problems I have encountered were up front with plumbing and belt(s), with a little bit of interference with the gearbox in the bottom rear, but not much. It would be interesting to see a photo from inside the cab...otherwise your exercise in packaging looks like it is going well.
Phil
 

NickD

Supporter
Suspension

Drew up rear suspension components and ready to fabricate.

You heard of saying: measure twice, cut ones?
I usually measure 400 times, CAD draw 100 times and cut ones... that is why it takes for ever. I guess the second one (GT40) will go together quicker...:laugh:

Maybe not...

Anyway, the components are cut and welded. Test fit both sides. Used correct hardware to make sure all is tight. I noticed that if I buy longer hardware and cut the threaded part the rod end fits better. In this case the rod end sits on unthreaded portion of the bolt. It's a pain to cut bolts but definitely worth it. Enlarged most hardware from 5/16 to 1/2 (overkill probably).
Have clearance issues on top mount for the shock. I'm thinking grinding off a 1/8 inch will correct the issue.

Next thing is to check that there is enough adjustment on rod ends to get suspension in check!

Test fitted the axles, looks like i might get lucky...

It's starting to look like a car! What a difference from endlessly paneling the chassis. Every part of the build is important and interesting but some do make you feel warm and fuzzy inside when you finish.


Renato

Renato,

Just looking at your rear suspension. I'm at a similar stage where I'm about to assemble. The Clevis Joint you have that attach the trailing links to the Top of the upright. They seem to be angled at about 10 degrees. can I ask where you got them ?, do you have a link to them ?

Thanks.


Nick.
 

Renato

Lifetime Supporter
Hi Nick,

I got them from Fran (RCR). Good quality and they fit perfectly.

Regards,
Renato
 
Hi Nick,

I got them from Fran (RCR). Good quality and they fit perfectly.

Regards,
Renato

I have the same ones. Very high quality part.

For our cars I think we need the bolt size different than what Fran typically supplies though. Seems to me two were 1/2" and two were maybe 7/16. I think we need both in 1/2" but I might not be remembering that correctly. Check your sizes before ordering.
 

Renato

Lifetime Supporter
Good point Darrin, I forgot to mention that I bored all holes to 1/2 inch. For me it worked out better that way because all my heim joints are 1/2 inch. Not sure if Fran sells ones with 7/16 thread.

Renato
 
Good point Darrin, I forgot to mention that I bored all holes to 1/2 inch. For me it worked out better that way because all my heim joints are 1/2 inch. Not sure if Fran sells ones with 7/16 thread.

Renato

I recall doing that too now that you mention it. That's why I was remembering it as 1/2"

I think Frans' come standard with one set as 7/16 and one set as 1/2. I had to exchange a set.
 

Renato

Lifetime Supporter
Renato:
Nice progress...how is your up front spacing? Most of the problems I have encountered were up front with plumbing and belt(s), with a little bit of interference with the gearbox in the bottom rear, but not much. It would be interesting to see a photo from inside the cab...otherwise your exercise in packaging looks like it is going well.
Phil

Hi Phil,

I've been fiddling with the engine for a few days now trying to get it as forward as possible. I just decided to redo the piping on the engine to get another 1/2 inch forward. The original setup uses plastic quick connects from thermostat housing to the block and to the radiator. With that removed I think I'll be OK with the engine position and half shafts will be almost perpendicular to the transaxle (looking from the top). The closest part of the engine to the firewall will be the starboard valve cover, about 1/2 inch.

Regards,
Renato
 

Attachments

  • Renato's GT40 376.jpg
    Renato's GT40 376.jpg
    158 KB · Views: 565
  • Renato's GT40 375.jpg
    Renato's GT40 375.jpg
    109.9 KB · Views: 449
  • Renato's GT40 370.jpg
    Renato's GT40 370.jpg
    179.8 KB · Views: 526
Last edited:

Renato

Lifetime Supporter
Transaxle

Decided to go with a single transaxle mount. Made a test mount from aluminum and then fabricated the part from 1/4 steel. The rubber mount is standard Mustang part. The whole assembly is mounted to the frame from underneath.

Renato
 

Attachments

  • Renato's GT40 357.jpg
    Renato's GT40 357.jpg
    136.6 KB · Views: 557
  • Renato's GT40 358.jpg
    Renato's GT40 358.jpg
    163.2 KB · Views: 445
  • Renato's GT40 363.jpg
    Renato's GT40 363.jpg
    140.7 KB · Views: 427
  • Renato's GT40 362.jpg
    Renato's GT40 362.jpg
    114 KB · Views: 484

Renato

Lifetime Supporter
No particular reason. Started building two separate mounts (left and right) and didn't like it. Looked at few factory solutions and then came up with this one.
At one point I did notice the bottom tapped holes but continued this route. It would probably be easier to do it with bottom holes unless they are not meant to support the transaxle. Not sure of that.

Renato
 

Renato

Lifetime Supporter
Cooling

Covered the SS cooling pipes with foam rubber insulation (McMaster 4463K127) and did a test fit to see how the hoses will fit. The pipes with insulation fit snugly inside the center tunnel.
Renato
 

Attachments

  • Renato's GT40 385.jpg
    Renato's GT40 385.jpg
    169.8 KB · Views: 572
  • Renato's GT40 386.jpg
    Renato's GT40 386.jpg
    150.8 KB · Views: 535
  • Renato's GT40 387.jpg
    Renato's GT40 387.jpg
    117.5 KB · Views: 464

Renato

Lifetime Supporter
Suspension

Took all suspension parts off and send them off to powder coating. Waited till I got all parts fabricated to do it in one shot. They came out nice. It's great to see them in color finally. Reassembled all suspension parts for the final time...

Renato
 

Attachments

  • Renato's GT40 389.jpg
    Renato's GT40 389.jpg
    152.4 KB · Views: 403
  • Renato's GT40 392.jpg
    Renato's GT40 392.jpg
    188 KB · Views: 439
  • Renato's GT40 397.jpg
    Renato's GT40 397.jpg
    155.1 KB · Views: 516
  • Renato's GT40 398.jpg
    Renato's GT40 398.jpg
    143.4 KB · Views: 475
Suspension

Took all suspension parts off and send them off to powder coating. Waited till I got all parts fabricated to do it in one shot. They came out nice. It's great to see them in color finally. Reassembled all suspension parts for the final time...

Renato

Hi Renato, great job on everything so far, I was wondering who you use for powder coat, I want to do some of the parts on my CAV GT 40 and a vintage go kart I am restoring, I live out in Miller Place, near Port Jefferson, thanks.
 

Renato

Lifetime Supporter
Hi Neville,

I used Applause Powder Coating in Brentwood. That is not far from Miller Place, 1-631-231-5223. They did a good job and are reasonably priced. I also used Action in Farmingdale. Did a good job also.

Renato
 
Renato,
Been following your build for some time. A friend of mine is following your theme with the Coyote. that is why your build interest me. I noticed two things that I think you might/should consider. On the post where you showed how close your valve cover is to the proposed firewall. I think you may have made a slight mistake. Feel free to correct me if I m astray here. Your stick that you used goes from the frame member to the top of the roll bar. I notice that there are two vertical bars that slant from that same position up to about the mid part of the roll bar. Aren't those vertical pieces where the sheet metal will attach as it goes up to the roll bar, and then follow the roll bar the rest of the way up to the roof line?? If so the angle of your stick is too shallow. If you place a stick across(sideways) those uprights and slide it upward, I think you will be closer to that piece of sheeting(with your motor) than your vertical stick demonstrates. Might even be touching it. May be just the angle in the pic.
The other thing I wanted to mention is that your engine like so many others will have the transmission hanging down below the bottom of the block. Your adapter will most likely be aluminum, yes?? Your engine will be making a lot of torque as my bored/stoked 351W does. I was told by someone that there is a the possibility of flexing between the engine and the trans with no real support of the drive train in that area(mid motor), thus causing the internal components some stress. This may not be true as I am sure some with more knowledge than I will set me straight if this is a myth or fact. At any rate, I have added supports to the bottom of the trans on my car to keep it from happening(if in fact it does). My engine and trans(930) are solid mount, so this may be a moot point, but here is my solution. I have them on both sides

Bill

P9300315.jpg
 

Renato

Lifetime Supporter
Hi Bill,

Great observation! You are correct, my original firewall had a bend in it and that is what you are seeing on the upright tubes. I'm trying to gain every inch possible because of Coyote size, it's very big on the top. Decided to go with strait fire wall, from the top of roll bar to the tub. I got the idea from another builder with Coyote engine in a Tornado chassis. My cross member (harness attachment point) was hitting the engine head so I'm putting a new one lower and forward to get the strait line. In order to clear the cross tube I could have used a shallow oil pan and tilted the engine. That creates other problems with transaxle. The engine needs to go low but the transaxle, because of output shafts, needs to go as high as possible. So this was my solution. Darrin, who is facing same issues, is going the other way, shallow oil pan and thinner adapter. Hope it works for both of us. I tried to do as much calculations and planning but there is always surprises. It' a very tight fit. The fire wall is next on my list so we'll see...

Didn't consider supporting the transaxle but it makes sense. Saw few builders doing similar brace like you. No sure what to do about that. As with you, this is beyond my knowledge.

Regards,
Renato
 
Be careful about moving your harness attachment around. They have to be pretty much parrallel with the shoulder harness opening in the seat. I think you can drop it no more than about 20 degrees. Take a look at the Schroth installation information. Best I have seen and I did mine in accordance with this.
http://www.schrothracing.com/docs/Competition_Instructions.pdf,
I don't use my Hans on the street but it is good practice to set belts up that way. I have a 6 point cage in mine so I was very careful to eliminate movement in a shunt that would put my head in contact with the padding on the cage. Even that can do some harm. In this arena, we are in that situation of "you pay your money and you take your choice". Remember that all of your decisions for safety have unintended consequences. Try to eliminate all the bad ones you can. No I don't ride around with a helmet on. For that I have/need a Hans device hooked up. Ever seen a video of a Rally car crash from inside the car?? Plenty of them on UTube.

Bill
 
I just wrote the people I plan to use to make the half shafts for me to ask them about the angle. If I drop the engine/transaxle (which I would really like to do) an inch it will add a couple of degrees to the shaft as it is currently below center line anyway. From what I have calculated, it should still be good at full bump but double checking with them.

Never dreamed the change Renato did could cause a problem with the harness but it's good to check. It shouldn't have altered the angle much.

I'm going with a Schroth four point as they make the only street legal ones I can find.
 
Back
Top