Scotland Tornado

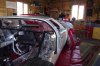
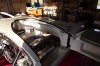
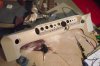
Rear clip prep work completed and underside painted. Also fitted the replica fuel caps along with aero type lockable caps and cap tethers for the IVA. Had to modify the funnel to accomodate a vent connection; my aluminium welding does the job, but fortunately nobody will see it!!
Ian
 

Attachments

  • DSCF0053[1].jpg
    DSCF0053[1].jpg
    28 KB · Views: 1,041
  • DSCF0054[1].jpg
    DSCF0054[1].jpg
    29.6 KB · Views: 1,095
  • DSCF0055[1].jpg
    DSCF0055[1].jpg
    27.8 KB · Views: 1,011
  • DSCF0059[1].jpg
    DSCF0059[1].jpg
    40.5 KB · Views: 1,198
  • DSCF0058[1].jpg
    DSCF0058[1].jpg
    27.6 KB · Views: 1,023
Not much to report..painted the inside of the roof spider and fitted a rubber seal along the inside gap between the roof and the panelling.
 

Attachments

  • DSCF0060[1].jpg
    DSCF0060[1].jpg
    53.7 KB · Views: 1,337
Continued to work on the rear clip, its almost ready for painting the carburettor apron, just a bit more sanding/filling on the air scoops. Seemed to spend hours on body prep, at least the weather this weekend was superb! Finally fitted the VIN plate now after it sitting in my garage for some months. Also prepared and trial fitted the dash. Now that the dash is in, I can start on the a/c next and locate the wiper motor. I can also start fitting the dash instruments.....now that I am looking forward to.
Ian
 

Attachments

  • DSCF0108.jpg
    DSCF0108.jpg
    200.3 KB · Views: 1,095
  • DSCF0115.jpg
    DSCF0115.jpg
    275.7 KB · Views: 1,060
  • DSCF0118.jpg
    DSCF0118.jpg
    272.5 KB · Views: 977
  • DSCF0121.jpg
    DSCF0121.jpg
    131.2 KB · Views: 1,033
  • DSCF0122.jpg
    DSCF0122.jpg
    170.9 KB · Views: 1,063
Worked on the dash this weekend, managed to get most of the gauges and switches finished. Will need to take them back out again to sand and finish the dash ready for flocking. I also had to group all the toggle switches together for the IVA test. Next weekend, I'll make a start on the A/C system.

No real conclusion yet as to which way I'll go with the engine options.

Ian
 

Attachments

  • DSCF0124.jpg
    DSCF0124.jpg
    149.5 KB · Views: 925
  • DSCF0126.jpg
    DSCF0126.jpg
    151.1 KB · Views: 810
  • DSCF0127.jpg
    DSCF0127.jpg
    144.9 KB · Views: 960
  • DSCF0129.jpg
    DSCF0129.jpg
    144.3 KB · Views: 1,046
Fitted the main components of the a/c system this weekend and located the switches on the dash, just need to run the piping. Also fited the windscreen wiper motor and cabling.
 

Attachments

  • DSCF0137[1].jpg
    DSCF0137[1].jpg
    187.7 KB · Views: 967
  • DSCF0141[1].jpg
    DSCF0141[1].jpg
    148.9 KB · Views: 951
  • DSCF0140[1].jpg
    DSCF0140[1].jpg
    121 KB · Views: 890
  • DSCF0148[1].jpg
    DSCF0148[1].jpg
    127.2 KB · Views: 884
  • DSCF0138[1].jpg
    DSCF0138[1].jpg
    218.6 KB · Views: 916
Panelled in the fuel tank downpipes from the cabin. I will also fit another panel on the drivers side to hide all the pipes for the heating and A/C system which I will run down and bekow the gear cover.
 

Attachments

  • DSCF0149[1].jpg
    DSCF0149[1].jpg
    133 KB · Views: 868
  • DSCF0151[1].jpg
    DSCF0151[1].jpg
    93.7 KB · Views: 792
  • DSCF0152[1].jpg
    DSCF0152[1].jpg
    99.8 KB · Views: 763
All the A/C hoses now run, just need to have the ends crimped and locate a few ties for it. Fitted a cover for the A/C hoses. Also fitted the car horn, located the windscreen wash injector and ran the hose for it.
 

Attachments

  • DSCF0157[1].jpg
    DSCF0157[1].jpg
    240.7 KB · Views: 882
  • DSCF0158[1].jpg
    DSCF0158[1].jpg
    202.2 KB · Views: 815
  • DSCF0159[1].jpg
    DSCF0159[1].jpg
    191.4 KB · Views: 849
  • DSCF0160[1].jpg
    DSCF0160[1].jpg
    198 KB · Views: 844
  • DSCF0161[1].jpg
    DSCF0161[1].jpg
    102.6 KB · Views: 842
Installed the gear arms and fixed the A/C hoses under the gear arm. Its a bit busy below the gear arm now so I'll have to run the heater hoses down the central tunnelalong with the wiring loom.
 

Attachments

  • DSCF0170[1].jpg
    DSCF0170[1].jpg
    152.9 KB · Views: 893
  • DSCF0171[1].jpg
    DSCF0171[1].jpg
    124.5 KB · Views: 817
  • DSCF0168[1].jpg
    DSCF0168[1].jpg
    172.5 KB · Views: 840
Hi Ian,
don't forget that you only need to have one heater hose to the engine. The return hose can be tapped into the main coolant return pipe to the engine at the front of the car, giving you more space in the central tunnel for the electrical harness etc.

Regards,
Andy
 
Andy, good suggestion; trouble is I have already run the cooling pipes and I'd have to cut and solder a tie-in for the return. I think I can get the two hoses and the loom down the central tunnel but if not, I'll keep your suggestion up my sleeve.
Thanks
Ian
 
Hi Ian,
don't forget that you only need to have one heater hose to the engine. The return hose can be tapped into the main coolant return pipe to the engine at the front of the car, giving you more space in the central tunnel for the electrical harness etc.

Regards,
Andy

Firstly Ian apologies for thread drift slightly

Secondly - Andy, why can't you take the feed and retuen further down the tubes? Why does one have to be at the engine?
 
Hi Brett, Ian,

Sorry I didn’t explain my self very well for this reasoning.

The heater feed pipe needs to before the thermostat for it to function correctly i.e. hot water is fed to the heater matrix before the thermostat opens. I’m assuming that Ian’s engine will use a conventional thermostat & water pump as Ford designed it.

On my engine / set-up I have an electric water pump & bypass thermostat mounted at the front of the car and as a consequence I have my heater feed & return in the pipes between the thermostat & the pump (in the front bulkhead above the steering rack)

Regards,
Andy
 
Made up and fitted a couple of 2" tubes to connect the a/c ducts to the dash and painted the inside. Also cut, prepared, painted and fitted the door end closure panels.
 

Attachments

  • DSCF0186[1].jpg
    DSCF0186[1].jpg
    160.4 KB · Views: 794
  • DSCF0187[1].jpg
    DSCF0187[1].jpg
    82.7 KB · Views: 777
  • DSCF0189[1].jpg
    DSCF0189[1].jpg
    101.9 KB · Views: 818
  • DSCF0190[1].jpg
    DSCF0190[1].jpg
    105.6 KB · Views: 881
.......forgot to mention that I also made up a couple of door panels out of marine ply. Used a couple of angle brackets with 4 rivnuts to bolt the wood panel to the bracket. These will be covered with a foam layer, then black leather.
 

Attachments

  • DSCF0193[1].jpg
    DSCF0193[1].jpg
    133 KB · Views: 815
  • DSCF0191[1].jpg
    DSCF0191[1].jpg
    119.4 KB · Views: 884
  • DSCF0192[1].jpg
    DSCF0192[1].jpg
    143.8 KB · Views: 823
Back
Top