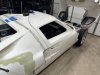
Sean, I don't think you can go wrong with a FFR Roadster kit. Starting in 2014, I built mine in 15 mo. after taking the 3 day build school which was conveniently located near where I live. Plenty of power with only a 306ci/340hp sbf, T5 trans & 3.55 axle. I didn't build it as a show car or to track it, but we still get lots of compliments on it. My wife actually loves to drive it and probably does so harder than I do. Just a little tip if you do decide on one: Buy a bunch of 1/8" drill bits and make sure you have an air powered rivet gun....... Rod