
- Forums
- GT40 Replica Manufacturers' Corner
- RCR Forum - RCR40/SLC/917/Superlite Aero
- The SLC Clubhouse
You are using an out of date browser. It may not display this or other websites correctly.
You should upgrade or use an alternative browser.
You should upgrade or use an alternative browser.
SLC 001 Build
- Thread starter Mesa
- Start date
Dave Lindemann
Lifetime Supporter
Rob -
I agree with Jack - everything looks great! Where are you going to run the 4th hose under the dash - to the floor? I hope you don't mind but I'll be copying your under dash vent technique. I'm looking forward to seeing more of what you have planned regarding the twin radiators. A trunk....what a novel idea!
Dave L
Yes Dave,
It will blow air into the footbox. I am really happy with how things are going, everything fits great, the ducting all fit perfect, the interface with the evaporator - just like a glove...almost like I knew what I was doing <chuckle>. Next step is to mnt the condensers and brake fluid res to clear. Then pin mount the front and make the 'hood' open as a separate piece.....although that may have to wait. Maybe the radiators before that.
It will blow air into the footbox. I am really happy with how things are going, everything fits great, the ducting all fit perfect, the interface with the evaporator - just like a glove...almost like I knew what I was doing <chuckle>. Next step is to mnt the condensers and brake fluid res to clear. Then pin mount the front and make the 'hood' open as a separate piece.....although that may have to wait. Maybe the radiators before that.
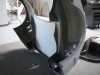
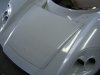
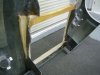
Nothing really interesting but some shots of recent doings. I finally got brave enough to start making the hood jamb. Drilling holes around the hood outline to make a visual reference for the inside was a little uh, scary. No turning back now. Did not think I'd get any time for car stuff today, I guess posting a few pics is car stuff.
Attachments
Looking good, Rob! Cutting up the front clam takes more than a little courage. :stunned:
Keep up the good work!
Keep up the good work!
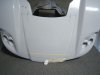
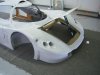
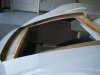
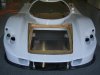
Well, I cleared the biggest layout-engineering hurdle (for me) in my build, and the most important one. If I didn't pull this off I would have had a bit of egg on my sorry face, all the repositioning of the cooling and AC systems will now make sense as there is a opening hood panel ") ... and soon to be .... a trunk insert to go along with it.
... and soon to be .... a trunk insert to go along with it.
It will get a few layers of glass from the top side to smooth in the original underbody reinforcements that now show through. There is filling and blending of the jamb corners and of course trimming and alignment of the gaps.
The plan is to use external hinges on the hood as hidden ones are a battle I chose not to fight (many more of those ahead). Anybody have suggestions on hinges?
Thanks
... and soon to be .... a trunk insert to go along with it.It will get a few layers of glass from the top side to smooth in the original underbody reinforcements that now show through. There is filling and blending of the jamb corners and of course trimming and alignment of the gaps.
The plan is to use external hinges on the hood as hidden ones are a battle I chose not to fight (many more of those ahead). Anybody have suggestions on hinges?
Thanks
Attachments
The plan is to use external hinges on the hood as hidden ones are a battle I chose not to fight (many more of those ahead). Anybody have suggestions on hinges?
Thanks
Hi Rob,
Don't know if these are any good, they are a bit pricey and come from a company in the UK called Ratsport.
http://shop1.actinicexpress.co.uk/shops/Rat_Sport/index.php?cat=Kit_Cars
The plan is to use external hinges on the hood as hidden ones are a battle I chose not to fight (many more of those ahead). Anybody have suggestions on hinges?
Thanks
I would strongly suggest fighting that battle, especially after all that hard work to make the access panel...aesthetics are a very important part of any car build...would hate to see lipstick on a pig
")
Jim Craik
Lifetime Supporter
Rob,
Your build looks great.
The build quality looks fantastic!
I love all the large under dash vent lines, I know it would be great to have that sort of venting on the 40.
Great work, I love the storage, the mod looks like it was designed from the begining, very nice.
Your build looks great.
The build quality looks fantastic!
I love all the large under dash vent lines, I know it would be great to have that sort of venting on the 40.
Great work, I love the storage, the mod looks like it was designed from the begining, very nice.
Nick - Thanks for the suggestion
Wyoming - Thanks for joining others questioning me over the exposed hinge thought :knife:
Jim - Thanks for the comments, nice to see you Saturday
I have caved in to peer pressure and knuckled down to design suitable HIDDEN hinges!
OK?
There is very little space under the front body and above the footbox in which to put hinges, but I think I've got a good solution and will be working on it over the weekend.
In other happenings - The redesign of the front radiator opening has been completed so that air is now directed to the sides under the headlight assemblies and blocks the air that was aimed at the 'trunk' area. Think Ferrari 360/420 type of airflow.
No pics this time as I've misplaced my camera charger .... maybe in Detroit
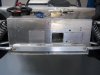
Here are some of the items covered so far in my adventure.
A) Capped the open ends of the upper frame member that makes up the dash crossbar....
Rob, how are you fastening the body to that upper cross member now that the backside of the two holes on each side are inaccessible?
Going all the way through, different location, access holes somewhere etc?
Doh! I realized after my post when I went back downstairs that thee body is in the way.Dave,
The crossbar is threaded as delivered and the bottom of the fasteners are inaccessible with the body in place. Capped or not, you can't get to the bottom side of the fasteners. Maybe a nutsert would be of some use to you here, if concerned.
I still don't like just the 1/8" deep aluminum threading into the crossbar to secure the body. I think I'll tack a solid block of aluminum in there and drill and tap as necessary. A nutsert is also good idea and is probably more practical.
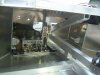
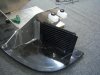
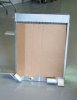
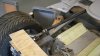
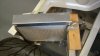
The radiators arrived from Superior Radiator in Detroit. Chuck and his men did a great job for a reasonable price, made them quickly and to spec. I couldnt wait to stuff them in the car so out came the die grinder right off the bat! The rads could not have been a mm wider or I would have been in some real trouble. I started the ducting work and it looks really uhh, cool ...... but I will wait till it's a bit further than the cardboard mock-up stage to post up on that. Something tells me I'll need a fender liner between the tire and the back of the rad <chuckle> BTW: The blocks of wood are there to test placement options.
Attachments
Similar threads
- Replies
- 14
- Views
- 2K
- Replies
- 26
- Views
- 7K
- Replies
- 5
- Views
- 785