Southern GT #48

Ed McClements

Supporter
Eddy;

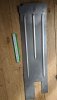
There is a way to avoid the loose bolt clearance problem. If you use a close-tolerance bolt in a hole reamed to size it will give far better results. Never use a fully-threaded fastener in this application; you do not want a load bearing on the threads. Here is an example of a suitable bolt (attached photo). It is a 1/4-28 close-tolerance bolt with a shank size of 0.249" +/- 0.0005". You specify a "grip length" that allows the non-threaded shank to fit through the diameter of the joint and perhaps one washer thickness. In a hole reamed to 0.2500", your loose fastener problem is solved.

Absolutely agree, Neil. I have a few confessions to make...you know...between friends. I am in the UK, and these days it's much simpler to work with the metric system, purely based on the easier availability of tooling and fasteners in metric. Plus my lathe has a metric leadscrew (it originated from a school in the 1970s, when there was a push to teach students in metric). Which is a shame, as the aircraft industry where these good quality fasteners originate uses imperial sizing, so I can't readily use them. Also....I don't possess any reamers! So my drills, even my "good" set reserved for the best work, drill oversized holes - my 8mm drill gives me a hole of about 8.08mm. I then make my own screws and clevis pins which are sized to fit these holes. At least I can make my fasteners with the correct shank and thread length for each application.
Maybe I should have bought an even older lathe, and worked entirely with UNC/UNF fasteners!
Eddy, I feel completely the same as you where my old Kva has already a mix of metric unc/unf, and here in France finding those bolts nuts...is sometimes driving me NUTS!
Paul
 

Neil

Supporter
Eddy, I have the opposite problem- although I am in the US, I sometimes am forced to use metric fasteners in a few applications. My transaxle is a Porsche G50 so those mounting bolts are metric as well as the CV joints. I used Porsche 996 rear uprights but I reamed the metric holes to the nearest larger SAE size and used NAS bolts. I prefer aerospace fasteners and use them whenever I can.
 

Ed McClements

Supporter
I have rolled some beads into the sill top panels, but there's some distortion as some of the metal is pulled into the beads...apparently the top tip is to pre-stretch the areas which are going to be beaded using an English wheel which provides some extra material to draw into the beads.

Now...if you don't have an English Wheel, and have already rolled the beads, how do you remedy the "oil-canning" around the end of the beads?
 

Attachments

  • IMG_20201007_150743.jpg
    IMG_20201007_150743.jpg
    244.6 KB · Views: 318

Ed McClements

Supporter
I have also discovered the reason for the poor surface finish on all of my gearshift machined parts - tool chatter. Now, this is a little 1980s Hobbymat / Prazimat milling machine, and there's not a huge amount of mass or rigidity to start with, but clearly something else was amiss....so I've pulled it apart. Pics will follow, but the main issue was that all the spindle bearings (some marked with "FDDR" as they were made in East Germany, from where this machine originated) were shot. Further evidence of the machine's history and origin were the nicely-made internal electrical components, marked "Made in Yugoslavia". There are four spindle bearings - two normal ball races and two opposed angular contact ball races with a fine-threaded adjuster to set preload / running clearance. I've ordered replacements and am looking forward to getting this nice little machine singing along, spitting out chips.
 

Markus

SPRF40
Lifetime Supporter
I have rolled some beads into the sill top panels, but there's some distortion as some of the metal is pulled into the beads...apparently the top tip is to pre-stretch the areas which are going to be beaded using an English wheel which provides some extra material to draw into the beads.

Now...if you don't have an English Wheel, and have already rolled the beads, how do you remedy the "oil-canning" around the end of the beads?
Eddy,
Search in YouTube e.g.
 

Ed McClements

Supporter
Your going to struggle without a shrinker /stretcher eddy

I think you're right, Mark. Going to give it my best shot with the tools & techniques I have. There's always the option of flat sills, I guess?


Thanks Markus - I think it was Lazze's Metal Shaping (or something like that) which put me onto the tip about wheeling the part before rolling the bead. But I have no English Wheel and I don't fancy building one just for the sills. Maybe rolling a shallower bead won't pull as much metal. Some more practice, I think.

Eddy
 

Shaun

Supporter
Not quite the same as a rolled section but I know Mick at SGT has some of these raised rib profiles you fix on? Going to get some for mine
 

Ed McClements

Supporter
Eddy
Are you using steel metal ?
Isn't feasable to use aluminium ?

Hi Michel - yes, it's currently 1.2mm aluminium sheet, supplied with the pre-cut panels from SGT. But, because I'm awkward, I want to roll beads into the sill top for stiffness and (to be honest) appearance. So, I used one of those cheap bead-rollers to put 1" beads into the pre-cut SGT panel....that's the photo in post #205 above. It might sit flat enough with closely-spaced rivets onto the SGT tubework.
 
Ok I understand ; but am surprised you got deformation ?
may be the alminium sheet was hard enought to get those ; in this case one safe solution will be ( before to do beads ) is to "anneal the sheet ?
Process is ;
sand with handsoap block ( savon de Marseille !!is the best) all surface where beads goes then gently with a flame make thematerial to warm until the
soap become black , as soon as the surface is" blackened" drop the all sheet onto fresh water
The sheet is ready for any forming for about 1/2 hours ; the metal will retrieve his strenght property after a day !!!
Only issue you will have to clean ( say polish the surface )to get an aceptable look

We used frequently this process when doing aluminium monocoque and using the hard Au4G 7075 sheet in place of the soft AG3 5086 to do aluminium monocoques very very rigid with nocarcks or even deformations on square bending

Hope this helps ;)
 

Davidmgbv8

Supporter
Before rolling the beads. Soften the metal by taking a sharpie, put a line where you want to soften, heat with a touch evenly across until the sharpie disappears. Let air cool, then roll the bead.
 

Ed McClements

Supporter
I have also discovered the reason for the poor surface finish on all of my gearshift machined parts - tool chatter. Now, this is a little 1980s Hobbymat / Prazimat milling machine, and there's not a huge amount of mass or rigidity to start with, but clearly something else was amiss....so I've pulled it apart. Pics will follow, but the main issue was that all the spindle bearings (some marked with "FDDR" as they were made in East Germany, from where this machine originated) were shot. Further evidence of the machine's history and origin were the nicely-made internal electrical components, marked "Made in Yugoslavia". There are four spindle bearings - two normal ball races and two opposed angular contact ball races with a fine-threaded adjuster to set preload / running clearance. I've ordered replacements and am looking forward to getting this nice little machine singing along, spitting out chips.

OK - so I pulled it all apart:-

50447498506_34a73ab79e_k.jpg


50446804948_ef6bd2a034_k.jpg


50447497061_8571fa395b_k.jpg


50447678952_22f6ff2d08_k.jpg


50446803948_4819d18928_k.jpg


50446803943_50606953d6_k.jpg


The new bearings are now installed in the spindle (2 x angular contact ball races, opposed & preloaded and 3 x ball races). The other issue with this mill is the tiny MT1 taper in the spindle nose, but there's an option of a bolt-on cutter holder which attaches to the (slightly) more rigid flange. I may have to resign myself to tiny endmills and very slow progress.
 

JimmyMac

Lifetime Supporter
Eddy
A great little hobby mill there. A bit noisier than the usual belt driven spindle machine because of the geared head which I like.
I have owned one for years and still use it for light repeat drilling work. My milling is done on a Tom Senior these days but I can't part with the Hobbymat.
The bolt-on accessory chuck is a good idea and will make your machine more versatile. It's good quality hardened steel like a Clarkson chuck.

fullsizeoutput_f2e.jpeg
 

Ed McClements

Supporter
Eddy
A great little hobby mill there. A bit noisier than the usual belt driven spindle machine because of the geared head which I like.
I have owned one for years and still use it for light repeat drilling work. My milling is done on a Tom Senior these days but I can't part with the Hobbymat.
The bolt-on accessory chuck is a good idea and will make your machine more versatile. It's good quality hardened steel like a Clarkson chuck.

View attachment 110660

Thanks, James.

I've never seen a collet of that pattern before - do you think it's Hobbymat-specific?

In good news, the mill is back together, but when I switched it on for the first time I thought something was wrong and the spindle was stuck....because it was sooo quiet! Now I realise what it's supposed to sound like - it's been noisy ever since I bought it 3 or 4 years ago. The first couple of passes using a sharpi(ish) 1/4" endmill are vastly improved. I think I need to treat myself to some new cutters, and we'll call it job done.
 
Back
Top