Congrats Lynn! One step closer-

You are using an out of date browser. It may not display this or other websites correctly.
You should upgrade or use an alternative browser.
You should upgrade or use an alternative browser.
SPF MKII Ownership
- Thread starter SpyderMike
- Start date
Roger, Wilco Ron.
So, I fly back up to Oregon to spend some time with the car, get it registered and enjoy the perfect weather right now. Lo and behold, I lost the one and only red battery cutoff key, can't find it. Cripes.
After sleeping on it, I think that Harbor Freight sells a knockoff of the same switch. There is a retail store in Medford (15 minutes away). I call and they have plenty of P/N 92688-2 for $2.99 and it comes with two keys.
Harbor Freight Tools - Quality Tools at the Lowest Prices
It works perfectly!!
So, if you only got one key from SPF like I did - $2.99 for two more is a pretty sweet deal.
By the way, on the way out to our property, I stopped for gas and drew a crowd of 10 or so...
Fun, fun, fun!
SpiderMike......
So, did the pump jockey let you put the gas in, or did you have to let him do it?
When you have the time, more pictures of your new ride would be greatly appreciated (like one at the "pumps"). Must be a ruch to drive a GT40!!!!!
So, did the pump jockey let you put the gas in, or did you have to let him do it?
When you have the time, more pictures of your new ride would be greatly appreciated (like one at the "pumps"). Must be a ruch to drive a GT40!!!!!
no Gary, he didn't let me pump it. I closely supervised him though
I will take more pictures - in fact I just installed some mirrors and want to post that. I went for a nice drive yesterday up to the local lake (Applegate Lake) and had a blast. Man, third gear acceleration is unbelievable -
I am still taking it easy and feeling the car out - it is so much more capable than I am. The engine sound above 3000 rpm makes my spine tingle.
How are you feeling Gary?
Regards,
Mike
SpyderMike,
Drove down to Creswell, OR to listen to my brother's German Polka Band on Saturday. Drive time round trip was 4 hours. Made a long day, and by the end of the day, I was pooped. Having some issues with diet and getting my plumbing to settle down. Other than that, life goes on.
Start Chemo on June 4th, followed by Radiation treatment. Next three months are going to be a challenge.
Do me a favor. Next time you are tooling around in your 40, goose it a good one for me!
SpyderMike,
Thanks. Very nice camera angle.
Your car is very pretty. I can see how it has the magnetic effect on attracting people. Hope it does not have the same affect on the enforcement side of the law.
Thanks. Very nice camera angle.
Your car is very pretty. I can see how it has the magnetic effect on attracting people. Hope it does not have the same affect on the enforcement side of the law.
Hope it does not have the same affect on the enforcement side of the law.[/QUOTE]
I took my car to a local shop to get the A/C charged with Freon for the first time. The local police chief saw me drive in and followed me to say he was going to confiscate it for official police business. He was joking of course but the lesson here is that these cars are eye catchers and look like they are going fast when parked. You're likely to get a speeding ticket for going 26 in a 25.
I took my car to a local shop to get the A/C charged with Freon for the first time. The local police chief saw me drive in and followed me to say he was going to confiscate it for official police business. He was joking of course but the lesson here is that these cars are eye catchers and look like they are going fast when parked. You're likely to get a speeding ticket for going 26 in a 25.
Well, I finally decideed to jack up the car and get the tire with the nail in it off. Instead of pushing the car onto 2X4, I had a section of 4X4 handy and noticed that I could wedge it in the rear jacking hooks and use a standard rolling hydraulic jack and jack the back up enough to get the tire on and off. The 4X4 was longer than the span of the hooks by a few inches. I also had three sections of 4X4 that were just the right height to fit under the car at teh cross member under the trans to allow me to not have to worry about the car coming down while I was out. The wood was soft enough that the hooks dug in a little and the jack pad dug in a little. No paint was damaged. Simple. It worked for me.
Back on the road-
Mike
Back on the road-
Mike
This turned out to be an easy fix - especially if you are one of those contortionists that can fit your entire body into a shoe box. This took 30 minutes at most. It takes a 1/2" socket only.
I am 5' 8" on a good day. My pedals were set up to the farthest forward location and I had to slump in the seat to reach them. I had been told that I had one closer location to move them to. This was wrong...I had about 4 closer locations - each at least 1" closer. I think you could be 4' 11" and find a pedal location to suit you.
The pedal assembly as installed in my car sat behind a square tube cross brace on the floor. It looked like it could not be moved forward even though there were locations on the four rails to accomodate it. The car has four rails with preset bolt receptacles evenly spaced (two top and two bottom) about ever 1.5". Undo the four bolts and you are given a fairly wide range of movement. I think I am in the middle of the range and they almost feel too close. I might try this location for a while and then push them one position back if needed.
As you move the pedal assy closer, the front left bolt runs out of locations first. However, there is another flange on the left rear of the assembly that lines up easily - thus maintianing four connection points.
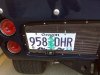
Another thing I did today was install a rear view wireless video camera so that I could get a hint of what was behind me. This was a cheapo setup from Costco - less than $80. Included in the package was the small camera with mounting bracket, a 3.5" color LCD with two powering options (hardwire or power adapter socket) and a couple of mounting options.
The camera comes with a metal bracket that is to be adhered using 3M VHB tape, to the back of the license plate. Normally they show this mounting on the top of the plate. I didn't like it blocking the state name on my plate, so I flipped it, unscrewed the camera and turned the camera upside down on the bracket. I routed the camera power up the LHS to the small cubby behind the driver's seat - where I found the electric fuel pump wiring. I mirrored the routing of the tail light loom on the RHS. The wireless antenna is routed up the inner clamshell and forward using tie wrap pads. I reduced the fuse rating (at location 16 for the purple fuel pump feed) from 20 amp to 2 amp based on the 2.5 amp fuse that was in the hardwire option of the kit.
Now I plug in the LCD and turn it on, then flip the switch over my start button to turn the camera on. The camera has a nice wide angle of about 90 degrees going out. It doesn't look fisheye or distorted. The picture is a bit graining and flickers now and then, but I does the job for what I need it. I did a test drive and the only issues I see so far are:
1. when I drove with the camera pointed to the setting sun it would wash out. If this become a proble, thenI will find a different camera. This LCD has provisions for a hardwired camera input which is a nice option.
2. I think I will make a small bracket to temporarily position the LCD on the LHS sill near the driver door hinge, or hanging from the door pocket as far forward as I can.
The other nice thing about this setup is that there is also a mini USB port on the LCD, and they give you a cable, so that you can power USB devices through the LCD.
The LCD has buttons for changing brightness, changing color saturation, selecting the wireless or wired video input, and rotating the image. It also has an audio input, I am not sure why yet as this isn't discussed in the documentation.
It was worth the few hours to install!
Attachments
Last edited:
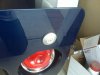
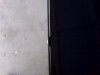
While installing the wireless backup camera on my car, I noticed how much deris was stuck between the spoiler and the body of the car. There are six fasterners that hold this on and they act to press the painted spoiler agains the painted clamshell. Any small debris works it's way into the crevise between the two and starts to scratch the paint.
I took the spoiler off with the thought of placing nylon fender washers between the two surfaces. When disassembling this, I found that the machined receptacle inside the rear clamshell was not flat to the inner surface. The holes drilled in the rear clam were too small to allow the receptacle to sit flush. I also found that the machined outer piece was digging into the spoiler paint.
I went to Home Depot and got a 7/16" drill bit and I found 1/4" x 1-1/4" rubber fender washers which I think will work better than the nylon. These were $0.73 each and I got 12. The 7/16" hole is slightly oversized which allows for alignment issues. Drilling into the existing locations, even with blue tape, caused me some frowns as the edges chipped slightly due to the aggressive nature of the large bit. This is easily covered by the washer and fastener though.
So now I have a rubber washer between teh outer faster and the spoiler and one between the spoiler and the clamshell. The finished product looks good I think. It also puts about a 1/16" gap between the spoiler and the clamshell to make cleaning easier.
Attachments
Last thing I did on the car this weekend was fix my missing turn indication. As suggest (by Jack I think) the bulb had not been placed in the receptacle and worked its way out. Now, it was very difficult to see let alone fix.
There is absolutely no space from underneath from which to reach this light. On my car, the indicator lens and housing are epoxied to the dash, so I just can't slide it out. I didn't want to pull the dash (I would create other problems for sure). So this left only one other way - pull the oil pressure gauge.
Disconnect the battery first, of course. Pull the left hand switch cover (the one that has the panel light dimmer, the horn button and a power receptacle). Disconnet the wires to the power receptacle and the horn, leaving the plate dangling. Disconnect the large molex type cable connector and push the flasher out of the way.
Reach in with your finger tips and barely feel the nut holding the gauge on. Cuss like a mother as your tear the skin off the sides of your index and second fingertips trying to loosen this jewel. Don't give up because this is the only way my friend. Once loosened, use blue tape to protect the area of the dash, slide the gauge out and let it dangle. Be careful not to stress the oil pressure tube. See the prize now....just enough room to get two fingers on it. A long screwdrive helps to coax the bulb into position and then a finger pushes it in. Sweet.
Now there is only one challange left - getting that gauge retaining nut back on. The same two wounded fingers are used. You have to act quickly as any swelling of the skin tissue means you will have to wait. Ten tries later and you feel it catch the thread - yes! Now position the bracket so as to clear the oil pressure tube and the gauge lamp and tighten the gauge retaining nut. With a wry grin, remind yourself not to tighten it quite as much as it was before...you know you will have to do this again someday.
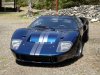
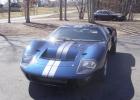
Beautiful MKll, by the way, is that police car in the background waiting for you? LOL! For what it's worth, when I take delivery of our SPF Indigo Blue & Orange Gulf livery MKl (Roush 427SR) in near spring, 2025, I plan to run unmuffled megaphone tips because, well, she has got to shout! You feel me?I can't measure it for you right now...I am in So Cal and the car is in Oregon. I will be there in early April and I will try to get you a measurement.
Working with Superformance has been great- good people in Lance, Deborah and Frank. They will get answers to anything I ask. Down the road I am sure they will have a nice owners manual.
Some pics attached.
Mike
Attachments
")
Very well said, Rick! You are very diplomatic. I, on the other hand, would be considerably more direct in response to what Alan alleged. I understand Alan's post is very old, but no less misguided. DaveAlan,
I don't understand that comment....why are you not at liberty to reveal the issues you say exist? It is not fair to state a "problem" but not express it. Sort of like the political callers who ask voters "If you knew XX had beat his wife, would you still vote for them?" They never said XX DID beat his wife but the damage is done. If you have defined quality concerns with the SPF GT, list them.
As to the damaged switch panel, yes, it hurts any owner to see something in his new pride and joy that is not "right". But I am sure that SPF/Olthoffs will make it right. I would not expect that part to be in stock in the US. If I were running the parts operation for SPF at this time, for a new product, I would only stock items that could hold up use of the car. I would not stock incidental, trim or non-critical parts. Nor would I carry parts that will only be required after a major "shunt". These can be sent from Hi-Tech in a matter of days. And if you tore a suspension corner off a chassis or wrapped up a tub, a couple of days of shipping is NOT going to hold up use of the car!
Keep in mind that there is a learning curve for both the factory and dealers with the GT. SPF is known for high quality and I am sure they will deliver in the long run.
BTW, find the CAR and DRIVER review of the GT40 MK III road test from 1967 and see how they SAVAGED the GT's production quality. "Lower quality then the cheapest Falcon" was what they wrote at the time...."Glue all over the upholstery, rattles, etc."
And a GT40 cost over 15K at the time when a new Corvette was $4500.....
Rick
(and yes, I have a very remote connection to SPF, so my comments ARE biased)
(edited for my fat-finger attempts at typing....)
Similar threads
- Replies
- 11
- Views
- 2K