Steering column alignment

Hi,

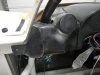
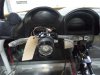
I seem to have a problem with the alignment of my steering column and would like your advice. If you take a look at the attached pictures, you can see that I've got the dash aligned on the left (needs minor cutout on A pillar for final fit) and the right. However, my steering column is nowhere near the center and I can't move the dash sideways any further without the vents being oddly aligned with the A pillars and the pillar covers.

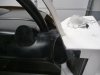
Furthermore, when I've laid a seat in the car, I never have the wheel centered with the seat even if I put it as close to the center as would allow with the center console in. The wheel is also too far to the right from a feel perspective. I don't know how the pedal alignment is since I haven't final mounted the pedals yet.

So basically I'm getting two signals that my column needs to move to the left. It's about 7/16-3/4" that it needs to move to the left. My questions are:
1) Has anybody had to do this and if so, any suggestions? Or is this normal alignment?
2) I plan to take the A/C ducting off again, unplug all the wiring and drill new holes 3/4" to the left of the current ones, then fill the current ones with JB weld. Thoughts?

Many thanks,

Tim
 

Attachments

  • dash left side2.jpg
    dash left side2.jpg
    205.4 KB · Views: 365
  • dash right side2.jpg
    dash right side2.jpg
    163.4 KB · Views: 379
  • column close2.jpg
    column close2.jpg
    259.9 KB · Views: 405
  • column far2.jpg
    column far2.jpg
    210.7 KB · Views: 393
Tim,
make sure that you have the whole body aligned before you move anything....with the wheels in place too.
One slight offset of the body vs chassis ...and it may only seem minor can throw off the whole package...

Ask Alex...he was fastidious enough to spend many hours getting his dialed in but it looks fantastic when done right.
 
Tim,
I slotted the four holes that hold the steering column (in a side to side fashion) to the top of the footbox. Then made two bolt plates that drop in from the top side of the box. This serves to allow movement to whatever location you ultimately need and hold the bolts in place so they won't spin while you are trying to hold the spacers/washers/column/nuts up there to tighten the column in the car. A little work up front - to prevent a PITA later.
 
Last edited:
Can't help you with your column alignment, but I have a question. What steering wheel adapter/release/mount setup do you have going on there? Looks interesting.
 
IIRC, my power shaft was slightly offset, but not nearly as much. I didn't worry about the a/c vents and just pushed and pulled around the dash as needed. There's no magic to the dash end cuts - they can be enlarged as needed.

I agree w/ Fran that you should set the body first (front, rear, spyder, and doors) because that can have a huge impact on everything (although I don't think it will impact this issue, but it will impact others)

The dash should be mounted to the chassis, so the edges of the body the wings of the dash are sitting on right now should be trimmed off. (at least that's the way mine is)

Also, another option (although most don't seem to like this one) is to scrap the electronic setup and replace w/ Fran's manual steering setup - a simple DD tube. Lightweight, functional, has a compact quick release and can be positioned however you want. Fancy buttons and stuff, screw that, give me 2 set screws and a DD tube :D
 
Thanks all for the replies. Yes, alignment of everything is a key concern. I do have the body bolted with a couple bolts, so that's in the correct position.

Rob's solution, as is generally the case, is a very good one. And this one isn't even hard to execute, so that's what I'll go with. I like the optionality of being able to move it a little at a later time which hedges against having some slight misalignment right now. I should have some pics by the end of the weekend on how this worked out.

Tim
 
Can't help you with your column alignment, but I have a question. What steering wheel adapter/release/mount setup do you have going on there? Looks interesting.

Ruth,

This is a Momo hub that's welded on with an NRG thin quick release (Thin Version | NRG Innovations), which has a horn button feed. I removed the round cable guide thingy (real name escapes me right now), though I regret having done that as I ended up fabricating my own.

On major thing to consider when figuring out your hub solution is how far the distance to the signal stalks is. This is influenced by:
- how far you push the hub on (I screwed it on, removed the screw and had ti TIG welded)
- how thick your quick release hub is
- how deep your steering wheel is (mine is very flat)

You can always make it longer with spacers, but shortening is hard once you've committed to the weld...

If you don't want to weld, there's also a splined Pfadt adapter, but I don't believe it has a rubber jacket around it.

Tim
 
You guys really need to upgrade to the race (manual) shaft. Sooooooooooo much easier to configure up/down/left/right, plus you can work in the footbox with ease

Viva la race shaft! :D
 
You elected to weld it on, or it HAD to be welded? And it fits the standard RCR-provided column? Looks a little cleaner and production-like than the Pfadt, which is why I ask.

Has to be welded on, as it's not the right spline. I basically press-fitted it by screwing the GM screw down and then had it welded. Momo does not make an adapter for that particular spline, which is different from most other GM splines.

I agree the Pfadt is ugly, though one idea is if you could get the Pfadt and get one of the rubber Momo covers somehow and they magically fit...

Tim
 

Ken Roberts

Supporter
With a little bit of creativity the Pfadt ain't so ugly anymore. It's a spray can (flat black) cap with a hole in it. Cost was free.
002-5.jpg
 
With a little bit of creativity the Pfadt ain't so ugly anymore.

Love it! I've been thinking of all sorts of ways to make it look more finished. That's awesomely simple.

To Mesa's point. . . it does look like a fairly lengthy extension, but I think you said somewhere that its just 1/2 inch longer than the factory QR.
 

Ken Roberts

Supporter
It sits out about 1 3/4" farther than a stock Corvette wheel. It looks worse because it is a flat dish wheel. The stock Corvette wheel is a very deep dish to accomodate the air bag.

You wouldn't want to install a deep dish wheel with the Pfadt/NRG setup. You can always buy the NRG quick connect that is thinner if you don't care for the "long look".
 

Dave Lindemann

Lifetime Supporter
Ken - Not to belabor the subject but have you installed the column/steering wheel assembly and the seat in the car to test the fit? The steering wheel on my early SLC is a bit further forward than yours appears to be and clearance to the seat is "close". I'd be concerned that you won't be able to have a very comfortable driving position with the steering wheel that far back.

Best regards,
Dave L

It sits out about 1 3/4" farther than a stock Corvette wheel. It looks worse because it is a flat dish wheel. The stock Corvette wheel is a very deep dish to accomodate the air bag.

You wouldn't want to install a deep dish wheel with the Pfadt/NRG setup. You can always buy the NRG quick connect that is thinner if you don't care for the "long look".
 

Ken Roberts

Supporter
The close up pictures are deceiving. It's really no different than the RCR wheel and quick connect.

I have my seat as far back as possible. It's on sliders. I'm 6' 1". I find that it's perfect like that. I will try and take pictures of me sitting in it this weekend.

One thing that I noted was that with the steering column bolted down in it's factory mounting holes and with my Tillet B5 seats (very narrow) installed exactly centered with the steering wheel I was unable to install the center console. I thought this kinda of odd.
 
One thing that I noted was that with the steering column bolted down in it's factory mounting holes and with my Tillet B5 seats (very narrow) installed exactly centered with the steering wheel I was unable to install the center console.
Me too. I was able to offset the center console to the passenger side all the way and it fit, but in the end, it helped me come to the conclusion that the exposed aluminum spine with a billet shifter looks way better anyways.
 
Back
Top