Stephan's SLC Build Log

Stephan E.

Supporter
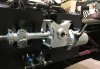
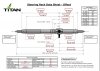
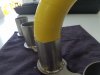
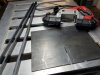
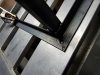
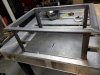
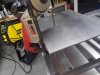
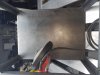
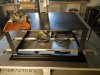
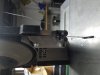
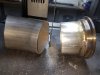
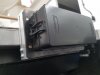
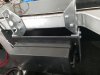
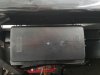
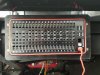
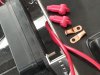
I had to find a away to hide the fuse box and still being able to reach it without anything to be removed. I came up with a retractable version of the 200 Amp Bussmann dual buss fuse/relay box. Completely concealed under the dash when up, fully accessible when lowered.
 

Attachments

  • 20200101_165202.jpg
    20200101_165202.jpg
    220.6 KB · Views: 494
  • 20200101_165329.jpg
    20200101_165329.jpg
    352.9 KB · Views: 499
  • 20200101_165621.jpg
    20200101_165621.jpg
    358.3 KB · Views: 456
  • 20200101_165635.jpg
    20200101_165635.jpg
    419.2 KB · Views: 433
  • 20200101_165830.jpg
    20200101_165830.jpg
    279.6 KB · Views: 440
  • 20200101_170612.jpg
    20200101_170612.jpg
    366.3 KB · Views: 503
Last edited:

Brian Kissel

Staff member
Admin
Lifetime Supporter
Beautiful cars Stephan. I see on the side, they say SLS. Is that someone's version that they are selling of the SLC ?

Regards Brian
 
Aren't they beautiful?

Sure Are. I have been playing in blender doing R18 LMP crosses with the SLC for the EV SLC project I have been working on. Surprisingly you can get the LMP style front end to line up very well on a SLC. The problem is the air channels the LMP cars use. The SLC chassis is just to wide for the air flow to go around the front fenders, you have to pretty much go with the stock air routing.

Take a look at what Jon oleson did with the Rebellion RK1 and RK2 Ultimas. I do like these renders thought. You know they were made for CLP motorsport? CLP motorsport has LMP and a LMP2 RCR for sale on Raceingjunk and I think in the classifieds here. I wonder if they every did anything with the renders.
 

Stephan E.

Supporter
Some info I would like to share. Kicked off by other discussions I am following. I did some research on a suitable EPAS fitting our cars, putting some parameters into consideration such as weight and weight distribution, placement etc. I could imagine to go with a Titan custom rack with a double pinion to take the servo motor out of the footwell or under dash and distribute the weight to the passenger site. This is already commonly being used on LMP with none centered seating. Not cheap! Such a double pinion steering rack can be acquired through Pegasus Racing or Titan, UK direct and custom made to any specifications.


Last edited:

Stephan E.

Supporter
Some additional info on the previous posting. Shown is RH drive LMP with Titan rack, dual pinion and front mounted servo. Order spec sheet for the rack.
 

Attachments

  • LMP EPAS.jpg
    LMP EPAS.jpg
    165.6 KB · Views: 452
  • TITAN Steering Racks.jpg
    TITAN Steering Racks.jpg
    234.5 KB · Views: 478
Last edited:

Stephan E.

Supporter
It is time to take a look at Revision #1 of the exhaust system since the engine management was done last week. I took delivery of the custom made stainless collectors and exhaust flanges. A beautiful job done by the folks of Stainless Headers. As per engine builders specifications, the primaries are 2" with the D-ports matching the exhaust ports on the heads. The collectors are 3.5" merge and only 12 degrees to maximize the flow and to reduce back pressure. You can see the significant increase in exhaust open area over the stock LS7 manifold. I laid both flanges on top of each other. Another bottleneck removed and no breathing problems going forward with the increase in HP. The flanges were ordered with stubs to avoid thermal deformation on the flange area during welding. These were ground after fabrication and arrive straight for the manufacturer. In addition I acquired the header modelling kit from ICengineworks. A nice tool which will help me with the layout and welding without wasting time and materials with trial and errors. The kit includes about 250 pieces with different radii of 3", 4" and 6" Centerline Radius (CLR). Each block is exactly 1" along the CLR and you only have to count them up to know if each tube is exactly the length you need it to be. It also has starter plug for the flanges and welding clamps to hold the tubes firmly together for a perfect weld. The kit should be enough to do both sides. Something I really like is the arrow markers on the blocks. They indicate a cut point every time the blocks rotate to change directions and the arrows do not line up. More along the way using this.

If someone is interested in my LS7 ceramic coated stock manifolds please PM me.
 

Attachments

  • 20200111_142943.jpg
    20200111_142943.jpg
    363.1 KB · Views: 544
  • 20200111_143240.jpg
    20200111_143240.jpg
    313.9 KB · Views: 548
  • 20200111_114723.jpg
    20200111_114723.jpg
    362.9 KB · Views: 526
  • 20200111_114652.jpg
    20200111_114652.jpg
    190.8 KB · Views: 495
  • 20200111_114425.jpg
    20200111_114425.jpg
    199.3 KB · Views: 503
  • 20200111_114552.jpg
    20200111_114552.jpg
    217.1 KB · Views: 517
  • 20200111_111936.jpg
    20200111_111936.jpg
    303.9 KB · Views: 556
Last edited:
Impressive to fabricate your own headers - 3D puzzle. I paid $1400 for a set of custom LS into BMW headers and I thought that was an absolute bargain over the thought of doing it myself...Kudos!
 

Stephan E.

Supporter
Impressive to fabricate your own headers - 3D puzzle. I paid $1400 for a set of custom LS into BMW headers and I thought that was an absolute bargain over the thought of doing it myself...Kudos!
Hello Tim,

Thanks for the feedback. This project is very complex due to the routing and equal length requirements. The heads are so damned big, no room to drop a dime. It crossed my mind to pull the checkbook and to involve a professional but I am up to the challenge. I checked a few header fabricators around the Philly area but did not find the level of confidence that I was looking for. Long waiting times, the SLC would sit in their shops etc. I visited the shops, snooped around and discovered that a project like headers is not all about skills but having the correct tools. That being said, besides what I posted earlier the tools I needed was a new smaller MIG/TIG welder to work closely on the car and band saw for straight and controlled tubing cutting. I looked for new and used ones but they were all to big or expensive. Then I found these build instruction on the web to make my own and I love this tool. I use it all the time since I built it. It led me into making the side impact bars as well. It cuts mild steel and stainless like butter up to 5" producing very low heat. Here is how to make a real cool aid for small money. I bought this deep cut saw for $100 on Ebay, $20 in metal and $13 for a foot switch. In addition I made a lower band guide for smaller tubing up to 2.5".
 

Attachments

  • 20191219_152021.jpg
    20191219_152021.jpg
    392.2 KB · Views: 506
  • 20191219_174923.jpg
    20191219_174923.jpg
    389.8 KB · Views: 543
  • 20191219_180631.jpg
    20191219_180631.jpg
    378.2 KB · Views: 541
  • 20191219_181850.jpg
    20191219_181850.jpg
    319.8 KB · Views: 494
  • 20191219_184229.jpg
    20191219_184229.jpg
    346.2 KB · Views: 499
  • 20200112_121305.jpg
    20200112_121305.jpg
    370.4 KB · Views: 485
  • 20200112_121344.jpg
    20200112_121344.jpg
    312.9 KB · Views: 486
  • 20200112_121358.jpg
    20200112_121358.jpg
    249.3 KB · Views: 475
  • 20191221_155420.jpg
    20191221_155420.jpg
    367 KB · Views: 493
  • 20191225_103102.jpg
    20191225_103102.jpg
    340.9 KB · Views: 490
Last edited:
Thanks for sharing that, it looks like something I might need to build. I love metal fabrication projects/mig welding. What are the benefits of this compared to the chop saws (I have 2 - I think 6" and 12")?
I've never owned a band saw. Thanks!
Dave
 

Stephan E.

Supporter
Hi Dave,

All I can say is that since I have that little saw I am not even looking at other cutting devices such a chop saw, angle grinder etc anymore. I don't know how I did what I did not having it. That little apparatus rocks. Smooth cutting, good control, no vibrations, rocking or jamming, low heat on tubing and flat stock. You can take the saw off the table and cut free hand.

Stephan
 
Last edited:
Thanks for the reply Stephan. Do you happen to have a link to the plans? What are you using for a guide for miter cuts? Sorry for the tangent in your build thread.
 

Stephan E.

Supporter
Thanks for the reply Stephan. Do you happen to have a link to the plans? What are you using for a guide for miter cuts? Sorry for the tangent in your build thread.
Hi Dave,

I don't remember the link but you'll find it through a keyword search. I stole the idea but the table is my design. Other good ideas are out there making a deep cut saw stand. SWAG has made them commercially available . There are versions 1.0 through 4.0 if you want spend the money.


Cheers
 
Last edited:
Back
Top