
You are using an out of date browser. It may not display this or other websites correctly.
You should upgrade or use an alternative browser.
You should upgrade or use an alternative browser.
Chuck and Ryan's Carbon Cub Build Blog
- Thread starter CESLAW
- Start date
Ah, yes. That is the weak spot. Around 95mph. In level cruise the 172 with its modest 145 HP Continental is faster. The downside of those STOL wings!
Yeah, but you can just about take-off or land on a postage stamp! :thumbsup:
I love it!
Okay, so I've shopped some Carbon Cubs. Not inexpensive aircraft with most between $100k and $200k. What's the savings building one compared with buying a similar used one?
I would never say it was a rational decision.
On the other hand, building saves around $40,000 over the cost of a comparable factory build.
Or, as you pointed out, buy a used one.
Why do we chose to build GT40s?
Ron Earp
Admin
Oh I'm not questioning the decision but asking out of genuine interest. I've recently gotten back into flying and am looking to expand my horizons, Our club has a bunch of aircraft; 152s, 172s, Warriors, Mooneys, a twin, and a recent acquisition, a Super Decathlon. The latter aircraft has my interest and I plan to build some hours with the instructor/owner of it.
These carbon cubs seem to be awesome planes. The kits look very complete. Is there a factory build school offered like vans does? It's really intriguing to think about taking a month off work, going someplace and essentially mostly building a plane, at least to the point where it is experimental for your time put into it.
You know, you have these dreams or ideas and you've got to make a move on them before they are too late. I want to do some flying with my daughter before she ages out of wanting to hang out with dad so I need to cut back on the racing at the moment and get on with some other stuff. The fellows and racing will be there in a couple of years, but my daughter will be moved on.
Ron
Cubcrafters does not have a build program like you are describing. The do encourage factory visits to see first hand all aspects of the build and have really good support for builders.
Flying with your daughter? Go for it. Ryan's interest in flying got me to follow in his footsteps (I've only been flying a few years). Some of the best times when he comes home to visit is flying in the 172. The Cub will be a whole lot more fun.
The Super Decathalon looks like an interesting option. Go for it !
Ron, check out the Rans S7. Great plane . I am building another type of Rans and can tell you they are a good kit.
www.rans.com
www.rans.com
Last edited:
These carbon cubs seem to be awesome planes. The kits look very complete. Is there a factory build school offered like vans does? It's really intriguing to think about taking a month off work, going someplace and essentially mostly building a plane, at least to the point where it is experimental for your time put into it.
Since I originally responded to this question, Cub Crafters just announced a new build program. The purchaser goes to the factory. He does not assemble the plane like most kit manufacturers would do. Instead he helps manufacture the parts that go into the plane. After the parts are manufactured he goes home and Cub Crafters assembles it. A bit different, but apparently it meets the 51% requirement. Check it out on their website.
Poly Brush Issue
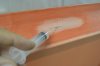
After spraying Poly Brush on the right wing the surface was a bit rough and grainy. It was not bad, but not as smooth as expected.
The Poly Fiber manual says that Poly Brush cannot be sanded. I ignored that admonition and used some 400 grit sandpaper to very gently sand the surfaces. It worked very well knocking off that grainy layer and leaving it perfectly smooth.
Three fourths of a gallon of Poly Spray was used to cover the right wing.
Attachments
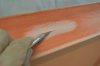
Bubbles
A previous post described a technique for applying the fabric in a way to assure it would be solidly adhered in the aileron valley without bubbles. That approach was used on the second wing. It was a few bubbles on the first wing discovered after the Poly Brush was applied that prompted that different approach.
So how were the bubbles in the first wing fixed?
1. They need to be identified. A bright light at an angle helps. We found several that warranted attention, each about a half inch by one to three inches long. Frankly I suspect that many would say this is a nonissue and just ignore it. One would not likely be able to see them when the plane is painted and the aileron is in place and functionally they should not cause a problem.
2. The poly brush was rubbed away with Reducer
3. A slit was made lengthwise with an Xacto knife.
4 Poly Tack, diluted with MEK, was injected through the slit with a syringe. Why can’t one just inject the bubble without cutting a slit? Two reasons. First the glue would take forever to dry since it is essentially inside an enclosed cavity. Second the bubble is under some tension and there is no reasonable way to hold it tight to the surface until the glue dries.
5. A small patch was cut from scrap fabric and placed over the slit with the Poly Brush.
6. Poly Spray and then Poly Tone were applied in the usual manner. The repair is barely visible.
Attachments

Ron Earp
Admin
Since I originally responded to this question, Cub Crafters just announced a new build program. The purchaser goes to the factory. He does not assemble the plane like most kit manufacturers would do. Instead he helps manufacture the parts that go into the plane. After the parts are manufactured he goes home and Cub Crafters assembles it. A bit different, but apparently it meets the 51% requirement. Check it out on their website.
Good info there.
Nice work on the wings!
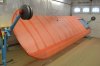
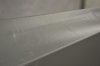
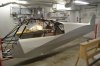
Wings painted.
The wings are both painted; Nevada silver and white trim. With a little help from family and friends they were moved to the racks and the fuselage moved in to the paint booth. Hope to have the fuselage painted before the engine and avionics arrives in the next week.
The wings are both painted; Nevada silver and white trim. With a little help from family and friends they were moved to the racks and the fuselage moved in to the paint booth. Hope to have the fuselage painted before the engine and avionics arrives in the next week.
Attachments
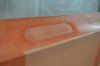
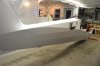
Fuselage painted
The fuselage is the most noticed part of the plane, so it was done last in the hope that by the time we sprayed it we might know what we were doing. I am really pleased. Nice crisp line between the silver and white, nice even sheen to the silver, and the white has a good even gloss.
It took the duration of the Republican presidential debate plus two more hours to get all of the masking off. So nice to be rid of it after six months-time.
The engine and avionics will be here in the next few days. The timing could not be better.
Attachments
Similar threads
- Replies
- 17
- Views
- 14K
- Replies
- 16
- Views
- 6K