Even low pressure expanding foam can create serious distortion over such a wide area. Be very cautious.Yes, it’s an L bracket with square tubing and am securing with a couple of bolts going up through the top bulkhead. I am also planning to fill the air void between the two skins with expanding foam to add some more structural strength, sound and thermal insulation value with the extreme Texas heat we get.

You are using an out of date browser. It may not display this or other websites correctly.
You should upgrade or use an alternative browser.
You should upgrade or use an alternative browser.
Classic HorsePower Scratch GT40
- Thread starter Wolfman
- Start date
Devin
Supporter
I was thinking about that as well. You have me thinking I may spray it open faced upside down and shave off what expands above the height of the skeleton before I bond the inner skin. That way it doesn’t add any pressure inside a cavity but yet does most of what I need it to do.Even low pressure expanding foam can create serious distortion over such a wide area. Be very cautious.
Devin
Supporter
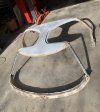
Lots of work done to make it fit and look the part. Lots more work to perfect it. It has really stiffened up with the bonding and am happy that it will be more structurally sound than an all fiberglass spider. Even though I don’t plan on anyone using the roof/A-pillar to support someone entering or existing the car, I think this will be able to give me peace of mind to avoid the possibility of it stress cracking the windshield.
Attachments
Last edited:
Devin
Supporter
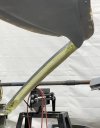
Work continues on the scratch spider. Inner skin bonded, insulated (albeit some voids), A-pillar weather seal flange installed.
Some lessons for those challenged with part or all of these steps. 1) bonding mix of the epoxy resin with the silica powder with various ratios seems to be working well for filling voids, thickening to stay in place and added strength during/after curing. 2) clamping is obviously super important but clamping it in the installed position is paramount. During the inner skin bonding it was necessary to lay out the epoxy while I had it dismounted and upside down to line up and clamp together by myself, however looking back I should have had another set of hands to help me remount the spider back onto the chassis and readjust the clamping prior to it curing. This was evident as I lighted the spider by removing some of my MANY clamps and remounted the spider before the final curing had occurred. When remounted, the inner skin had a slight buckle at the rear bulkhead flange to which I had to correct (just a couple hours into the cure) with a heat gun and releasing the outer edges of the bulkhead inner/outer skin door/weather seal flanges. Later I had to come in to re-bond those area I separated to take out the misaligned areas. 3) Insulation… I toiled over how to tackle this and settled on getting a can of “door & window” minimal expanding foam. Made extra long straw extension to reach the deeper recesses of the open spider cavities and sprayed a “layer” of the foam from inside out, due to the length of straw and how it flowed, the product only approximately doubled in size so I ended up having a few voids next to the inner skin (had it upside down while spraying) but best I can tell it covered 90% or better of the cavity between the two skins. Those considering doing this, it is important to visually see where it is being sprayed and with how much product/the expansion rate to avoid over filling and possibly warping the skins. I am glad I did do it as it sounds so much more solid, added strength and am sure will help a little with heat transfer. THE MINUS for using it. It doesn’t appear to be as hard or solid at the normal version of the expanding foam. I am attempting to use it as the shaping layer for my inner A-pillar fiberglass skin…yet to see how that will work but a grinder appears to be the best shaping tool so far since it tears easier being softer. 4) Welded the weatherstripping flange on the A-pillar. Not only did this add the ability to secure the same pinch weld seal but since it is welded steel, it has also added strength to the corners too.


The great news is that with what is complete on the spider so far and without the windshield in place, this thing is now strong enough to support almost my entire body weight on the center of the spider (at least 150lbs+)! Frankly I never thought it would be this strong so it gives me confidence that my windshield will be safe from people grabbing the corners of the A-pillar as a support getting in/out of the car.
Some lessons for those challenged with part or all of these steps. 1) bonding mix of the epoxy resin with the silica powder with various ratios seems to be working well for filling voids, thickening to stay in place and added strength during/after curing. 2) clamping is obviously super important but clamping it in the installed position is paramount. During the inner skin bonding it was necessary to lay out the epoxy while I had it dismounted and upside down to line up and clamp together by myself, however looking back I should have had another set of hands to help me remount the spider back onto the chassis and readjust the clamping prior to it curing. This was evident as I lighted the spider by removing some of my MANY clamps and remounted the spider before the final curing had occurred. When remounted, the inner skin had a slight buckle at the rear bulkhead flange to which I had to correct (just a couple hours into the cure) with a heat gun and releasing the outer edges of the bulkhead inner/outer skin door/weather seal flanges. Later I had to come in to re-bond those area I separated to take out the misaligned areas. 3) Insulation… I toiled over how to tackle this and settled on getting a can of “door & window” minimal expanding foam. Made extra long straw extension to reach the deeper recesses of the open spider cavities and sprayed a “layer” of the foam from inside out, due to the length of straw and how it flowed, the product only approximately doubled in size so I ended up having a few voids next to the inner skin (had it upside down while spraying) but best I can tell it covered 90% or better of the cavity between the two skins. Those considering doing this, it is important to visually see where it is being sprayed and with how much product/the expansion rate to avoid over filling and possibly warping the skins. I am glad I did do it as it sounds so much more solid, added strength and am sure will help a little with heat transfer. THE MINUS for using it. It doesn’t appear to be as hard or solid at the normal version of the expanding foam. I am attempting to use it as the shaping layer for my inner A-pillar fiberglass skin…yet to see how that will work but a grinder appears to be the best shaping tool so far since it tears easier being softer. 4) Welded the weatherstripping flange on the A-pillar. Not only did this add the ability to secure the same pinch weld seal but since it is welded steel, it has also added strength to the corners too.
The great news is that with what is complete on the spider so far and without the windshield in place, this thing is now strong enough to support almost my entire body weight on the center of the spider (at least 150lbs+)! Frankly I never thought it would be this strong so it gives me confidence that my windshield will be safe from people grabbing the corners of the A-pillar as a support getting in/out of the car.
Last edited:
Devin
Supporter
More fiberglass work…be gentle, this is some of my first attempts at free form molding and layup. I know there are a few voids due to air pockets in the shaped expanding foam. It was ok to shape and found the grinder made quick work and a smooth surface and followed up with 80 grit sandpaper to smooth and round to the shape I wanted. Although I need to add one more layer of glass for added strength, I want to make sure it is as smooth as possible, cut out & fill the voids and sand the entire added areas before this final layer.

Attachments
Devin
Supporter
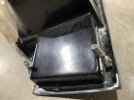
Started working the door hinges using rod ends, bronze bushings, removable hinge pin, and steel reinforcement plates. Next will be tacking the adjustable mount plate.
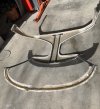
Also have started the refinement of the windshield mounting channel. I decided to source and use a 1/4” thick rubber as the spacer on the back of the windshield to replicate the urethane/butyl sealant thickness as well as an 1/8” thick rubber for the surround spacer. Once secured with painters tape, I laid the windshield in place and are only using fiberglass stranded filler on one side of the windshield surround at a time to enable an easier & safer extraction of it once dried. This is a multiple step process as once removed there is lots of trimming, sanding and filling of voids to perfect the channel for a smooth and form fitting spider.


Also have started the refinement of the windshield mounting channel. I decided to source and use a 1/4” thick rubber as the spacer on the back of the windshield to replicate the urethane/butyl sealant thickness as well as an 1/8” thick rubber for the surround spacer. Once secured with painters tape, I laid the windshield in place and are only using fiberglass stranded filler on one side of the windshield surround at a time to enable an easier & safer extraction of it once dried. This is a multiple step process as once removed there is lots of trimming, sanding and filling of voids to perfect the channel for a smooth and form fitting spider.
Attachments
Mark Turner
Supporter
Looks good with the windshield sitting in there. very interested to see more of your door hinges.
Devin
Supporter
I knew from my windy west Texas experience that the doors need to be as robust as possible when the 35+mph winds catch them unexpectedly to avoid future damage. I may be “over engineering” many things for a mostly street “race car” but IMO I hate to go back and redo things that should have been made to last more than a few years.Looks good with the windshield sitting in there. very interested to see more of your door hinges.
Devin
Supporter
Well they may be true, but unfortunately that’s not what I had the opportunity to start with…just some pieces of splash molds taken off of an unknown car. For me it was better than nothing but requiring more work and an opportunity to “make” my own spider to match my clams, windshield & doors from various other sources as well as a mild 2” stretch to the wheelbase.I am finding there are lots of things with the AP body that need to be re engineered!
Devin
Supporter
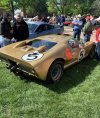
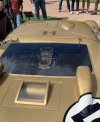
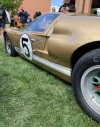
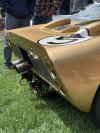
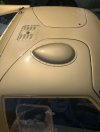
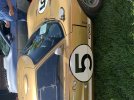
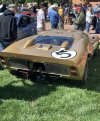
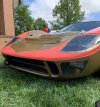
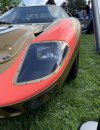
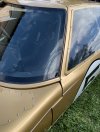
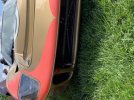
Just happened to be in McPherson KS last weekend at the McPherson College annual car show and got the awesome opportunity to see P1016 in person! What a treat to see it in the wild and on the grounds of one of the unique auto restoration degree programs in the US.
Let me know if anyone wants other close up pics as I took about a dozen for reference to aid in my personal “graduate research project”.
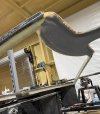
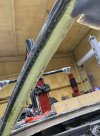
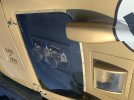
Also got back to some progress on the ‘40’. After completing about 95% of the perfecting of the windshield mount, I decided to work on slicing/splicing and modifying the upper door skins to properly fit them to the rest of the contours of the spider & roof/A-pillar. The driver side was the worst (pics) as it required both the door top and skin in front of the side window to be cut and re-epoxy/fiberglassed.
Due to my slightly larger wheelbase (2”) or the variety of my body panel sources, I am discovering that some of my height dimensions are off by about 3/8-1/2” and will have to split my doors horizontally to make up this difference in the front part of the door. More future pics will make sense once I post them.


Let me know if anyone wants other close up pics as I took about a dozen for reference to aid in my personal “graduate research project”.
Also got back to some progress on the ‘40’. After completing about 95% of the perfecting of the windshield mount, I decided to work on slicing/splicing and modifying the upper door skins to properly fit them to the rest of the contours of the spider & roof/A-pillar. The driver side was the worst (pics) as it required both the door top and skin in front of the side window to be cut and re-epoxy/fiberglassed.
Due to my slightly larger wheelbase (2”) or the variety of my body panel sources, I am discovering that some of my height dimensions are off by about 3/8-1/2” and will have to split my doors horizontally to make up this difference in the front part of the door. More future pics will make sense once I post them.
Attachments
Would love seeing more 1016 photos.Just happened to be in McPherson KS last weekend at the McPherson College annual car show and got the awesome opportunity to see P1016 in person! What a treat to see it in the wild and on the grounds of one of the unique auto restoration degree programs in the US.
Let me know if anyone wants other close up pics as I took about a dozen for reference to aid in my personal “graduate research project”.
Also got back to some progress on the ‘40’. After completing about 95% of the perfecting of the windshield mount, I decided to work on slicing/splicing and modifying the upper door skins to properly fit them to the rest of the contours of the spider & roof/A-pillar. The driver side was the worst (pics) as it required both the door top and skin in front of the side window to be cut and re-epoxy/fiberglassed.
Due to my slightly larger wheelbase (2”) or the variety of my body panel sources, I am discovering that some of my height dimensions are off by about 3/8-1/2” and will have to split my doors horizontally to make up this difference in the front part of the door. More future pics will make sense once I post them.
View attachment 138947View attachment 138948View attachment 138949View attachment 138950
Devin
Supporter
Sorry some of these were turned upon uploading.
Attachments
-
 IMG_8787.jpeg220 KB · Views: 195
 -
 IMG_8790.jpeg583.8 KB · Views: 185
 -
 IMG_8789.jpeg727.7 KB · Views: 201
 -
 IMG_8788.jpeg440 KB · Views: 189
 -
 IMG_8786.jpeg346 KB · Views: 204
 -
 IMG_8774.jpeg166.6 KB · Views: 192
 -
 IMG_8773.jpeg437.9 KB · Views: 184
 -
 IMG_8772.jpeg499.1 KB · Views: 191
 -
 IMG_8770.jpeg491.8 KB · Views: 191
 -
 IMG_8775.jpeg331.2 KB · Views: 196
Devin
Supporter
What are you using to bond your panels back together?
Joe
I’m using Total Boat epoxy resin and combine it with the West 403 Silica to thicken as needed and a variety of fiberglass matting depending on the size and strength of the repair needed. Once shaped after curing, I’m using a light weight body filler that has fiberglass strands to get the final shape and will eventually follow up with “normal” body filler, primer/sealer, etc. before paint.
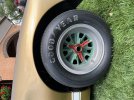
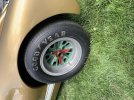
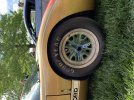
Also got a sample 315/35R17 to mock up my rear wheel for finding the right wheel backspacing & forward spacing. Looking like 4.25” forward and 6.75” BS for the rear.
Am really considering ordering the Image Wheels bolt on BRM6 in 8x17 and 11x17 Anybody have any good/bad experience or input in ordering these? My biggest concern is the cost and shipping these from the UK to US.
Devin
Supporter
Took another bite of the “elephant” today…it’s been a big stumbling block in the unknowns of custom car building.
Today I finished the final construction of the door hinges. To make things more difficult, I not only wanted them to be functional but easily adjustable as well as accommodate easy removal/installation of the door itself. As a result, I can unlatch the front clam access the door hinge and pull one pin and remove the door.


Today I finished the final construction of the door hinges. To make things more difficult, I not only wanted them to be functional but easily adjustable as well as accommodate easy removal/installation of the door itself. As a result, I can unlatch the front clam access the door hinge and pull one pin and remove the door.
Devin
Supporter
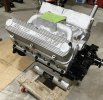
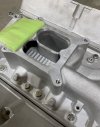
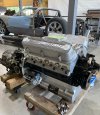
Well the heart of the beast has been completed and bought home. 347 Stroker (SCAT) with Edelbrock RPM heads, spicy roller cam, Aviaid oil pan, FMS shorty water pump, and modified and leveled aluminum intake.
Tried my set of cast GW valve covers on and discovered three things. One, the bolts needed to secure them will have to be extra long to go through the tall bolt pockets (something I didn’t notice on others pics). Two, the manufacturer didn’t exactly check nor rectify their miss drilling of the bolt pockets as they don’t mate up with the heads (poorer quality than I expected for the money I paid). Three, these are quite tall and the oil filler neck is extra tall and will need to be shortened to fit under my clamshell with the cap installed. I’m glad the cover is a little taller due to my roller tip rockers but sad I have to spend the extra time to modify the bolt holes as this isn’t just a simple rounding out of a little material as it will have to involve burring a three in deep narrow pocket. Oh well, nothing is easy when scratch building.
Tried my set of cast GW valve covers on and discovered three things. One, the bolts needed to secure them will have to be extra long to go through the tall bolt pockets (something I didn’t notice on others pics). Two, the manufacturer didn’t exactly check nor rectify their miss drilling of the bolt pockets as they don’t mate up with the heads (poorer quality than I expected for the money I paid). Three, these are quite tall and the oil filler neck is extra tall and will need to be shortened to fit under my clamshell with the cap installed. I’m glad the cover is a little taller due to my roller tip rockers but sad I have to spend the extra time to modify the bolt holes as this isn’t just a simple rounding out of a little material as it will have to involve burring a three in deep narrow pocket. Oh well, nothing is easy when scratch building.
Attachments
Last edited:
Devin
Supporter
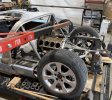
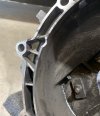
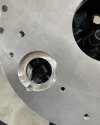
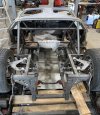
Time for the mock up motor to come out and the 347 stroker to get mated (although not final) and ready to check final fit with it in its final form. I also needed to clearance the starter with the Kennedy Engineering Products adapter plate. A small albeit time consuming job of using a burr grinder to remove just enough aluminum but not too much to allow the starter to extend and engage the flywheel without contacting the transaxle housing. Tomorrow I’ll drop in the drivetrain and check for frame & clamshell clearance.
Attachments

Similar threads
- Replies
- 5
- Views
- 4K
- Replies
- 9
- Views
- 13K