Dean's new RCR40 build thread

Looking really good Dean. Those faux sill panels look like the real thing.

On the cover for the wiring harness, I used a long piece of .040 5052 aluminum bent over a 2" tube. It's fastened with rivets and makes the tunnel look like an original. Checnk out my website here to see what it looks like.

Keep the pics coming!!!

Bill
 
I have the brakes finished up as well but I didn't take the pictures yet. I have also done the alignment and have installed the dual adjustable shocks and torqued it all the spec. The engine and drive train will go in this weekend and the car should be painted next week.
 
Dean that looks fantastic! What are the chances of having it done for Mid America in Tulsa? I sure would like to take a look or even better (hint hint) get a ride.
 

Rob

Lifetime Supporter
Looking good Dean....... go man go...!!!!

Neat idea for the plenum. More than one way to skin a cat eh...
 
Mr. Ross, I am doing what I can to get to Tulsa. I think I will have the time but it might come down to parts. The car is going together better than I thought it would. I am expecting some stuff this week. If it shows up, chances are good that I will be there. If it doesn't come this week, I probably won't make it. :rolleyes: I need to make good use of a long weekend.
 
Well, it has been almost a month and a lot has happened. First the AC system is complete. I recieved all the parts from Hot Rod air and it all went in very well.

DSC00163.JPG

I still have room for the swaybar to go on the front bulkhead between all the lines.
 

Ron Earp

Admin
Dean, I like that plenium, nice work. Wish I'd seen your 45 angles before I got all linear in my thinking on 90 degree angles for the water tubes up front.

Ron
 
Once I had the chassis clearanced to fit the gauges and the AC ducts it was time to mount the dash in the car but I didn't want to see the bolt heads. I got an idea from a friend on how to do it and this is what it looks like.

DSC00158.JPG

You have to drill through the wood and the chassis, then hammer in the threads. Once you have the wood bolted to the chassis you just apply a epoxy of some kind to the wood and clamp your dash in place. After it dries, sand the wood to fit and use a little body filler to clean up the edges.

DSC00161.JPG

DSC00160.JPG
 

Rob

Lifetime Supporter
Ohhhh yeaaaa..... nice lookin mill. What were the numbers?

Interesting idea on the dash mounting.
 

Chuck

Supporter
Dean:

Been studying your pictures. They are really helpful. Some questions:

1. You car is a left hand drive but the AC plumbing is for a right hand drive car. Obviously you made it work. Just curious as to why. I am prompted to ask because my car is left hand drive and I was provided with the right hand drive pre bent hard lines. Rather than go through the hassle of trying to get the correct ones, which I suspect will take weeks, I am contemplating using what I have and making a few extra bends to make it work. Is that what you did?

2. When you installed the evaporator under the dash you discovered the two braces running side to side rivited in place. Looks like you removed them. I assume you removed them to enable you to get the evaporater as high as possible. Did you then replace the braces on either side of the evaporator? Your approach seems more practical then leaving the braces in and letting it hang down an extra half inch or so.

3. I am trying to figure our an elegant way to install the magentic pick up on the rear wheel for the speedometer. The idea of drilling ten holes on the inner perimter of the disc does not appeal to me. How did you do it? Did you use the bolts that secure the disc as the sensor points? Next question: Were you able to do the calculations to pre set the dip switches on the back of the speedometer in advance? I can't imagine trying to do that after it is installed.

4. You presumably have an oil temp gauge rather than the clock. Did you get it through Fran or direct from Classic? I note that Classic has one avaialble that is a very close match, although the font is slightly different. I am getting anxious and need to get this issue sorted out as I finalize the assembly of the dash.

Look forward to seeing youf and the GT at Run and Gun in a couple of weeks. Made reservations at the Hampton. I put a couple hundred of miles on the Cobra this weekend to make sure it was ready.

Chuck
 
Chuck, Here is what i can tell you. My AC lines fit very well. I thought they were for the left hand side! I just tweaked them them a little to get around my front swaybar. They actually fit pretty well. I did a little bending but not much at all.

The braces under the dash came out then Cut them to fit around the evaporator. No big deal there.

My speedo sending unit mounts on the front. The pick up reads off of the 8 bolts that holds the rotor to the hat. I built a bracket to hold the sensor that will bolt to the 2 half inch tapped holes on the front of the spindle. The dip switches are preset but I am assuming they will need to be adjusted. I had to clearance the aluminum behind the dash to accomidate the speedo anyway so i made the hole large enoungh to get to the switches on back.

The oil gauge came from Fran. He can get one for you from classic. I have mine on a switch to monitor the transaxle temp as well as the engine oil.
 

Fran Hall RCR

GT40s Sponsor
Chuck,

Deans lines are indeed LHD lines..not RHD...Dean received his directly from Hotrodair as they were running behind on their delivery schedule..as I think you did too.
Its an RCR specific kit so they should have been able to provide the correct parts...(from stock by now)..

He has done the correct thing with the removal and reinstallation of the aluminum braces under the dash..

It appears that Classic Instruments may have forgotten a component relating to the speedo ....Dean called and they shipped him the missing component directly...
 
Last edited:

Chuck

Supporter
Dean:

A switch so you can check engine oil temp and transmission fluid temp with one gauge: Now that is really slick!!

Mounting the speed sensor on the front is another good idea. Looks like more room than on the back.

Thanks!

Chuck
 
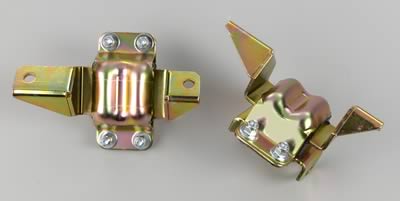
Mine are Lakewood. They look like the standard motor mount. I did drill a hole and run a bolt through the urethane to control the motor torque. They came from Summit or Jegs.
 
Hi Dean, sorry to jump into your thread, but I have an RCR ready for dispatch and would like to fit the same "fog" lights that you have. What USA vehicle are they from? I'm in Australia and would like to buy them in the USA before the car ships. Thanks in advance.
 
Back
Top