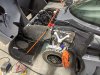
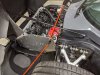
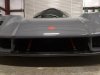
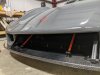
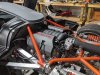
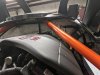
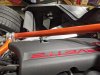
Illusion orange powdercoated splitter rods & nose box support.

- Forums
- GT40 Replica Manufacturers' Corner
- RCR Forum - RCR40/SLC/917/Superlite Aero
- The SLC Clubhouse
You are using an out of date browser. It may not display this or other websites correctly.
You should upgrade or use an alternative browser.
You should upgrade or use an alternative browser.
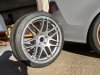
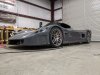
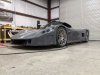
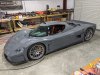
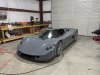
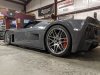
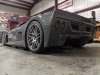
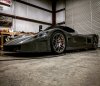
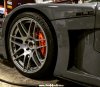
Super chrome with a gloss clear which mutes it down a good bit. Discovered it's very hard to get an accurate picture of it to show how it looks in person, camera just doesn't pick up the reflectiveness for some reason. I can't lie, I do miss the bigger contrast the bright silver wheels had on the gray paint and the wheels also looked bigger in silver as well.
First picture is Super Chrome without the clear, looks pretty much like chrome. 2nd picture is wheel in the sun, will be curious to see how the whole car looks in the sun. Rest are unedited pictures of it under the fluorescent shop lights.
First picture is Super Chrome without the clear, looks pretty much like chrome. 2nd picture is wheel in the sun, will be curious to see how the whole car looks in the sun. Rest are unedited pictures of it under the fluorescent shop lights.
Attachments
-
 Attach10833_20191231_125122.jpg164.5 KB · Views: 473
 -
 IMG_20200107_154811.jpg234.2 KB · Views: 512
 -
 IMG_20200107_180157.jpg218.3 KB · Views: 482
 -
 IMG_20200107_180205.jpg223.3 KB · Views: 467
 -
 IMG_20200107_180349.jpg234.7 KB · Views: 452
 -
 IMG_20200107_180356.jpg224.7 KB · Views: 525
 -
 IMG_20200107_180524.jpg213.8 KB · Views: 466
 -
 IMG_20200107_180622.jpg202.6 KB · Views: 443
 -
 IMG_20200107_180708.jpg189.8 KB · Views: 435
 -
 IMG_20200107_180726.jpg222.4 KB · Views: 513
Edited pictures for comparison, wheels color in these is a more accurate representation of how they look in person. Still have few things I need to take care of before I pull it out int he sun.
adjust & tighten splitter rods (used all new black SS hardware)
tint & install center caps (may draw new ones to 3D print)
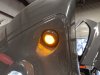
finish signals & install
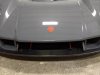
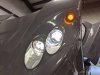
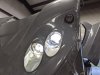
align headlights
headlight covers back on
get windows back on the car
adjust & tighten splitter rods (used all new black SS hardware)
tint & install center caps (may draw new ones to 3D print)
finish signals & install
align headlights
headlight covers back on
get windows back on the car
Attachments

Joel K
Supporter
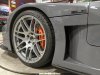
While piddling around in the shop, it's funny how you get sidetracked to do stuff you didn't plan to do while out there. Painting the rotor hats was one of those things and unsure why I didn't do this when I originally painted calipers white. I probably didn't need need to paint the face of them, but without the wheels around I wasn't sure. When I get my wheels back from powdercoat, I'm kicking around the idea to plasti-dip the barrels black to hide brake dust and road grime, just depends how much I'd need to tape off to do it as I'll be excited to see them back on the car.
Also painted the eye bolts for the splitter rods. Swapping out all the hardware for them to black SS versions and didn't have a replacement for them in black so I painted. The 4 splitter rods are with the wheels and getting powdercoated illusion orange
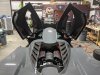
Was thinking of ways to hide the LED board and thought about etching the backside of the projector lens, which lead me to go ahead and etch the Superlite logo on them. I need to get the heat gun out and think the tint will stick better to the etched part.
Looks good Del, what kind of paint did you use on the rotors?
Looks good Del, what kind of paint did you use on the rotors?
I used high temp low gloss black engine paint, scuffed up with a red pad. I can't recall what brand paint I used, just what I had on hand
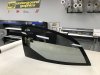
Got a picture from the vinyl place of one tinted window with 3M 1080 gloss black vinyl frit applied to outside of the door. If I had to do it all over again, I'd gotten the vinyl applied to the window prior to the tint. BUT it will serve it's purpose and allow me to seal the windows to the car.
Since I have already confirmed Avery Dark Gray vinyl is pretty much a spot on match to Grigio Telesto paint, I could ask them to do it in body color. Any opinions if I should consider that or stick with gloss black?
They took my tracings I scanned in and digitized it so the frit can be duplicated for anyone else if they wanted. Tint place said they are willing to do more SLC windows as well, could be one stop shop for anyone wanting tint other than shipping them.
Attachments
Seems if you used body color, the side cut out profile would not line up with the windshield profile (visually)
I agree with you on that. Also with the big angle of the top corner of window (by windshield) would probably look funny being body color. If it was a straight 2" border around window, it could be okay in body color, but black is definitely the safer way.
Windows are all done, will be back in tinter's hands this afternoon to box and ship. This is taking alot longer than expected, but at least there's progress and hope to get them back in my hands ASAP.
Have a poker run scheduled for end of February from Houston to Golden Nugget casino in Lake Charles. Pretty excited and been looking forward to doing one with the car.
Signals are all rewired and loomed. Just need to attach the other side.
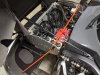
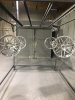
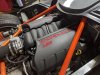
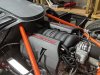
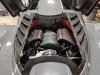
Got my C6 fuel rail covers installed, kind of surprised they fit without issues with the intake flipped around. Only thing I had to do was use shorter stand-offs for the coolant reservoir to make room. Does make it harder to fill reservoir when needed, but can always loosen the bolts for it to pull it out. I did not realize how much my engine bay needed a set of these till now. Hope to get some inlays made and installed this weekend for it. Plan is in the future fill in the Corvette, sand whole covers smooth and paint Grigio Telesto. OR cut out a rectangle where it says Corvette, draw and 3D print a new piece with Superlite logo embossed in it and fill in the gaps and paint.
No pictures, but also pulled my android screen out to replace with similar one with a volume knob.
Attachments
-
 IMG_20200114_164826.jpg141 KB · Views: 445
 -
 IMG_20200114_164832.jpg189.6 KB · Views: 484
 -
 IMG_20200114_164836.jpg183.2 KB · Views: 423
 -
 IMG_20200115_200308.jpg214.5 KB · Views: 471
 -
 IMG_20200115_200319.jpg236.6 KB · Views: 417
 -
 IMG_20200115_200324.jpg257.1 KB · Views: 435
 -
 IMG_20200115_200358.jpg197.9 KB · Views: 436
 -
 IMG_20200115_200407.jpg203.3 KB · Views: 481
 -
 IMG_20200115_200533.jpg218.9 KB · Views: 453
 -
 IMG_20200115_200607.jpg223 KB · Views: 478
Looking good Del!!
Seeing how close your Corvette LS3 engine covers are to the roll cage has me concerned that my custom designed and 3D printed covers are not going to fit. This will be one of the first things I dive into when I get my kit. I made the wall thickness on the covers rather substantial (3/16") and they stand off of the coils a bit. Oh well, if they do not fit I will go another route") They are not carbon fiber skinned yet.
They are not carbon fiber skinned yet.
If they do not fit I may have to CF skin a set of Corvette covers or I have also considered rolling some aluminum into a cover and skinning that. Decision, decisions, decisions. Other builders like yourself who post lots of pics certainly help in making these decisions by sharing what has been done, so THANK YOU!!
Seeing how close your Corvette LS3 engine covers are to the roll cage has me concerned that my custom designed and 3D printed covers are not going to fit. This will be one of the first things I dive into when I get my kit. I made the wall thickness on the covers rather substantial (3/16") and they stand off of the coils a bit. Oh well, if they do not fit I will go another route
They are not carbon fiber skinned yet.If they do not fit I may have to CF skin a set of Corvette covers or I have also considered rolling some aluminum into a cover and skinning that. Decision, decisions, decisions. Other builders like yourself who post lots of pics certainly help in making these decisions by sharing what has been done, so THANK YOU!!
Looking good Del!!
Seeing how close your Corvette LS3 engine covers are to the roll cage has me concerned that my custom designed and 3D printed covers are not going to fit. This will be one of the first things I dive into when I get my kit. I made the wall thickness on the covers rather substantial (3/16") and they stand off of the coils a bit. Oh well, if they do not fit I will go another route
If they do not fit I may have to CF skin a set of Corvette covers or I have also considered rolling some aluminum into a cover and skinning that. Decision, decisions, decisions. Other builders like yourself who post lots of pics certainly help in making these decisions by sharing what has been done, so THANK YOU!!
Thanks, glad to help out!
Skinning skinning the C6 covers in carbon has crossed my mind as well. Also considered body color covers and skinning the intake cover (had no clue these are only covers) or I believe they make them in real carbon as well.
Life update, turned in my notice at work and going to work with a couple of electrical engineers who own a small engineering firm locally. I've worked with both in the past, so looking forward to this new adventure. I'm a senior instrument/electrical designer and while I'll still be doing some design work, I'll also be running all their projects and we will be building a team which I'll get to manage. Something completely out of my comfort zone, but also climbing the proverbial work ladder, so to speak. It's sort of a gamble to leave the job security I have now, but this whole thing just feels right. Always been in the background of their company, never crossed my mind I'd work for them. It's as close as I'll ever get to owning an engineering firm without a financial investment and my bosses will be awesome to work with/for. Worse case I'll have some good resume stuff to add and no problem finding a job in office with another engineering firm or even back out at the plant if I chose to.
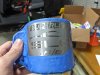
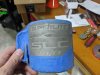
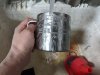
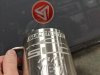
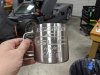
Got sidetrack piddling in the shop while drinking my coffee and decided my mug needed to be etched so took the 30min to cut some decals and make it happen.
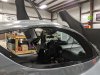
Going to Houston Auto Show Saturday so since my windows are tinted and wrapped, I'll scoop them up while there instead of getting them shipped. Pictures will follow, plan to put at least one on when I get home Saturday evening to see how things look and share some pics.
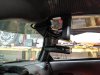
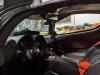
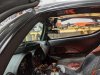
I've ran a radar detector since I had my license and while when a kid I did it more so I could speed, but now it is just nice knowing when cops are around or clocking people so still run one. I've planned to put one in the SLC and had enough Amazon points to pay for an average radar detector (Uniden DFR6) and ordered the universal BlendMount to fit on the Autovox LCD rear view mirror stalk (3/4" diameter). It didn't work out how I hoped, RD just seems too much in my field of view. I use the same brand mount in my daily and while it's definitely still in my field of view, I don't find it bothers me (took me a couple days to get use to it). SLC may be the same after driving with it, but it's a way smaller car and field of view is already limited. This weekend I'll see if it's possible and room to flip the mount around and have the RD above the mirror. Pictures as always.
Got sidetrack piddling in the shop while drinking my coffee and decided my mug needed to be etched so took the 30min to cut some decals and make it happen.
Going to Houston Auto Show Saturday so since my windows are tinted and wrapped, I'll scoop them up while there instead of getting them shipped. Pictures will follow, plan to put at least one on when I get home Saturday evening to see how things look and share some pics.
I've ran a radar detector since I had my license and while when a kid I did it more so I could speed, but now it is just nice knowing when cops are around or clocking people so still run one. I've planned to put one in the SLC and had enough Amazon points to pay for an average radar detector (Uniden DFR6) and ordered the universal BlendMount to fit on the Autovox LCD rear view mirror stalk (3/4" diameter). It didn't work out how I hoped, RD just seems too much in my field of view. I use the same brand mount in my daily and while it's definitely still in my field of view, I don't find it bothers me (took me a couple days to get use to it). SLC may be the same after driving with it, but it's a way smaller car and field of view is already limited. This weekend I'll see if it's possible and room to flip the mount around and have the RD above the mirror. Pictures as always.
Attachments
-
 IMG_20200117_194559.jpg169.2 KB · Views: 439
 -
 IMG_20200117_195543.jpg152.1 KB · Views: 409
 -
 IMG_20200117_200023.jpg150.1 KB · Views: 392
 -
 IMG_20200117_200202.jpg152.7 KB · Views: 409
 -
 IMG_20200117_200501.jpg157.4 KB · Views: 441
 -
 IMG_20200121_175655.jpg185.7 KB · Views: 447
 -
 IMG_20200121_175708.jpg201.7 KB · Views: 407
 -
 IMG_20200121_175738.jpg200.4 KB · Views: 424
 -
 IMG_20200121_175741.jpg228.7 KB · Views: 431
 -
 IMG_20200121_175803.jpg206.1 KB · Views: 420
Why not mount it on top of the dash on the right side?
That's exactly the spot I was eyeballing when I realized the rear view mirror location may not work. I haven't tested the location out yet, but stuff not being centered bugs me for some reason so not sure if I could do it. Originally I wanted to put it on the center of the dash via suction cups like I've done on f-bodies, but honestly totally sure why I didn't pursue it. Maybe I thought it would make noise, like that matters when you hear the sweet sound of an LS?!
Del,
Good luck in your new career venture! Any time you make a career move it can be very nerve racking. I sure it helps a lot that you already know the new people you are working for.
If you ever end up in NW Ohio we are always looking for electrical engineers at my workplace. They are hard to find. My daughter is studying electrical engineering (Sophomore at Ohio Northern University) and it does not seem like many young people are choosing that career path these days.

Good luck with the new job!