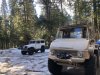
For New Year’s me and my daughter took the unimog On a snow run in the Sequoia national Forest with the valley crawlers club. Our crew busted through miles of amazing trails That travel deep into massive forests that very few people will ever see.Took most of the day. If any of you guys from back East ever come to California during the summer months just rent a jeep and play with Google Maps and you will see trails that run through these massive forests. These are trails that you access on your own without going through the forest Park gates. No fees needed. You might go all day without seeing another soul.

- Forums
- GT40 Replica Manufacturers' Corner
- RCR Forum - RCR40/SLC/917/Superlite Aero
- The SLC Clubhouse
You are using an out of date browser. It may not display this or other websites correctly.
You should upgrade or use an alternative browser.
You should upgrade or use an alternative browser.
Dusty's SLC Build
- Thread starter Dusty
- Start date

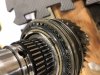
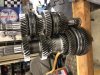
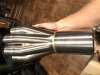
OK. Finished swapping out the 6th gear overdrive on the input shaft. My finger is pointing at the one year that you will be changing. Everything on top of this Gear must be removed from the stack and everything below it does not get touched.
Attachments
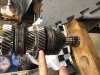
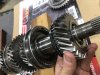
Just start lifting stuff off. Gears just slide off on the input shaft. There are a few pieces like this in the picture that you carefully remove and keep track of where they came from. The bearings are in a split plastic case and they easily come off. Cake
Attachments
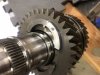
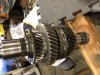
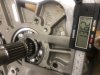
After taking off a couple years you’ll come to the snap ring that you see in the picture. That snack bring easily comes off. The gear just below that snap bring is the gear that you need to remove with a 3 jaw puller. It’s not on very tight at all. It comes off really easy.
Attachments
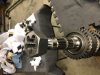
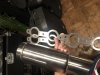
Once you pull off that gear you have two more years to go. The next gear in line slides right off and the gear below it is the one that you swap out with the new overdrive gear. Once you swap out the overdrive gear and put back the one that was on top of it It is time to press on the one gear that you just pulled off with the puller. That gear presses onto the splines that you can see in this picture. This is not a tight pressed gear like that big dick Gear you put on the output shaft. This gear pushes on with very little for us. If you were lazy you could tap it on with a mallet. I just used my Pres and I used that cheap Harbor freight 2 inch receiver that I used on the output Gear job to press on the splined gear
Attachments
Pile the rest of your bits on top and you’re done. The stack is very easy to swap out On the input side. Much easier than the output side.
While I was at it I cleaned up the splines on One of the chefs with a cheap harbor freight spline clean up die. Note that this is the day I made just to clean up splines and not to cut them. You can get the cheap from Mcmaster for about 20 bucks each.
While I was at it I cleaned up the splines on One of the chefs with a cheap harbor freight spline clean up die. Note that this is the day I made just to clean up splines and not to cut them. You can get the cheap from Mcmaster for about 20 bucks each.
Attachments
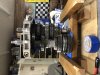
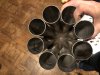
OK I took a little time tonight to mount the input and output gear stacks back into the bearing plate. Note that these two stacks of gears must be pressed into the bearing plate once the new overdrive gears are installed. Remember that the Gear stacks had to be pressed out of the bearings plate before I replaced the 6the gear overdrive. I Posted some pictures of that weird tool I made to press out the bearings from the bearing plate earlier in this blog.
Remember that the two Gear stacks must stay in position with relation to one another as they are pressed into the bearing plate. The gears need to mesh and you only have about 1/8 of an inch of actual axial position difference that is acceptable between the two gear stacks as you press them into the bearing plate. Note that I have the wood block With a couple of holes in it that I used earlier To keep the side of the gear stack opposite the bearing plate tight together.
Note that you are actually pressing the bearing plate down on top of the two gear stacks. And the pressing force is being applied to the bearings not the housing plate. So as not to put undue stress on the bearings you’re actually pressing the part of the bearing that is tight against the shaft as seen in the picture. There is no need to stress the gears By pressing against them as you compress the bearings so be sure to put something at the very bottom of the stack to support it as you press the bearings on. As seen in the picture
I used my press to alternate back and forth from the input bearing to the output bearing and only pressed about an eighth of an inch each time before alternating back-and-forth. You have to do it that way if you expect the bearings to go on flat Without unnecessary stress on them. They are not that tight of a fit and if you had a buddy with you you could probably lightly tap them quickly back-and-forth with a mallet without using A press to seat the bearings on the shafts. My daughter is my helper and she had her Wisdom teeth out today so she did not have the cognitive fortitude to be of much help.
Attachments


HCF - John
Gearbox / Brake Systems
Congratulations, Dusty!!
Best,
John
Best,
John
I’m still waiting on one of those expensive lock nuts from Germany so that I can finish putting the transmission back together
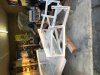
In the meantime I took all the suspension components off and ordered up all these cool exhaust bit so that once I have her back together my fab shop but he’s can put the eight into one exhaust together
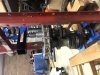
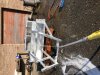
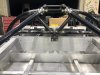
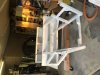
I took all the suspension components off and prepped the chassis for paint
In the meantime I took all the suspension components off and ordered up all these cool exhaust bit so that once I have her back together my fab shop but he’s can put the eight into one exhaust together
I took all the suspension components off and prepped the chassis for paint
Attachments
-
 29FF37CF-599B-4A48-8AE1-E66078C87092.jpeg484 KB · Views: 459
 -
 5F5A6CF2-4B1F-4DAB-974C-1A4EE11B8F1C.jpeg426.4 KB · Views: 483
 -
 C7FAA519-79F9-46BB-9A49-085631B65239.jpeg329 KB · Views: 437
 -
 88BDCE29-D1C6-4FB1-A1E0-7847D1045E7D.jpeg325.6 KB · Views: 445
 -
 56630693-1D83-45D7-8689-8DB5362B0CCB.jpeg333.5 KB · Views: 475
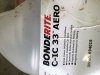
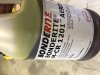
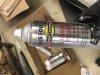
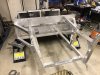
I have a buddy that works at Lemoore Naval air station. He is the head painter for the Fa18s on the base. He told me to send the whole chassis down with 500 grit then wash it down with iC 33 And wash that off with water. Then I brushed on this CR 1201 prep solution And washed that off with water also. After that I dried the whole thing off and primed it with this aluminum primer. Note that this primer is not an etching primer. Supposedly that two-step solution process gets the etching done. It took me about five cans of paint to prime it.
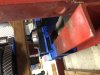
The bottom of the chassis I am going to cover with a heavy bedliner. Hopefully that will cut down sound a bit and offer some protection.
Note that I don’t think this chassis really needs any help With regards to corrosion but as I had it all the way torn down anyway I thought I would just go ahead and paint it. It only took me about an hour to remove all for suspension corners. Only eight bolts hold on each corner (the a arm brackets) so with a buddy and an electric impact wrench the whole thing just falls apart.
Attachments
-
 BA6B0EAF-B262-4FF6-A81F-C56306DBDA4D.jpeg814.9 KB · Views: 434
 -
 3F373D96-CB32-431F-8796-044229679DD7.jpeg452.6 KB · Views: 474
 -
 32E4C6A3-BF77-49C2-9649-2878F3809F87.jpeg241.4 KB · Views: 488
 -
 AB602530-FEFA-4235-A157-F3B17B6BFB79.jpeg263.1 KB · Views: 422
 -
 06EA1FCE-2EB5-4D04-AE3C-FFABD279361D.jpeg378.5 KB · Views: 475
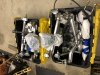
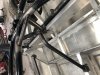
The primer turned out great. I hope it will stick.
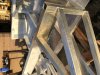
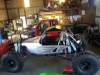
The cage work done by the fab shop turned out awesome also. And the electric power steering is really trick and should work well.
The cage work done by the fab shop turned out awesome also. And the electric power steering is really trick and should work well.
Attachments
-
 1B447CAC-96F4-4DB7-B8BA-0652B972E6FD.jpeg355.7 KB · Views: 450
 -
 3541EC13-6CC4-457F-A307-93E239492D9B.jpeg387.6 KB · Views: 443
 -
 A7F93246-A261-4EE8-83E5-2134854233D8.jpeg377.3 KB · Views: 459
 -
 1573B5C9-D8AE-40A2-829B-EA24165A9EFA.jpeg399.3 KB · Views: 443
 -
 B2007B01-BA7A-45B2-B10F-9256DAE879D9.jpeg379.5 KB · Views: 456
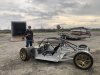
I considered using fancier paint but ive had good luck with rustoleum as long as it isn't exposed to too much sun. the real question is whether the primer will stick with my prep. I want to be able to touch up with rattle cans as there is still a lot of tinkering that needs to take place to the chassis.
I considered having the whole tub powder coated and even have a good local shop that has coated many of my prior projects. But once I do that its a total mess to grind the stuff off to weld. and if I grind it off or scuff I can nevre get the touch up to match. I left my rockracer as raw steel so I just oil it down after a hard day. still looks like the day it was built
im going to roll on a bedliner to the underside
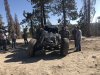
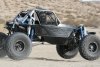
shameless pics of the racer
I considered having the whole tub powder coated and even have a good local shop that has coated many of my prior projects. But once I do that its a total mess to grind the stuff off to weld. and if I grind it off or scuff I can nevre get the touch up to match. I left my rockracer as raw steel so I just oil it down after a hard day. still looks like the day it was built
im going to roll on a bedliner to the underside
shameless pics of the racer
Attachments
Similar threads
- Replies
- 36
- Views
- 8K
- Replies
- 26
- Views
- 8K
- Replies
- 7
- Views
- 6K
- Replies
- 64
- Views
- 18K