Eric's SLC Project Code Name "Grifter"

Hmmm... any advice anyone?

lrg-2114-img_20141009_190818.jpg
 
If you need a way to use the head light hardware that comes with the system, here are a couple brackets I made up to use the hardware, with a way to adjust the beam instead of shims and washers. If you would like the drawing, send me a email, for some reason I cant upload the pdf drawing.
 

Attachments

  • DSCF0570.jpg
    DSCF0570.jpg
    155.3 KB · Views: 394
  • DSCF0572.jpg
    DSCF0572.jpg
    208.7 KB · Views: 449
  • DSCF0573.jpg
    DSCF0573.jpg
    227 KB · Views: 377
More updates can be found on Gearhead Daily | Certified Car Guy Cool! too if I don't always post on the build threads. Just throwing it out there :)

10696165_10154649102060702_1440262660570361635_n.jpg


Well folks, fall is officially here in Minnesota and it’s starting to get colder. I hope you enjoyed summer because completely over with. Kaput.

I’ve been working a couple hours per night on the car whenever I get a chance. I’m not that confident with fiberglass so this has been a decent learning experience. Let’s get down to it.

1174891_10154599402340702_7434537733066667189_n.jpg


I was able to finish installing the lights and lens cover on the passenger side of the from clam. This is a bit of work to get everything just right. I know it looks a bit chaotic from some of the previous pics, but if you take it slow and take it in small chunks, it makes life a lot easier.

10603377_10154611045330702_7014750409154269070_n.jpg


The tail lights provided their own challenge as there isn’t a clear way to attach the lenses (borrowed from a Dodge Dakota, seriously, take a look at one some time!). I took the better part of an afternoon to make sure these fit tight and as close as possible. I will have to back fill them with fiberglass at some point, but that point isn’t now.

10402719_10154604274370702_5206523824937847682_n.jpg


Now, as parts get put on the car, so does my list of custom tools. This is the first “fun car” that I have owned that will have AC so I’ve had no need for an AC hose crimper.

10710593_10154628737750702_6278049495802479339_n.jpg


I decided that since the name “Stormtrooper” came up a bunch lately, it made sense to add a few black accents to the body. When the doors are closed you won’t be able to see much of the black, but when you open that and the front and rear clam you’ll see the accents to the color. I had some issues with tape sticking to the body after using some “Goof-Off” sticker remover so that’s why I have all the over spray issues. I tried several kinds of tape and had come to the conclusion that there was some residue on the body keeping it from sticking. I tried a couple solvents with no avail. I reinstalled the doors and will attack the overspray soon. I’ve found that brake cleaner eats right through this type of paint! Easy and cheap fix!

I think I may have figured out the engine situation for “Griftrooper”, here’s a small hint…. Giggity.

10170825_1492601204322153_1026050724064502153_n.jpg
 

Howard Jones

Supporter
Have a look at my build log. I made a shifter mechanism to address that issue. However I like this one better. Or drill a big hole in the diffuser side plate.
 

Attachments

  • attachment 11.jpg
    attachment 11.jpg
    38.6 KB · Views: 397
  • attachment222.jpg
    attachment222.jpg
    40.6 KB · Views: 421
  • attachment333.jpg
    attachment333.jpg
    45.5 KB · Views: 403
64239_10154735799465702_944972013337674990_n.jpg


Hey hey say hey sports fans! We’re back with some progress on some of our projects on Grifter.

Pictured above is what the car looks like right at this current moment. I was able to finish the passenger side head lights and light cover. I finished off the masking the body for the black accent pieces. It should look pretty good when I finally get around to taking care of the overspray (don’t ask). Ugh.

10410852_10154662916780702_4079561381022579608_n.jpg


I also added a battery box I made with some left over aluminum pieces I had laying around (you can see going here to YouTube!)

10418144_10154662555800702_6263656573358605467_n.jpg


64264_10154695912675702_7727440526162858926_n.jpg


The seats needed seat belts so I made sure to get some stout ones and mount them to the frame with grade 8 bolts and 1/4 thick plates holding the belts in place.

10409028_10154711653035702_7733814118978559930_n.jpg


The shifter needs a bracket made and installed. It’s ugly, but it works. Shrug.

1959855_10154660484000702_1813609621336805132_n.jpg


10418256_10154661056610702_6123015296291814510_n.jpg


I had to pull the transmission out to get at some of the points in the chassis to do some minor work. It had to come out regardless to fit the engine so I just went ahead and did it.

10641063_10154687889060702_3182065239371127573_n.jpg


I’m no good at wiring but this ISIS system makes this fairly straight forward. Pigtails for the lights already built in and minimal connection points makes this one of the most straight forward systems I’ve used.

10645266_10154708702950702_3246200286252212373_n.jpg
 
lrg-2120-10922779_10155027367860702_4994778122724823104_n.jpg


Straight up for reals player, it's damn cold in our home state of Minnesota. We've seen temps well below zero and not having a garage heater has frankly gotten in the way of making decent progress on the car.

I've resorted to finding things to bring into the basement and shuttling tools one at a time from the garage. It's not all that efficient and frankly, slow work. Regardless, I've been trying my best with a small space heater and finding other projects to do. My motto through this whole build is:

It's all gotta get done, so any work, even not %100 on task gets us closer to a finished product

lrg-2130-10846155_10154908799755702_9100829097114251268_n_copy.jpg


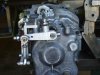
This is of Jim Hall who works at TPIS in Chaska. He helped us get the motor to and from his shop.

lrg-2126-10407589_10155021470180235_4614827572967183435_n_copy.jpg


The dyno went pretty well all things considered. If you missed our dyno video, it can be seen below.

https://www.youtube.com/watch?v=KVFA8TUqvmM

Our motor made the "as advertised" 525hp on the dot and 461 ft-lbs of torque. No fiddling, no adjustments, no "corrections" to the tune or anything. It was spot on. No complaints from us! We will dyno the motor again once it's in the car and running so we can make some tuning adjustments with a load on the tires.

lrg-2125-10355756_10154976775165702_3282909278019504814_n_copy.jpg


lrg-2124-1509119_10154853933715702_735619728507830450_n_copy.jpg


Next up, I started to attack the interior. We mocked up the dash board to see what needed trimming and what needed to be done. The more stuff we put on the better it gets! I then opted and purchased a new steering wheel and adapter. Planning ahead, I noticed that we would have to weld the stock shaft onto the steering column which didn't allow much wiggle room down the road.

lrg-2131-10846263_10154852858685702_4867303160160760245_n_copy.jpg


lrg-2132-10898168_10154976776935702_8349040463740993451_n_copy.jpg


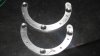
I finished up some little piddly bits such as the door latches and a couple turnbuckles for the front splitter. I installed the inner door latches too, but still have to figure out how to attach them all together. That said, I'm are going to wait to see how the body lines up before installing the door strikers.

lrg-2129-10689527_10154829320405702_4017837363236899446_n_copy.jpg


lrg-2123-1507106_10154829474455702_3337206738270232714_n_copy.jpg


This could be called "before and after". This is a job we were able to do while it was -35* outside. Think I'm joking? I sadly am not.We trimmed the vents and cut out the holes, it's an odd shape so it took some doing to get it just right. We opted to pop-rivet them in place rather than graft them in because it's quite possible that they will break from a rock or something stupid, we do want to be able to fix them easily in the future.

lrg-2122-1377515_10154846137960702_6800361706947900436_n_copy.jpg


lrg-2128-10628627_10154976363945702_6135332013814917436_n_copy.jpg


If the padding on the seat pictured above looks familiar, it's probably because we stole our wife's yoga mat and cut it up to make some padding for our seats. It made a world of difference.

lrg-2121-10916691_10155026379140702_5736550842715253489_o.jpg


We'll see if that's enough belt wrap for the alternator, we will ad a pulley later if it's not sufficient. The alternator is a stock GM 105amp unit with the stock number of 8247. These come on Tahoe's, Silverado's and GM trucks with the 5.3L engine in the mid 2000's. You'll need a couple 1/2" spacers and 2 - 90mm 10x1.50 bolts to finish it up.

lrg-2127-10599699_10155032237115702_8915651132278004807_n_copy.jpg


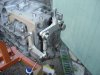
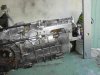
The motor was put into place, despite the cold weather we soldered on.

Catch'ya on the flip side!
 
Well, the cold weather continues and work on the SLC has been in a word: Slow.

We were able to get some work done and here's where she stands.

11004569_10155152782520702_8889432037148211714_o-1024x804.jpg


Who doesn't love finely welded aluminum custom pieces? A while back one of the members on the SLC specific forum made a very limited run of these coolant overflow tanks. I completely missed that by a good year or more, but thankfully one of the lucky recipients decided to sell me his because he was going another direction. This is a killer piece and totally worth the extra bucks. This one is sooooo nice, dontcha think?

1378349_10155079672110702_8291414676582275999_n-copy.jpg


The Mast Motorsports oil pan that we reviewed recently comes with two plugged ports on the pan for an oil cooler (which we will add at a later date). These are perfect for an oil pressure sending unit (left) and an oil temp sending unit (right) that are specific to our STACK gauge cluster. For those who know how the LS oil pan is routed, this one is slightly different. The oil in the stock pan recirculates via the external piece, this one recirculates the oil internally, so no worries about oil starvation.

10958929_10155150232220702_6564040416626827178_n-copy.jpg


We got our air inlet tube from Nate at One Guy's Garage (One Guys Garage). He made it a tad long in case it needs to be trimmed when the rear clam is installed. More custom aluminum pieces! Baller status has been achieved!

10426156_10155079793920702_7847738880953099383_n-copy.jpg


Moving to the exhaust side of things. We decided a long time ago that the exhaust had to exit out the side. We found our exit location first and worked backwards towards the LS7 exhaust manifolds bolted to the engine. We promised a friend that we would do our damnedest to get some pics of the car shooting flames.

10945608_10155105172265702_2022173991219734942_n-copy.jpg


Here's what we eventually came up with this for both sides of the car. It's two pieces and slips on with a thick band clamp. A one piece system wasn't going to fit, so that kinda sucked.

16503_10155162439390702_1992040641581282766_n-copy.jpg


We added some VHT high temp exhaust paint to the whole tube and manifold. It should look decent after a few heat cycles for the paint to cure.

10990014_10155158007950702_8083745882638268092_n-copy.jpg


Our neighbor came by to help remove the body. There's really only a few ticky-tack things left like wiring up the gauge cluster, adding fluids and doing the finish wiring. Hopefully we'll be posted a first start video soon!

10983538_10155183957385702_7627993995200586055_o-copy-1050x651.jpg


My god this thing looks so badass. Dat'ass y0!
 
Found it.

[ame=http://www.amazon.com/gp/product/B003CM6E3K/ref=oh_aui_detailpage_o06_s02?ie=UTF8&psc=1]Amazon.com: High Gloss Black / Backer Paint Aerosol 3.5oz: Toys & Games[/ame]

Bit of advice, use some vinyl tape and pretty hard with a plastic edger or credit card to get a crisp line.

Also, pull this up while it's still slightly tacky, if you let it dry it will come up in chunks.
 
Back
Top