Eric's SLC Project Code Name "Grifter"

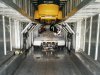
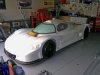
The car has arrived! I have questions... LOL!

I'm super pumped to have the car here. It certainly brought a lot of people out of the neighborhood asking all sorts of questions and taking pics. It does draw a crowd!

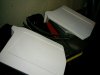
Soooo.... I honestly have no clue... is what I have the 'race splitter'? It's hard to tell from the pics online of the other cars. Also, this long black fiberglass piece... I assume it's the side skirts that need to be cut in half? Yes?

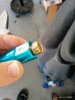
I'm super confused by the sheer volume of stuff I unpacked, so I'll get a chance to sort it all out tomorrow in the day light.

The wife wasn't super keen on the idea, but now that it's in the garage... She's pretty impressed. "Ok, this might be kinda cool" :D
 

Attachments

  • 8284.jpg
    8284.jpg
    380.4 KB · Views: 691
  • IMG_20140830_161737.jpg
    IMG_20140830_161737.jpg
    928.9 KB · Views: 770
  • IMG_20140830_164144.jpg
    IMG_20140830_164144.jpg
    498.3 KB · Views: 868
Thanks everyone for the help! There's still a few pieces that I can't seem to ID just yet, but I'll post 'em up here when I get a chance.

I decided I ain't wasting no time. I need to get my car back in the garage before winter, so the goal is the be at the point of having the body back on the car by then... that's a lofty goal, but what the hell.

I have done some insulation but have some left over. Any thoughts on where to put some next?

Body off:
lrg-2082-img_20140831_153359.jpg


Starting insulation:
lrg-2083-img_20140831_165652.jpg


lrg-2084-img_20140831_173348.jpg


Back side:
lrg-2085-img_20140831_175021.jpg
 

Ken Roberts

Supporter
Hope you pressure tested your fuel tank. A few of us have found small leaks at the welded seams. It will be next to impossible now that you have added the stick on insulation.

Personally I wouldn't stick on the insulation at this point. Fit up as many items as possible first. The surface you attach a bracket, bolt, rivet nut or rivet to should be bare to achieve proper clamping forces.


If you look closely you'll see I cut out all the bracket pieces so nothing is being sandwiched with insulation.
 

Ken Roberts

Supporter
Your coolant expansion tank, isis module and other items will be/might be mounted to the rear bulkhead. Then there are the adel clamps to hold and route the wiring harness. Plus the fact that many of these items get moved two or three times until it's just right. Without the engine and the wiring harness in place it's a big gamble to get it "spot on" as Fran would say.
 
Your coolant expansion tank, isis module and other items will be/might be mounted to the rear bulkhead. Then there are the adel clamps to hold and route the wiring harness. Plus the fact that many of these items get moved two or three times until it's just right. Without the engine and the wiring harness in place it's a big gamble to get it "spot on" as Fran would say.

Ah fair point. I suppose a little scraping won't kill me... Thoughts on other places that need it?

Also... Haven't figured out exactly what these pieces are for. Does anyone have a pic of the head liner?

I'm not sure I got one. Need to make sure before I bug RCR :)
 

Attachments

  • IMG_20140831_194802.jpg
    IMG_20140831_194802.jpg
    363 KB · Views: 583
Congrats! I'd like to arrange a time that is convenient for you to buzz over and take a look at it. My project is not going to happen until next year so would love to stop in and check yours out from time to time; even help as needed.
 
I'm curious... you first posted 3 weeks ago, and now you have your car. How long between order and delivery?
 
Ah fair point. I suppose a little scraping won't kill me... Thoughts on other places that need it?

Also... Haven't figured out exactly what these pieces are for. Does anyone have a pic of the head liner?

I'm not sure I got one. Need to make sure before I bug RCR :)

Those panels go behind the rear tires as a tail light close out. You will have to cut out an access panel in them and make a panel to cover the hole.
 
Those panels go behind the rear tires as a tail light close out. You will have to cut out an access panel in them and make a panel to cover the hole.

Gracias!

Thanks everyone for the help/suggestions... lord knows I need it! LOL

On a side note... anyone have any thoughts on how to get rid of the tape residue? Goo-gone just isn't working for shit.

Got a little progress today, drilled/tapped many holes for the brake lines, etc... Starting to mock up the fuel system. How's everyone feel about this?

Fuel pump on the floor, pull up pump mounted to the frame, filter/reg/return mounted to the rear part of the frame. Surge tank in stock location.

lrg-2087-img_20140901_164911.jpg


lrg-2086-img_20140901_164247.jpg
 

Fran Hall RCR

GT40s Sponsor
It will be a bit of a pain to service once the bulkhead is permanently attached....

I prefer to have them mounted out in the open for ease of service...mounted on a single panel that holds both pumps, regulator and filter
 
I made a mounting plate going from the upper rear chassis tube to the lower tube.
Lots of room then, and accessable, and can be removable as a unit too.
 
Never underestimate the amount of stupidity I have because this happened.

Ugh.. the one end is epoxied in and now it's smashed all to hell from me trying to get it off. Any suggestions would be nice. Tried heating up the epoxy with no luck.
 

Attachments

  • 10665870_10154508190110702_2856472713125937455_n.jpg
    10665870_10154508190110702_2856472713125937455_n.jpg
    81.4 KB · Views: 654
Back
Top