Thank you Will. While I have read through multiple build threads and the build manual many, many times, I just wasn't sure of the specific interferences that preclude this option. Thanks for the info. I will most definitely be looking at options to find a way to make this happen.

- Forums
- GT40 Replica Manufacturers' Corner
- RCR Forum - RCR40/SLC/917/Superlite Aero
- The SLC Clubhouse
You are using an out of date browser. It may not display this or other websites correctly.
You should upgrade or use an alternative browser.
You should upgrade or use an alternative browser.
Fling SLC Build Thread
- Thread starter mcfling
- Start date
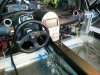
I was able to fit a double din unit in, but you will have to rework the dash to get it to fit. The 2 Vintage Air controls and a third switch for the 4 way valve is about the screen - just the stalks are showing as I haven't found any knobs I like yet. Trying to match the billet push button switches as close as I can.
Attachments

I was able to fit a double din unit in, but you will have to rework the dash to get it to fit. The 2 Vintage Air controls and a third switch for the 4 way valve is about the screen - just the stalks are showing as I haven't found any knobs I like yet. Trying to match the billet push button switches as close as I can.
Peter, where did you get your center "tunnel" trim pieces. Looks nice and tight/streamlined. --- Mike
I was able to fit a double din unit in, but you will have to rework the dash to get it to fit. The 2 Vintage Air controls and a third switch for the 4 way valve is about the screen - just the stalks are showing as I haven't found any knobs I like yet. Trying to match the billet push button switches as close as I can.
Peter, very nice, neat looking install! :thumbsup: Who is the manufacture of the display/control unit and what capabilities did you incorporate into it?
Jim
Peter,
that is pretty impressive...first time I have seen an SLC with that kind of system.
Well done.
that is pretty impressive...first time I have seen an SLC with that kind of system.
Well done.
I was able to fit a double din unit in, but you will have to rework the dash to get it to fit. The 2 Vintage Air controls and a third switch for the 4 way valve is about the screen - just the stalks are showing as I haven't found any knobs I like yet. Trying to match the billet push button switches as close as I can.
Weren't you telling me you had no mechnical ability a year ago? That's far better than I could ever hope to do :thumbsup:
Peter- beautifully done! Thanks for sharing. You have 10 switches on your modified center panel. Can you identify those in regards to each use?
Thanks for the compliments – creativity is often undetected plagiarism J
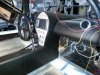
Mike - console is simply a piece of aluminum I had bent into a “U” shape and covered in leather. The dash is the stock piece Fran supplies, I just reworked the “humps” to be a bit taller and extend down to meet the console. Easy to do even though I didn’t have a lot of experience working with fiberglass. Send me a PM if you want more info on how I did it – I don’t want to clutter up Mr. Mcfling’s build thread.
Jim – the display is a Jensen vm9424bt with touch screen, blue tooth, navigation, satellite/am/fm radio, DVD, ipod , rearview camera , USB. I wasn’t planning for all that stuff, but I needed a screen for the backup/rearview camera and well….one thing lead to another and this is where I ended up. I have the fm/sat/nav antennas and the camera mounted on the roof in a “shark wing” I pulled off a 5 series BMW. The amp is mounted under the dash in the passenger foot well and I plan to mount speakers on the bulkhead behind the seats.
Alex – You learn a lot in a year, especially when you follow the advice of fellow builders J The best advice I received was something Allan told me when I first started out – “Don’t be afraid to just try something, if you screw it up, you fix it.”
Michael – switches are as follows:
Center section: wwiper, wwasher, rearview camera, backup lights, interior lights, garage door opener, hazard, ac/heat, fan speed, 4way value open/close. Couple of notes: I didn’t want the coolant circulating into the VA unit when I didn’t need heat and the LS wants to see circulation at the thermostat housing so I install a valve to take care of that. I had to remove the wiper stalk from the steering column in order to extend the center section of the dash and I need a windshield washer to pass MA inspection, so those are dash switches now. I am using the camera for BU as well as rear view so I wanted an additional switch to turn it on besides the reverse switch in the transaxle. I also wanted to be able to turn on the backup lights when people tailgate me just so I could get their attention, so this is controlled either by the dash switch or the transaxle switch.
Other dash components are: the standard KOSO unit with 4 additional indicator LEDs, the start/stop button to the left of the steering wheel, a rocker switch to control a valve to open/close the defrost, and a momentary button for the horn. I also plan to repurpose one of my ISIS key fobs and mount it in the center section of the steering wheel so I have a wireless horn button. And before you think it will be easy to steal my car now that I announced I will have an extra controller hidden there, I am working on integrating a biometric fingerprint reader as an additional security feature. I also have a HUD built into the hump behind the steering wheel that is flush mounted so you can't really see it in the picture.
Still to be installed – rocker switches to control the linear actuators for the doors/front/rear clips, lift kit switch, traction/launch control, and fire suppression. I am trying to keep the dash clean so my idea is to mount these in the space under the driver’s door where they are accessible but not all that visible.
Thanks
Like a squirrel gathering nuts, I collected a few more goodies today. While the debate remains about the need for an oil cooler and 4 point steam vent system, I got those ordered. The vent system was from KUR-
LS Water Vapor System.
I found a Low-Profile Thermostatic Oil Cooler Adapter for LS-Series Engines from Improved Racing-
Improved Racing | Oil Cooler & Sensor Adapters
This will serve as a bypass when temps are not up to speed yet. I have yet to order the oil cooler itself, as I was unclear about the size needed. My thoughts were that it would be mounted behind one of the rear side inlets (I assume 1 is sufficient). Because I intend to enlarge the side inlet, I thought it might be best to wait on purchasing the cooler until that is complete...
Howard, if you have recommendations on size after your inlet mod, that would be great.
Nice selection of parts.
For the cooler I went with a Setrab unit. I forget the model # but it's an ideal fit for the stock side vent (non Mini-Mesa).
For the cooler I went with a Setrab unit. I forget the model # but it's an ideal fit for the stock side vent (non Mini-Mesa).
Ken Roberts
Supporter
Setrab 625 being used here in the drivers rear side inlet.
Weren't you telling me you had no mechnical ability a year ago? That's far better than I could ever hope to do :thumbsup:
Peter minimizes his abilities. Nice work Peter. Have you taken any test drives yet?
I really don't know.
Fran- can you help me with that?
I do know I am having that number stamped on the frame. Apparently. that makes the registration process in Oklahoma a little easier...
Fran- can you help me with that?
I do know I am having that number stamped on the frame. Apparently. that makes the registration process in Oklahoma a little easier...
I really don't know.
Fran- can you help me with that?
I do know I am having that number stamped on the frame. Apparently. that makes the registration process in Oklahoma a little easier...
in Texas they didnt want a # stamped on the frame. they gave me a TEX# to stamp on the frame. Nice thing is as a kit car, they didnt charge the 6.25% tax. it was a flat $65.
OK may be different but im sure you could still add a 2nd number.
I am trying to spread some of my purchases for the car before it arrives in hopes that my wife won't need jewelry to compensate. Before I started racing, I had a few airplanes. After they were gone, she still has the jewelry??? Go figure.
I am ordering components for the fuel system. I am open to any suggestions you may have to my plan. I intend on turning the the fuel rail around to the driver's side to shorten the fuel lines. I am ordering an engine cover from www.VRaptorMotorsports.com which is custom made to the particular set up that you give him i.e fuel lines and oil fill. I will have it painted in a way that I think will really be cool.
Here is the sequence and what I am ordering:
Fuel tank... in line filter (unsure of exact one and I am open to suggestions / Edelbrock Inline Fuel Filters 8130?)... Walbo VPN GSL392 Fuel Pump... To Surge Tank... WIX all in one Filter/Regulator 495-33737... Goes two directions #1 Fuel Rails... #2 Sends fuel back to the tank. I wii use the Aeromotive AN Quick Disconnect 15118.
Fran suggested a Fuel pressure gauge. I remember a few build threads that suggested 2 places where they should be used. Autogage Analog Gauges 2176 0-60 psi. Would that be 1 before the regulator and 1 after?
BTW- I have been investigating seats. I have mentioned before my concerns about the seats not having adjustable seat backs. However- I don't know of anyone who has come up with a good alternative. Since I have the new style seats coming and the sliders already ... I think I may have a fairly unique but simple way to allow the seat to not only slide, but also tilt. Stay tuned...
On to oil and tranny coolers. I am thinking Setrab 625's. Initially, my thoughts are to mount the tranny cooler more towards the rear as to not block airflow through the side vent. The oil cooler would be mounted near the opposite side vent.
I am always open to any thoughts.
Last edited:
Ken Roberts
Supporter
How tall are you Michael? I'm 6'1" and my head barely clears the roof with my seat back at approx. 45 degrees and the seat pushed back as far as it can go. I'm not sure if I can wear a helmet. If you are shorter then you might be able to mount the seat more up right. When the seat arrives play with it's angle till you get the most incline that feels comfortable for you. For me and a few others that angle matched the angle of the panel directly behind the seats (45degrees).
As far as the fuel system you really need some kind of surge tank or sump built into the tank. The tank is long and narrow and the bung is located on one end. There are baffles inside but this alone won't be enough. Alex built a sump in the middle of his tank bottom. I put a production style fuel bucket/module inside my tank. Most other owners go with the surge tank. Once you decide which to choose then layout the rest. I have a very unique and safe way of monitoring the fuel pressure at the rails. I welded a Swagelok fitting on the end of one fuel rail that holds a Autometer transducer. This then sends an electrical signal to inside the passenger compartment to a fuel pressure gauge. I can monitor the pressure while driving. I'll post a picture tomorrow of the fitting and transducer.
Don't bother with the Aeromotive AN quick connect. Mount a Swagelok fitting on the inlet of the fuel rail. It is permanent and very robust (stainless steel). Fran also uses it on his race car.
Last edited:
Don't bother with the Aeromotive AN quick connect. Mount a Swagelok fitting on the inlet of the fuel rail. It is permanent and very robust (stainless steel). Fran also uses it on his race car.
Have you read of any problems w/ the aeromotive quick connect? i'm using it and havn't had any issues (yet....). All the failed reports seem to be of the Russel model.
Similar threads
- Replies
- 14
- Views
- 2K