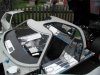
Hi all
Hi all
I've seen a few people to have fiited sill panels that look like this:

I am guessing these are to match how the originals looked and I really like them but can't work out how they are made and fitted. Are they part of the aluminium sill panels or are they an additional cover/panel that sits on top of the sill panels?
I'd be grateful if anyone who has produced something similar could give me a bit of advice as to how to achieve this look.
Thanks
Trevor
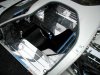
Hi all
I've seen a few people to have fiited sill panels that look like this:
I am guessing these are to match how the originals looked and I really like them but can't work out how they are made and fitted. Are they part of the aluminium sill panels or are they an additional cover/panel that sits on top of the sill panels?
I'd be grateful if anyone who has produced something similar could give me a bit of advice as to how to achieve this look.
Thanks
Trevor