Howard B's RCR 40

Howard,
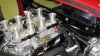
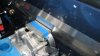
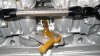
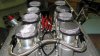
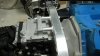
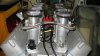
Turning it 180 is probably the easier way to go. I can't see your linkage from the pics you posted. The TWM's that I have use a circle link for the two sides mounted in the middle. The butterflys are opposite in function, pushing outward to open. So you might have a problem with coordination. KISS!!
Could you use a right angle on the two end throttle bodies to pull the line closer in?? Don't know if it wold restrict flow that much. Just a thought.

Bill
 
Bill,

I've been sitting out in the garage (man cave) for a couple of hours thinking it through. I have a couple of issues to solve. First, the number one header tube comes with in 1/4 inch from the electrics at the end of the throttle body. To close for comfort and maybe even a heat shield. I may get away with dimpling the tube. Second, their was a Superformance with the EFI on it at the Carlisle Kit Show. I took plenty of pictures, they used insulated clamps mounted to the throttle bodies to pull the fuel rail in. They didn't have the same header tube problem and mounted the accelerator linkage from the RH side. It was nicely done, possibly worth copying. I have attached a picture. You can see both places.

It's going to require more thinking time.
 

Attachments

  • Carlisle 2009 Kit 015 B.jpg
    Carlisle 2009 Kit 015 B.jpg
    45 KB · Views: 666
Well it's been a little while since I have posted. I have been chipping away at getting things done. I had my friend John, who manufactures machine parts convert my RCR NASCAR steering wheel hub to accept a GT40 Motolita steering wheel. It really turned out very nice, I must say.:shocked:

I have to give John all the credit. I sent him some pictures, plus a replica of a FORD G.T. emblem to fit in the wheel. He made the bottom half of the hub to fit the NASCAR quick release then set up the upper hub up to resemble the original style G.T. hub. Six screws attach through the steering wheel and into the base hub.

John can be reached via email at [email protected] for those of you who may be interested. He is a car guy and likes doing these kinds of projects. The results are just what I needed. In the picture the emblem is just sitting in the hub and not attached, thus a little crooked. (BTW, he didn't make the emblem, you have to come up with that yourself.) :happy::happy:
 

Attachments

  • GT40 WK 55 001 B.jpg
    GT40 WK 55 001 B.jpg
    63.4 KB · Views: 436
  • GT40 WK 55 008 B.jpg
    GT40 WK 55 008 B.jpg
    29.9 KB · Views: 470
  • GT40 WK 55 009 b.jpg
    GT40 WK 55 009 b.jpg
    89.6 KB · Views: 527
  • GT40 WK 55 010 B.jpg
    GT40 WK 55 010 B.jpg
    90.6 KB · Views: 433
Hey Howard, I like that idea. I may have to look at doing something like that someday also. BTW I found the steering wheel decal can be gotten from Chris "Race Line Digital."
 

Randy V

Moderator-Admin
Staff member
Admin
Lifetime Supporter
Nice work Howard?

Where did you locate the steering wheel? I've been to the Moto-Lita website and can't find that particular wheel...
 
I made a slight 1 inch error in getting an oil pan. I purchased a Moroso SBF oil pan. All the dimensions fit the car except one! The one where it stuck out of the bottom of my car almost one inch.

Now, my county (The People's Socialist Republic of Arlington, VA) has more neighborhood speed bumps then fire hydrants. These speed bumps (Traffic Calming Devices/Areas in England) and the oil pan don't match up too well.

Just a heads up to new builders, and I am sure it has been stated elsewhere, measure every thing every way 6 to 8 times then cut!

Well I purchased another pan from Armando in El Paso, TX. (Google Armando's Racing Pans). It's a Daytona Coupe pan, which according to John (same John in the above post) is the same as a 40 pan minus the notch for the starter. You apparently don't need the starter notch if you are using a mini-starter. This should save you a few bucks on the pan, since the 40 pan costs more.

I am quite pleased with the workmanship on the pan. I overlooked photographing the nice welds before I painted it. It is nicely done.

Oh yeah, the pan is the right depth of course.:thumbsup::thumbsup:

Anyone need a Moroso SBF pan after I make the swap?
 

Attachments

  • Armando 014B.jpg
    Armando 014B.jpg
    23.4 KB · Views: 462
  • Armando 016 B.jpg
    Armando 016 B.jpg
    34.8 KB · Views: 491
  • Armando 019 B.jpg
    Armando 019 B.jpg
    34.3 KB · Views: 537
Make sure you test fit the pan prior to installing. I had to send mine back to Armando have the mounting bolt holes redrilled. Other than that, it's a great pan, and I also noticed a drop in oil temps after switching to the Armando's pan. Armando can also install a dip stick bung in the side of the sump, if required.
 

Ron McCall

Supporter
Howard,

I was so impressed with the steering wheel center ,that John made for you, I had him make one for me to fit my Grant wheel!!! What a job he did! John is truely a gifted machinist and a absolute GT40 entheusiest! The detail work that he did on his own SPF GT40 is evidence of that. I would suggest that anyone who has a machine project for a GT40 (large OR small) send John a e-mail at the link that Howard provided. He can do anything you need no matter what manufacturer made the car. If anyone is building a car and hasn't seen his gorgeous front accessory drive system ,thay should definitely take a look. It is totally functional as well as beautiful.


Well it's been a little while since I have posted. I have been chipping away at getting things done. I had my friend John, who manufactures machine parts convert my RCR NASCAR steering wheel hub to accept a GT40 Motolita steering wheel. It really turned out very nice, I must say.:shocked:

I have to give John all the credit. I sent him some pictures, plus a replica of a FORD G.T. emblem to fit in the wheel. He made the bottom half of the hub to fit the NASCAR quick release then set up the upper hub up to resemble the original style G.T. hub. Six screws attach through the steering wheel and into the base hub.

John can be reached via email at [email protected] for those of you who may be interested. He is a car guy and likes doing these kinds of projects. The results are just what I needed. In the picture the emblem is just sitting in the hub and not attached, thus a little crooked. (BTW, he didn't make the emblem, you have to come up with that yourself.) :happy::happy:
 

Attachments

  • s10 001-2.jpg
    s10 001-2.jpg
    36.8 KB · Views: 349
  • s10 002-2.jpg
    s10 002-2.jpg
    20.3 KB · Views: 347
  • s10 003.jpg
    s10 003.jpg
    38.1 KB · Views: 366
  • s10 004-2.jpg
    s10 004-2.jpg
    33.9 KB · Views: 407
  • s10 005.jpg
    s10 005.jpg
    40.8 KB · Views: 445
Howard - That's true about the starter notch but, don't forget that is assuming you are using a 10.5" (157 tooth) or 11" (164 tooth) bell housing, flywheel and clutch arrangement. The original stlye bits (like Safir sells) will need a pan with the starter relief.

Ron - I'm glad you were pleased as well. Thanks for the kinds words.

Regards,
John
 
Thanks for the heads up John and John!

I haven't checked the bolt holes yet for the pan, that should happen in the next couple of minutes.

later,
Howard
 
John, (Jay P), Ron,

Armando did put the dipstick bung in the pan. It's on the other side of the pan in my picture.

It is a nice pan. :thumbsup::thumbsup:

Ron, you are right on about John's machining capabilities! :thumbsup::thumbsup:

Later,
Howard
 
Now that the GT40 Anniversary at Road American and SAAC 34 are history and I have been under the weather this week. I hope I can get back to having my weekends for car building.

Since I last posted the Armando pan fits like glove. I moved the throttle linkage to the opposite side of the Dynatek Classic fuel injection throttle bodies to enable the throttle to be hooked up for a RHD accelerator cable. I secured the fuel rails to the throttle bodies on the back of the intake out of the heat range from the exhaust. I set up the engine mounting brackets using the plastic engine as a guide. I also used the same engine to set the ZF mounting spacers length to the proper distance so the water pump won't need a bump-out in the firewall. John Schriver is fabricating my alternator and AC compressor brackets and pulleys for a serpentine pulley set-up. John's the man!

My friend Bill Tuttle is cutting the door latch pin mounting plates to be fully adjustable. I don't have any photos of those yet. I hope to post all of those pictures shortly. Bill's the man!

I began to load the engine in the car this past week when I reallized I have an 11 inch bell-housing and a 10.5 flywheel. This won't work. It would be okay if I could just swap out the flywheel. However I bought it from Ford racing and it's a zero balance flywheel. I don't see that they sell a zero balance 11 inch flywheel. A quick call to Fran at RCR and he said he would trade the bell-housing for the smaller one. Thanks Fran. Fran's the man!

Here's some of the results (the ali block on the front of the waterpump is amessuring spacer for the front brackets):
 

Attachments

  • GT40 WK53 001 B.jpg
    GT40 WK53 001 B.jpg
    29.1 KB · Views: 482
  • GT40 WK53 002 B.jpg
    GT40 WK53 002 B.jpg
    29.9 KB · Views: 435
  • GT40 WK 59 001 B.jpg
    GT40 WK 59 001 B.jpg
    37 KB · Views: 432
  • GT40 WK 59 005 B.jpg
    GT40 WK 59 005 B.jpg
    42.8 KB · Views: 429
  • GT40 WK 59 014 B.jpg
    GT40 WK 59 014 B.jpg
    32.3 KB · Views: 459
A few more pictures:
 

Attachments

  • GT40 WK 59 010 B.jpg
    GT40 WK 59 010 B.jpg
    30.8 KB · Views: 436
  • GT40 WK 59 022 B.jpg
    GT40 WK 59 022 B.jpg
    28.1 KB · Views: 406
  • GT40 WK 59 023 B.jpg
    GT40 WK 59 023 B.jpg
    36.8 KB · Views: 410
Howard,
Glad to see your are busy making progress.You are taking the sensible approach using the mock engine. I had to load and unload the real thing too many times to get the small things right. I plan on taking the engine out later in the fall to clean up some of the things we did get done with it in place.
Wanted to tell you that Lynn and I really enjoyed your company at Road America. We haven't tried the wine yet. Doesn't seem right to do it as a Duo instead of a Trois!!

Bill
 
Back
Top