Keith Baker's Southern gt on the build

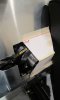
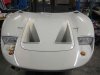
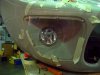
Stage 2 of the nostril panel.
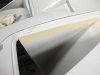
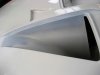
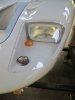
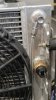
To get rid of the bow that's common in many nostril panels I decided to install a fillet panel in the sides.
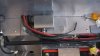
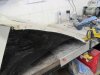
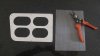
Firstly I roughed up the side of the panel, taking it past the gel coat
Then made a fillet from fibreglass, rough that up .
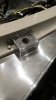
Drilled, countersunk rivetted the fillet on after coating both parts with fibreglass matting.
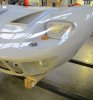
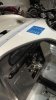
After it was hardened I ground of the excess and hand block sanded to a rough shape.
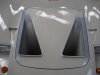
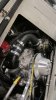
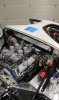
Re aligned on the front deck.
Time to let the glass fully harden for a few days but the panel is now 80% there.
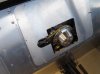
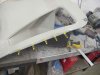
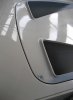
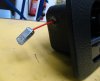
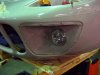
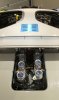
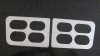
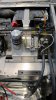
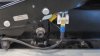
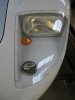
Inside of the nostril vents there was a joining seam, this was roughed up with 40 grade paper, cleaned and filled ready for sanding later.
 

Attachments

  • jan22 0198.jpg
    jan22 0198.jpg
    135.8 KB · Views: 605
  • jan22 0200.jpg
    jan22 0200.jpg
    115 KB · Views: 631
  • jan22 0204.jpg
    jan22 0204.jpg
    106.6 KB · Views: 578
  • jan22 _0202.jpg
    jan22 _0202.jpg
    78.4 KB · Views: 553
The shut lines on the front nostril are now much better and ready for the bodyshop. The seam in the inner part of the nostril and a joining crease have now been filled and sanded. I ideally need a smaller Dzus clip but it will be more than ok for the IVA test.
Wired up the spotlights and tested. all looks OK .

" The least amount of filler used the better "
 

Attachments

  • web 0216.jpg
    web 0216.jpg
    55.7 KB · Views: 390
  • web 0212.jpg
    web 0212.jpg
    95.6 KB · Views: 404
  • web 0218.jpg
    web 0218.jpg
    77.6 KB · Views: 406
The doors have been altered to do away with the inside opening lever. I have altered the operating lever on the lock on the inside the door, this will accept the cleat and plastic coated cable that now is the inside door opening cord.
It's actually a modified trailer brake away cable. I made a plastic bush for the cable to pass through and machined a nice stainless steel fixing for the other end of the cable.
The doors are smooth operating. Had to fill in the lever hole but that was not a problem , you can't see it was ever there.
The door boxes are now completed, except I have seen an almost identical trim for the top of the Carbon insert but neater.
I originally used a satin black to paint the door boxes but decided to tone it down so made a 50/50 mix of satin and matt, so it's easy wipe cleanable.

To stop the doors opening to far I will use the same webbing as the door closer strap, which is same as the Black willans harnesses I have.
I have made some neat little polished ally strap fixings but need to get the car back from SGT ( Exhaust being made ) to get the lengths right.
 

Attachments

  • web 0230.jpg
    web 0230.jpg
    150.8 KB · Views: 463
  • web 0237.jpg
    web 0237.jpg
    102.3 KB · Views: 435
  • web 0241.jpg
    web 0241.jpg
    198.3 KB · Views: 461
Last edited:
Normally there's not wiring in the loom allowed for spot lights so I had to run a new wire back to the dashboard. As far as I know the spots can only be on if the headlights are on so the supply will have to come after the headlight switch with a fuse in line.
With the spot lights fully tested all that I need is to make up a quick release connector at the front to match the rest of the loom.

Decided to fit the perspex light panels, I think Mick at SGT said dont bother until after IVA but I have little to do at the moment and I have itchy fingers.
I remember on my 1st GTD they were fiddly and hard to fit, but I have a cunning plan.
You have to be carefull there brittle and scratch easy. They are oversized to the hole and need cutting to suit almost on every side.
1st I overlaid the panel on the hole and taped on with masking tape strips then with masking tape outlined the recess of the hole. With care cut the larger oversized sections off with a 1mm bladed angle grinder and the smaller bits off with the bench grinder.
tape up the bench grinder rest so no scratching.
On and off a dozed times, bit by bit until all the radias's are equal and the gaps are good.. Allow a small extra gap for the paint when it goes on and " BOBS YOUR UNCLE " as we Brits say
When drilling the fixing holes use a small bit and make the perspex hole a clearance hole for the screw. It may sound bloody obvious but if you try screwing through the perspex it may crack.
 

Attachments

  • web 0206.jpg
    web 0206.jpg
    161.6 KB · Views: 440
  • web 0254.jpg
    web 0254.jpg
    126.8 KB · Views: 423
  • web 0244.jpg
    web 0244.jpg
    121.7 KB · Views: 410
Last edited:
Fitted one of the headlight perspex covers, not as easy as the spot light ones.
Although they are well made and shaped nicely they are as stiff as a priest at a childrens sunday school.
Even warming them up to make them a bit more pliable they wont take the shape at the top outer edge.
Every edge and corner needed trimming and shaping
4 hours to fit the first one.
It needs a little bit of working at one point but all looks good.
 

Attachments

  • web jan 29th 0261.jpg
    web jan 29th 0261.jpg
    71.3 KB · Views: 408
  • web jan 29th 0263.jpg
    web jan 29th 0263.jpg
    87.5 KB · Views: 421
  • web jan 29th  0272.jpg
    web jan 29th 0272.jpg
    62.3 KB · Views: 431
Things have been a little slow lately, the weathers been so cold and the boss won't have any heating in the works, he's as tight as as ducks arse.
DOH ! I am the boss.
Anyway SGT have made the exhaust and it's been sent away for coating satin silver.
The delay was that the laser cut blanks for the exhaust were wrong, I had sent the gasket as a pattern that the engine builder gave me. These were wrong so new blanks were made.
Ultimately my fault.
Micks done a few little jobs as well that would be needed to get through IVA.
I have managed to finish the doors and front deck so not all wasted time.
The cars coming back tommorow and I'm taking it to my garage at home. Had to clear the garage out and have put one of the Ultimas in secure storage for a while.
Off to Daytona 500 next week so I'll get stuck in when I come back.
Weathers better in Florida !
 
Cars back from SGT....Thank you Mick...
SGT made and fitted a modified water hose housing to shoot the hose off in the right way.
Below this is the water temp sender mounted in line.
Also SGT made a vent louvre grill for the top back of the spider.
Underneath this is a circular ventilation hole.
The poilished stainless steel front deck Dzus support brackets will look good when the car is painted.
Should have the pipes back from coating within a couple of weeks.
 

Attachments

  • web 0296.jpg
    web 0296.jpg
    83.2 KB · Views: 578
  • web 0306.jpg
    web 0306.jpg
    101.5 KB · Views: 623
  • web 0310.jpg
    web 0310.jpg
    65.2 KB · Views: 532
  • web 0300.jpg
    web 0300.jpg
    63.4 KB · Views: 592
  • web 0313.jpg
    web 0313.jpg
    68.6 KB · Views: 554
Found on e bay some laser cut rear deck grills originally I was going to get them just to use as a pattern for making mine but they actually fit the recess perfectly and are well made,
So I decided to use them. £29 plus post. Delivered in 3 days.
I think for IVA you need grills over the holes and they might restrict air flow but I'm trying them.
Because they are laser cut they are both equal in all dimensions.
So I decided to make a stainless steel mesh between the two plates.bonded together and finish off the edges these can be polished or powder coated later. Will need to order 2 more now.
Pictures show the process.
 

Attachments

  • web 0326.jpg
    web 0326.jpg
    161.3 KB · Views: 372
  • web 0329.jpg
    web 0329.jpg
    281.1 KB · Views: 377
  • web 0336.jpg
    web 0336.jpg
    268 KB · Views: 388
Last edited:
Also I have made my dashboard so that it can be removed with the screen in. Just take off the steering wheel few bolts and it's out. This makes for easy access when something stops working. And I can't lay upside down it does my back in.
To do this the wires need extending, also the extra wiring is installed for the alarm system, Twat nav etc.
Last picture shows the washer tank I had made then mounted on it the washer motor and the front brake bias sensor.
Although I believe the IVA dosen't allow for adjustment of brakes bias you do need to set it up. The sensors are well out of the way and the gauge can be just plugged in or later installed.
 

Attachments

  • web 0350.jpg
    web 0350.jpg
    113.2 KB · Views: 540
  • web 0338.jpg
    web 0338.jpg
    95 KB · Views: 553
Just got back a couple of days ago from Daytona.
If anyone else was there for the 500 Nascar race, boy what a couple of days that was.
The race for 54 years has been on Sunday and dry always.
Sunday it rained the race was postponed till 12 Monday then 7 pm Monday.
A night race for the 1st time ever.
Loads of crashes and if you haven't seen Montoya's car hit the Jet powered track cleaner look it up on U Tube, destroyed motors !
200 gallons of jet fuel being hit at high speed by a car.
Left the circuit at gone 1 am Tuesday, 6 hours after the start and it's a foggy drive back down the Interstate 4.
Anyway
some parts arrived while I was away so should be back in the saddle pretty quick.
The exhaust should be back from SGT's coaters soon.
Mounted the hand brake switch that's used for IVA brake test and run a 3.5 mm I/D bleed hose from the rad to the expansion tank.
lots of silly little jobs with nothing to show for it.

Colour scheme is sorted, it's going to be the same colour as my 1961 Harley Duo glide.
 

Attachments

  • web 0601.jpg
    web 0601.jpg
    170 KB · Views: 514
  • web 0609.jpg
    web 0609.jpg
    74.6 KB · Views: 493
Last edited:
Hi Nick , hows it going !

There's a clue there somewhere, you just got to look harder.

You would think that choosing the colour would be straight forward but there's so many nice colours out there.
It's not an original but we all like to make them look like they are. The colour I have had in mind since starting the build is an age related straight colour, not metalic with roundels on sides , front and back and two stripes.
This scheme looks superb.
I did consider Gulf at one time but 7 out of 10 have that colour. So Gulf it's NOT.
Like I said, There's a clue there somewhere, you just got to look harder.
 
After a couple of longer days on the wiring of the dash switches etc. I decided to do something else. Fitted the fuel solenoids for the return from the swirl pot to the tanks, these are normally closed and energised to open and are piggy backed of the corresponding fuel pump wiring.
Just got to hook up the last fuel pipe to the tank.
The engine wants to come into the cockpit so I started cutting out the cover panel to clear the pulleys. Made a template for an add on bit. There's hardly any room for the seat, it's tight.
Started fitting the Immobiliser, neat little box but I wont connect the wiring in until the whole car is running as I dont want to cut into something I shouldn't.
The engine turns over, fans run, wipers wipe and the air con fans work.
Not all works well... When I put the indicators on the brake lights and fog lamp flashes.
Found out that I'm missing the dip / main beam switch so had to order it.
It will be sorted.

Exhaust should be with me any day now.
 

Attachments

  • web 0785.jpg
    web 0785.jpg
    113.9 KB · Views: 483
  • web 0759.jpg
    web 0759.jpg
    131.9 KB · Views: 491
  • web 0774.jpg
    web 0774.jpg
    50.9 KB · Views: 446
  • web 0768.jpg
    web 0768.jpg
    181.8 KB · Views: 456
  • web 0767.jpg
    web 0767.jpg
    244.6 KB · Views: 510
Keith,
I notice in an earlier post you installed a switch for the hand brake lever coming ‘off closed’. You say that this is an IVA requirement for the brake test, but I checked sections 09A/B/C and section 30 in the IVA manual and I could see no explicit requirement for this. Am I missing something?
Ian
 
Hi Ian, I believe that you have to prove the brake warning lamp is working and this lamp covers the hand brake and low brake fluid in both cylinders.
By operating the hand brake the light will come on.
I think it makes circuit when hand brake is on but can check this if you want.
This I believe is correct as SGT told me.
Cheers
 

Ian Anderson

Lifetime Supporter
Keith / Ian

that is certainly how it was for my SVA - I did not have a handbrake on light, and had only tested the brake warning light by lifting the lid out the reservoir.

The light needs to be able to be tested from inside the cockpit.

I was also told at SVA that a simple push button switch would suffice to be able topress it to prove the light works but the handbrake on facility also helps so I went down that route

Ian
 
Keith/Ian,
Thanks, I have the pushbutton and light on the dash for the brake test. When I saw Keith’s hand brake switch, I thought maybe I needed to add, but it sounds like both options should be OK.
Cheers
Ian
 
For my IVA test (7 car) I had a switch on the dashboard to test the low brake fluid light. The tester also checked that the float would turn the light on too. You don't need a switch on the handbrake, but it would save having a switch on the dashboard.
 
Back
Top