M20 Dreaming

Merry Christmas friends, I hope you all had a great day and your families are all well and looking forward to the challenges of 2015. My oldest daughter is off to University in Feb 15 so things will be a little different around the house with just her younger sister left ( she is looking forward to being the only child )
Well I have managed to get some work done over the last month or so and even have some photos for Terry and all you guys (I know threads are no good without photos)
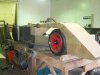
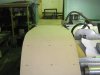
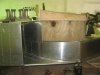
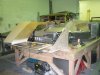
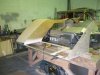
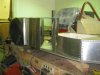
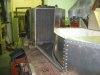
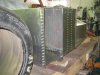
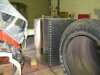
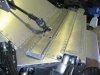
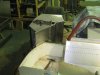
As I may have mentioned in an earlier post the T/A has been a big focus and to be honest pretty hard work so I decided to have a break and get the radiator pontoons done. There is a lot of work in these suckers !! and getting the fine details sorted was a big part of it. I long time back I was at the McLaren Trust and they have a piece of an M20 that was sent out for repair a few years ago after a crash that single piece told me a lot about how the pontoons were set out. The out side edge is rounded about a 1" radius and the base has a 1" rise at the outside edge so when you look directly at the side of the car the opening at the back of the pontoon rises to the back edge of the side panel and then drops from the front of the side panel the point where it meets the side of the tub. I know this seems like a trivial detail but if you don't know it and make it all flat then the side panel is too tall and looks skinny. I have a dummy Radiator core in the photos but will get custom made ones for the final set up. There is about 15hrs work in the pontoon so at this point I have only done the right side but have about half of the left side parts made cut out so will get that done soon. also started the fuel tanks. Once these are done then that is the tub finished and I will start on the body. I also chucked a couple of pics of the steering rack top brace I talked about last post.
Check out the photos and as always I look forward to your feed back

Cheers Leon
 

Attachments

  • Right Rad pontoon 01.jpg
    Right Rad pontoon 01.jpg
    117.6 KB · Views: 323
  • Right rad pontoon 02.jpg
    Right rad pontoon 02.jpg
    147.9 KB · Views: 303
  • Right rad pontoon  03.jpg
    Right rad pontoon 03.jpg
    146.4 KB · Views: 288
  • Right rad pontoon 04.jpg
    Right rad pontoon 04.jpg
    190.1 KB · Views: 274
  • Right rad pontoon 05.jpg
    Right rad pontoon 05.jpg
    155.4 KB · Views: 274
  • Steering top brace 02.jpg
    Steering top brace 02.jpg
    152.4 KB · Views: 322
  • Steering top brace.jpg
    Steering top brace.jpg
    156.8 KB · Views: 283
  • Right rad pontoon 06.jpg
    Right rad pontoon 06.jpg
    129.7 KB · Views: 317
Last edited:

Terry Oxandale

Skinny Man
Great work Leon. You are so fortunate to be able to see actual pieces to recognize these little nuances that are not easily recognized in the many web photos out there. Keep up the good work. Any idea why McLaren made the floor of the sidepods like that (a slope). I'm not sure I fully understand the slope as described, but could this have been a first attempt/experiment with ground effects?
 
Thanks guys, Not sure of the real reason for the slope but if you look at photos or video footage of the car in high "G" bumpy turns they lean over and move around a bit and when full of fuel they were very close the ground, I read where they would grind the rivets of the floor on the track in bumpy sections, the kick up starts about 3" from the edge so this would give some clearance and stop the extreme outside edge contacting the ground, that's my take on it anyway??
Thanks Mic for the comment on my rivets, there is a lot of work gone into getting them to look right. Every hole is measured to 1" apart and where I can I count the rivets in the photos I have and try to have the same number and layout as the original car. Of course there is the obvious difference that I'm using "pull rivets" and they used "driven rivets" to be honest I don't know how they got them in some of the places as it seems impossible the access both sides of the rivet. Hopefully next post will have both sides done and the fuel tanks.

Cheers Leon.
 
Working on the left pontoon and the right side fuel tank, did the volume calc today and it is 46 ltr/12us gal per side. Not as much as I had hoped for as I really wanted 60 ltr/16 gal as this is the max of 120 ltr allowed under MSNZ regs. The Can-Am were restricted to 32gal in the last season, this is said to have been introduced to slow the 917/30 as it only did 2mpg and would have to stop at least 3 times in a 200mile race. The Shadows, M20s and other V8 powered cars did over 3mpg, It is believed by many that the 917/30 didn't compete in the last season for this reason.
I will get some alloy this week and hope to have this done in the next week or so.

Cheers Leon.
 

Terry Oxandale

Skinny Man
Need I ask? :D

Aside from being a smart Alec, are you going to have any tanks other the two side tanks (rear tank for example, behind the seats)? Nice bit of CanAm information.
 
Last edited:
I had thought about extra tanks and the seat back or the section in the side pontoons in front of the existing tanks would be the obvious place but "Rules Wise" if I want to race it in NZ I can only have another 30ltrs so probably not worth the work now
Just siting here writing this I'm now thinking about the front sections as I would like to take the top off to the dash and make it one panel anyway so I could line the section and add 2 small tanks.
I see if I can be bothered when I get my sheets of alloy this week, watch this space.

Cheers Leon.
 
Hi Dave, they are called "SR'' Rivets and I buy them from a company called "Rivtech" here in NZ but I'm not sure if they are a NZ company you might have a branch in Aussie.

Cheers leon
 
What size are they? Shaft and head diameter would be handy.

Seems we have a Rivtec in Oz. So SR- structural Rivet, dome head?


Cheers
Dave
 
Last edited:
I'm using 4.8mm (3/16") Dome head. There are different type heads and the "Grip Range" is what ever you require. If I do another car I will use solid rivets where both sides can be seen and accessed and use the SR where needed.

Cheers Leon.
 
Interesting you would use a solid rivet if you had the chance again.
I have digressed about this for when I build my chassis.
I came to the conclusion that SR rivets and adhesive would be an easier alternative.

But know I read your comment what has changed your mind, is it purely the reverse side look or is their more to it.

Jim
 
Hi Jim, the only reason I would use the solid rivet is to make it look more original and as you say the reverse side look. The side pontoons is the only place that you can plainly see the reverse side of the rivet and I find it quite ugly. I'm seriously thinking of using a solid rivet tool on the back side and rounding them over either that or grind then down so they aren't so obvious. I'm not at all concerned with the strength of the SR rivet.

Cheers Leon.
 
Well I have now done the left side pontoon and as it is the holiday break I was unable to get some alloy to finish the tanks and top of that part of the tub so I have moved forward with my body construction.
I would like to take this time to explain how I'm going to do this. As you will see from the photos later I'm building the body persay from a light 3ply timber with a thin 2mm sheet for the flat surfaces with some framing work in a 10mm 5ply. This will then be laminated with G/Fiber both sides, probably just 2 layers so the wood becomes a core. the whole body should end up about 4-5mm thick and very strong. The reason for this in the first body is I have to make a buck anyway so why not make the buck the actual body and if I want or need to I can take a mold off it later.
I know this may be a heavy body when finished but I will be able to fine tune the shape as I go and I owe this train of thought to Terry, I have watched him fab up his body with no molds and what a great job he has done. I only hope mine works out as well. So far I have the right side door and most of the right side front fender and have started the left fender. I will use surfboard foam on the sides to get the shape as you transition back along the body at the thickest point its only about 2" so there is no weight.
Here is the start, FYI I have no plans for this, it is coming straight out of my head with a the few known measurements and some scaled drawing I did back in 2009, wish me luck

Cheers Leon
 

Attachments

  • Body 01.jpg
    Body 01.jpg
    132.6 KB · Views: 256
  • Body 02.jpg
    Body 02.jpg
    114.8 KB · Views: 271
  • Body 03.jpg
    Body 03.jpg
    125.7 KB · Views: 250
  • Body 04.jpg
    Body 04.jpg
    94.8 KB · Views: 244
  • Body 05.jpg
    Body 05.jpg
    152.9 KB · Views: 248
  • Body 06.jpg
    Body 06.jpg
    120.1 KB · Views: 247
  • Body 07.jpg
    Body 07.jpg
    114.4 KB · Views: 252
  • Body 08.jpg
    Body 08.jpg
    147.5 KB · Views: 264
  • Body 09.jpg
    Body 09.jpg
    145.2 KB · Views: 269
Yep, I am wishing you luck! Wondering why you don't use f/glass over foam for the whole deal though? Its scary how much wood moves around especially in positions like the curve over front wheel with damp/dry weather changes.
 
Hi Jac, Reason 1) the wood is free, Reason 2) did I tell ya the wood is free. I did think of the foam option but I'm told its not cheap and I'm impatience and wanted to get on with it as I had time to burn also they have been doing glass over ply on boats and construction for years successfully so figured it will do for me. if it gives me grief I will take a mold and do a glass copy when I have the money. The main issue is to get the proportions and dimension's correct so it doesn't look like someone's bad kit car.
That's where the "Free" stuff becomes important if I end up junking it.
Thanks for the interest and you know your comments are always valued.

Cheers Leon
 
Hi Leon,

This new idea of yours can / will work. Don-t know if you know but there are heaps of threads in the power boat forum of the " Glen-l" web site. Many guys and dolls "Roberta" for one , posting pics and problems about this construction method.


Z.C.
 

Terry Oxandale

Skinny Man
The advantage Leon has over many of our homemade bodies is fact that the McLaren body shape relied heavily on 2 dimensional curves or panels. The '40 , Lola, etc, has a lot of compound curves which would most definitely require foam or other material in order to accomplish a good semblance. As said earlier on another string, they do resemble a door-stop.

I'm jazzed to see the body preparations being made. For fiberglass purposes, especially in light of the above characteristic shape, I've found alloy (aluminum) to be very helpful. It shapes like thin plywood, but the fiberglass will pop right off of it (especially if the surface is oxidized from age), or with any common release agent (even WD-40 works really well), and can be cleaned off very easy. I use these for external surfaces, which greatly reduces finishing time because of the smooth surface from the aluminum-side of the lay-up. This is the method I used for the rear vents, the entire top of the rear panel, radiator outlet, and any flat planes. It also was responsible for being able to make all the panel gaps perfectly parallel and aligned. Lastly, When I needed two parts to fit together like a glove (in areas where the body must fit tightly to an adjacent complex-shaped piece, a simple single layer of masking tape is a very convenient boundary in which the adjoining glasswork can be laid directly onto the adjacent part. This makes two perfectly fitting pieces (once you separate the two pieces from each other, and then remove the tape) for just about any shape.
 
Last edited:
Good stuff Terry, you are most helpful with little nipits of information like you have just given me. I will be making a pattern for the rear panel which has 3 recessed panels with the vents in 2 of them. As you have said this is a pretty easy body to do because of the basically flat surfaces. Having said that it would be easy to end up with a very square "door stop" if one doesn't contour the sides properly so we will see how it turns out in the weeks to come.
Z.C. thanks for the vote of confidence.

Cheers Leon
 
Back
Top