My Scratch Built Project

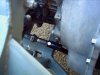
Some more photos from recent work on the project.
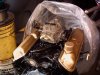
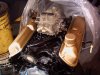
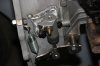
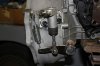
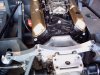
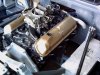
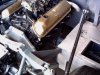
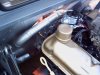
Motor is a 302, originally had a 289 that needed "refreshing" but this came up and we made a trade and I got a very nice 302, roller cam, steel crank, etc. no leaks smoke or noises, about 300 miles on fresh rebuild.
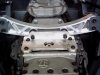
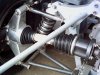
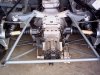
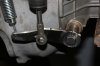
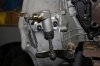
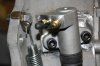
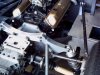
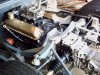
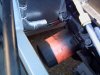
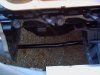
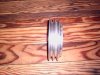
Some better photos of the new crossmember, a little on the blingy side for me but I think it looks good on the chassis.
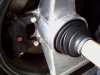
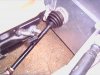
Next step is to get everything mated up and installed which will be a big step forward.
Cheers
Phil
 

Attachments

  • x member 6 12 3.jpg
    x member 6 12 3.jpg
    201.2 KB · Views: 572
  • x member 6 12 4.jpg
    x member 6 12 4.jpg
    202.3 KB · Views: 487
  • motor 6-12.jpg
    motor 6-12.jpg
    201.5 KB · Views: 527
  • motor 6-12 (1).jpg
    motor 6-12 (1).jpg
    200.1 KB · Views: 484
That cross member looks great. I like your use of the cap screws instead of regular bolts. I always thought they looked cleaner. Cross member will look great with a set of nice cast valve covers too. Actually looks a lot like the cross member for a T-70. It was all billet machined out like that too. Doing a great job on the car. Was following the up-rites you made & re-made LOL. If you haven't done it at least 3 times it aint worth it LOL
Mike S.
 
Mike:
Thanks for your comments. I have always been one of those that has to fiddle and find a better mousetrap so to speak. The results are usually pretty good.
Those valve covers on the motor are going to stay, they are original 1965, 289 pieces, and are spaced up to clear the rockers and I like things simple and neat.
The saga of the uprights is a story in itself. I would have done things differently but for one little mistake.....but thats another story. They came out rather well I would say.
I am definitely with you on the socket head capscrews, they do give a great appearance and I use them where I can, unless the part or assembly can't be done that way.
I can't take credit for the crossmember, I have many customers that I do welding and sub- assembly work for, and a lot of them are machine shops so its easy when they are a little slow to sneak in a piece or two. One of my machine shop customers took my original tubular crossmember that I had removed to drop 1", and within a 1/2 hour e-mailed me the drawing, 2 hours later we were looking at a finished part....talk about fast, and it fit first time so no more re-do's on the crossmember.

Cheers
Phil
 
Re-inventing the mouse trap? Hell I thought I was the only one doing that? LOL Or was it the Wheel? Just look at my Lotus project! I'm re-inventing the Lotus Europa LOL
Mike S.
 
Last edited:
Time to post some more progress although not a lot each step now is a good move forward.
All of the drive components are assembled and installed, and I am ready for flexible brake lines in the rear, which have been ordered.
As soon as I get my new flywheel, and install the clutch and related components the motor can go in for good (hopefully) and then exhaust system and it will be close to time for startup....I am hoping for that before late fall.
I couldn't help myself and re-designed the shift mechanism (Russ take note), so that is a lot smoother and takes up less space in the engine bay.
Here are some photos.
Cheers
Phil
 

Attachments

  • Halfshaft3  8-12.jpg
    Halfshaft3 8-12.jpg
    202.4 KB · Views: 435
  • L S Halfshaft assy 002.jpg
    L S Halfshaft assy 002.jpg
    202.9 KB · Views: 499
  • Halfshafts 001.jpg
    Halfshafts 001.jpg
    202.7 KB · Views: 532

Ian Anderson

Lifetime Supporter
Phil

What are the big spacers for on the drive shaft flanges?
Surely it would be better to have the inner CV on the output flange and get a longer driveshaft to reduce CV angles on bump and droop

Perhaps I'm missing something - if so please let me know

Ian
 
Ian,
Those inner pieces that you see as spacers are actually "tri-pot" CV joints. They allow for 2 1/2" of plunge and are super strong.
The shafts are originally from a mustang cobra and have been altered substantially to fit.
The inner tri pot joint had a snout that went into the rear which I machined off and made adapters for the gearbox.
Cheers
Phil
 
Scott:
Chomping at the bit to say the least, just got my flywheel today and if all goes well this week I can get the gearbox and motor together and start on the exhaust....you know the feeling I am sure.
I hope all is well with you.
Cheers
Phil
 
Some more progress:
I have been working on the clutch and assorted bits and so far its looking good. I wanted to do a cross-shaft clutch release instead of an internal throwout so there was a bit of work involved since my gearbox was originally setup for the internal cylinder.
I am planning to mate the motor and box soon and the clutch is on the way. The disc hub is a GM pattern so I had to get it separately from the cover, but all should fit well.
Have my release mechanism all set, and as soon as the clutch arrives I can qualify it and set my distance for the release bearing length for proper clearance.
Here are some photos of the slave cyl. and associated parts, and I will post more photos of the fork and release bearing assy. as soon as that is set.
Cheers
Phil
 

Attachments

  • IMG_0613.JPG
    IMG_0613.JPG
    114.4 KB · Views: 357
  • IMG_0614.JPG
    IMG_0614.JPG
    123.1 KB · Views: 307
  • IMG_0616.JPG
    IMG_0616.JPG
    115.4 KB · Views: 318
  • IMG_0611.JPG
    IMG_0611.JPG
    131.8 KB · Views: 345
  • IMG_0617.JPG
    IMG_0617.JPG
    127.5 KB · Views: 292
Some good progress:
I finally got the clutch sorted and dimensioned all the parts to get clearance for the throwout bearing, the clutch is a Ford mustang unit, 10.5 inch pressure plate, and the disc is a GM pattern (1 1/8 X 10 spline), also 10.5". They seem happy together and the gearbox went in quite easily, the last 1/4" going over the alignment pins being the tightest.
I hooked up a small hand pump to the flex line on the slave, and a few pumps later we had a clutch release, repeated it a few times and I think it is working well.
Today was a good day, and with the help of a friend we muscled the motor in. As most of you know it requires a pretty sharp angle going in, but all went well, everything tight and now its on to wiring, exhaust, plumbing etc.
The chassis sits almost perfect, but I think I need a little less spring in the rear as the shocks are dialed down pretty far.
Some photos of the work.
Cheers
Phil
 

Attachments

  • motor1.JPG
    motor1.JPG
    472 KB · Views: 429
  • motor2.JPG
    motor2.JPG
    436.9 KB · Views: 317
  • motor3.JPG
    motor3.JPG
    437.3 KB · Views: 299
  • motor4.JPG
    motor4.JPG
    442.6 KB · Views: 419
  • motor6.JPG
    motor6.JPG
    441.1 KB · Views: 341
Thanks Bill:
Starting to get a little cool here and I suppose much cooler by you now, ran the wood stove a few nights this week.
Had a little progress this week, got my clutch master sorted and I think I may need a little larger slave.
I have a good clutch now, and I am using a .7 tilton master with a 3/4" slave. The clutch is a bit on the heavy side, not too bad, and I suspect I may wait and see if it relaxes a bit, and maybe go to a 1" slave....hopefully maintaining enough travel to release the clutch.
I fabbed some of the water outlet (Top) line and routed it and I am waiting on a short water pump to do the inlet side.
The shift linkage also is hooked up and gets all the gears, and I was able to eliminate one u-joint by re-configuring the second part of the linkage between the mid point support and gearbox to clear the starter....smooth is the word with minimal play. Found a nice little VW halfshaft boot to seal up the bulkhead where the shaft exits.
Hoping next week or so to start getting to work on the exhaust, and finish some of the plumbing details.
Cheers
Phil
 

Attachments

  • Picture 017.jpg
    Picture 017.jpg
    202.3 KB · Views: 275
  • Picture 018.jpg
    Picture 018.jpg
    199.2 KB · Views: 256
  • Picture 021.jpg
    Picture 021.jpg
    198.3 KB · Views: 282
  • Picture 022.jpg
    Picture 022.jpg
    199.2 KB · Views: 318
  • Picture 025.jpg
    Picture 025.jpg
    200.2 KB · Views: 311

Ian Anderson

Lifetime Supporter
Phil

Suggestion here

Reduce master size instead so you move less fluid through the long run to the slave as the drag of moving more fluid can cause clutch slip when asking for a quick change at full power

Ian
 
Ian:
You make a great point, and I just may do that. I believe I have a 5/8 master of the same type so it would just swap right out, If that happens I will surely post it.
Thanks for the input....I have a 1/4" line running full length and had a -3 flex line laying around that would have been perfect from the chassis to the slave but used a -4 because of the same reason you mentioned concerning the master.
Cheers
Phil
 
Thanks Jim, I watched your build and attention to details and must admit I am envious of the result, just a fabulous build.
The bell housing was bought from Kennedy Engineered products in CA., I welded the block to the side of the housing to mount the slave cyl., and I must admit I copied that idea from a photo of an original, it just seemed like a common sense and simple setup.
Thanks again for the kind words, and I hope that you are enjoying your car after all that work.
Cheers
Phil
 
Some progress:
I have been working on getting the pulleys set up for the crank, water pump and alt.. I wanted to be as tight as possible to the motor and it looks like i am about as close as I can get. The water pump I am using is a Ford Motorsports unit with a 4 1/4" dimension from the timing cover to the pulley hub, this gives a lot of room and I machined up a pulley to fit the damper with two grooves anticipating an AC belt in the future, I am working on the water pump pulley now and should have that done soon, then comes the alternator pulley and I think I am going to run that a little slower than normal so I will need a pulley for that so it will be back to the lathe.
Photos here of the damper pulley, I have a 4 bolt damper and once all is mounted I will take some shots of the whole setup.
On another note thanks Ian for your suggestion on the smaller master, I had a 3/4 slave with a .7" master and the pedal was a little more than firm, and I had to move my pivot where the slave rod hooked up outward to increase leverage, but lost some travel, it was driveable but heavy. Today I switched out the .7 master for a 5/8" (.625) and was able to move my push rod closer to the cross shaft, the result was less travel needed to release the clutch, but less effort at the pedal thanks to the smaller master...it all balanced out and I got what I wanted. Sorry for the crappy photos.
Cheers
Phil
 

Attachments

  • Picture 031.jpg
    Picture 031.jpg
    201 KB · Views: 279
  • Picture 032.jpg
    Picture 032.jpg
    202.7 KB · Views: 190
  • Picture 033.jpg
    Picture 033.jpg
    203.6 KB · Views: 196
  • Picture 034.jpg
    Picture 034.jpg
    201.5 KB · Views: 182
Phil,
I noticed on your pics of the master that you are running a balance spring setup. I just went through this connection on my 930. The balance spring is to offset the force of the spring in the slave. Your slave maybe different but this is just informational for you to ponder. The slave that i am using is a Porsche unit. Both master and slave a re .75. The amount of pressure it exerts is around 40# and the balance spring is at 40 as well. Thus the "balance". With my lever setup the slave wasnot being retracted enough to get the clutch to release. I tried changing masters and it still didn't work. The balance was always about 4mm from the start point of the slave. Even adding a light throttle spring didn't help. I checked with my Porsche mechanics and they all agreed that the balance spring isn't needed. Seems the 933's stopped using them and have had no ill effects. I believe it is all in the angle of attack and it is such that the distance needed is more than the stroke of the master(24mm). I can tell you that the added pressure of the balance spring on my leg muscles was too much for me(80#). Now that I have removed the spring, I am able to retract the slave to it starting point and it now releases very easily. In doing so the adjustment of the lever is set at the beginning of the travel and it will now automaticly be set with clutch wear. Sort of set it and forget it. And my leg appreciated the drop in pressure as well. We had a good discussion of all this here:
http://www.gt40s.com/forum/gt40-tech-powertrain-transaxles/37915-clutch-master-cylinder-matchup.html#post387384

Bill
 
Back
Top