Norfolk Tornado

Hi Dave,
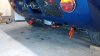
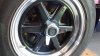
You’re right; they’re subtle and a nice finishing touch. I’ve seen various styles used on these cars, but the ones I’m using are Mk1 Escort/Cortina/Capri. Original ones (with mounting pins) seem to fetch serious money, but I found a Ebay seller offering them from CNC’d & polished aluminium and then mounted with double sided adhesive tape at a fraction of the cost.
Regards,
Andy
 
Hi all,
Over the winter months, I’ve been slowly working through the to-do list and finding other things than needed sorting

  • New front lower wishbones.
  • The new silencers are in (6” diameter straight-through re-packabale units)
  • A couple of header pipes reworked & the whole system ceramic re-coated
  • Re-spaced switches on new black anodised switch plates
  • New mechanical oil pressure gauge
  • New chrome plated bronze spinners & black anodised centre caps. No fear of the lugs breaking off these
  • Rubber boots added to all rose joints. Fiddly to fit and cheaper than having to change them in a few years time
Regarding the wishbones, the comparison of material cross section is interesting. For clarity the original Tornado is 1.5mm, seamed tubing and I’ve used 2.5mm seamless tubing (as used by Lotus for their wishbones). These ones aren’t going to bend or break!

Regards,
Andy
 

Attachments

  • Wishbone 1.jpg
    Wishbone 1.jpg
    308.8 KB · Views: 690
  • Wishbone 2.jpg
    Wishbone 2.jpg
    334.6 KB · Views: 678
  • Wishbone 3.jpg
    Wishbone 3.jpg
    144.7 KB · Views: 648
  • Exhaust.jpg
    Exhaust.jpg
    343.7 KB · Views: 870
  • Dash.jpg
    Dash.jpg
    234.6 KB · Views: 755
  • Spinner.jpg
    Spinner.jpg
    323.8 KB · Views: 621

Randy V

Moderator-Admin
Staff member
Admin
Lifetime Supporter
Nice work on the wishbones!! It's good to have peace of mind.. The silencers look and fit perfectly as well.
I've also wondered about the longevity of the cast alloy spinners. Yours look quite nice and fit for duty..
 

Keith

Moderator
Regarding the wishbones, the comparison of material cross section is interesting. For clarity the original Tornado is 1.5mm, seamed tubing and I’ve used 2.5mm seamless tubing (as used by Lotus for their wishbones). These ones aren’t going to bend or break!

Regards,
Andy

I hear you, but Colin's philosophy was always that if it couldn't break it was too heavy!

Love the 23 by the way. A favourite of mine from the '60's.
 
Now back on the road, but still going through various smaller issues, it had its first public showing at the weekend at the local Wings & wheels show at <?xml:namespace prefix = st1 ns = "urn:schemas-microsoft-com
><st1:PersonName w:st=
</st1:p
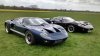
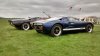
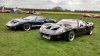
ersonName>Old Buckenham airfield. I was joined by Nick & Phil Rutherford’s MkIII KVA. Lots of interest & positive comments for both cars.

The new silencers have worked out well, giving a slightly deeper note and my wife now knows when I’m nearly home!<?xml:namespace prefix = o ns = "urn:schemas-microsoft-com<img src=" /><o:p></o:p>
The front tracking & camber settings had to be re-done as the new wishbones have the lower ball-joint in a slightly different position. Also got the rear towing eye & quick lift jack points fitted. Next job to sort out out the fron ones.
<o:p></o:p>
Regards,<o:p></o:p>
Andy<o:p></o:p>
 

Attachments

  • Wings & wheels 1.jpg
    Wings & wheels 1.jpg
    344 KB · Views: 720
  • Wings & wheels 2.jpg
    Wings & wheels 2.jpg
    341.7 KB · Views: 587
  • Wings & wheels 3.jpg
    Wings & wheels 3.jpg
    284.9 KB · Views: 533
  • Wings & wheels 4.jpg
    Wings & wheels 4.jpg
    357.1 KB · Views: 669
  • Rr lift hooks.jpg
    Rr lift hooks.jpg
    284.8 KB · Views: 688

Keith

Moderator
Looks very good Andy, and kudos to the MKIII. A very well finished example. It looks a bit chilly there and is that a German 88 I see in pic 2?
 
I was out with a local photographer who specialises in motorsport and automotive over the weekend, which resulted in the following dramatic shots, which I’m really pleased with. He already posted them on a digital photography site and won the weekly award for the best image.
<?xml:namespace prefix = o ns = "urn:schemas-microsoft-com<img src=" /><o:p></o:p>
Enjoy….<o:p></o:p>
Regards,<o:p></o:p>
Andy<o:p></o:p>
 

Attachments

  • Woodland Drive 25%.jpg
    Woodland Drive 25%.jpg
    136.6 KB · Views: 632
  • Classic Drive 30%.jpg
    Classic Drive 30%.jpg
    150.1 KB · Views: 647
  • Classic Lines 25%.jpg
    Classic Lines 25%.jpg
    192.4 KB · Views: 646

NickD

Supporter
Those shots are the ADB's. I only wish my car will look half as good as yours. One thing is for sure, I'm gonna commission that photographer for my cars photo's. I think we Brits call those kind of picks, The "Money" shots !
 
Hi all,
Thanks for the feedback, glad you like them and Matt the photographer did a really good job. Here’s a few more of this work on the car. I’ll also post them in the general section, as not everybody looks in the build logs.
I did O-level photography years ago, but things have moved on significantly since then and the techniques Matt used to achieve the sense of speed were interesting. The camera was mounted off the car via a 6m carbon fibre pole, hence the sharpness of the image A 8-10 second exposure was used through a neutral density filter (much darker than a welding mask) and then the car moved along the road at walking pace. We did originally drive it, but this resulted in too much camera shake – Matt wasn’t use to V8’s!. The camera mounting rig is then photo-shopped out of the finished image.
<?xml:namespace prefix = o ns = "urn:schemas-microsoft-com<img src=" /><o:p></o:p>
<o:p></o:p>
Regards,<o:p></o:p>
Andy<o:p></o:p>
 

Attachments

  • Out in the Countryside 25%.jpg
    Out in the Countryside 25%.jpg
    119.7 KB · Views: 602
  • Ford GT40 25%.jpg
    Ford GT40 25%.jpg
    107.2 KB · Views: 565
  • IMG_20150523_rear view.jpg
    IMG_20150523_rear view.jpg
    226.4 KB · Views: 587
What was planned as a light winter refresh, has turned into a major rebuild, resulting in the car only being back on the road this month.<?xml:namespace prefix = o ns = "urn:schemas-microsoft-com<img src=" /><o:p></o:p>
It started with a slight oil leak from the rear crank seal and the concern that the oil pressure seemed low, eventually resulted in a full strip of the engine<o:p></o:p>
<o:p></o:p>
The first issue I found was a problem with the inlet manifold gasket, which had moved, causing a bad air leak. I believe that issue was caused by the cork gasket between the block and the manifold being too thick, preventing sufficient clamping force between the manifold and heads. A dry build confirmed this and it was rebuilt with o-ring cord between the manifold & block (the manifold has a channel to take this) and a small amount of sealant on the gasket to cyl head to prevent any movement<o:p></o:p>
<o:p></o:p>
Removing the oil pan to check the bearings I found 2 of the internal gallery plugs had come out (the ones behind the cam sprocket). The one that hadn’t been mashed by the chain, showed a perfect sealing witness make around the periphery, so it was a bit odd. All plugs have now been replaced with threaded ones. The resultant low oil pressure had damaged the crank, resulting in a re-grind and a fresh set of shells. At least I’ve now got good oil pressure again.<o:p></o:p>
<o:p></o:p>
Whilst it’s been off the road a few other mods were done:<o:p></o:p>

<o:p></o:p>
  • Rear wheel rebuild with 1” additional offset, now fills the arches out better<o:p></o:p>
  • Rear suspension rebuild, due to the original powder coating flaking off!<o:p></o:p>
  • This strip resulted in new rear dampers, as one had a bent rod, which was only noticeable when the spring was removed for re-coating<o:p></o:p>
  • Removable luggage box, made from a few scraps left over from panelling, finished with some carbon effect vinyl wrap<o:p></o:p>
  • Thermostat added to the oil cooler<o:p></o:p>
  • Plumbed in fire extinguisher fitted<o:p></o:p>
<o:p></o:p>
Looking forward to driving it again and taking it down to Classic LeMans next month<o:p></o:p>
<o:p></o:p>
Regards,<o:p></o:p>
Andy<o:p></o:p>
 

Attachments

  • Inlet port.jpg
    Inlet port.jpg
    262.9 KB · Views: 497
  • Inlet manifold gasket.jpg
    Inlet manifold gasket.jpg
    352.9 KB · Views: 593
  • Engine Out.jpg
    Engine Out.jpg
    329.2 KB · Views: 582
  • Luggage Box 1.jpg
    Luggage Box 1.jpg
    335.6 KB · Views: 547
  • Luggage Box 2.jpg
    Luggage Box 2.jpg
    349.7 KB · Views: 622
  • Extinguisher Install.jpg
    Extinguisher Install.jpg
    342.1 KB · Views: 588
  • Rear Suspension.jpg
    Rear Suspension.jpg
    313.8 KB · Views: 617
  • Oil Thermoststat.jpg
    Oil Thermoststat.jpg
    303.3 KB · Views: 582
Hi Frank,
glad you like it
From memory the wheels are 7x16 with a -0.5" inset on the front and 9x16" with a 1" offset on the rear, supplied by Image Wheels
Rgds,
Andy
 
Back
Top