Porsche 908/910 project

Woowwwwwwwwwwwwwww
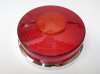
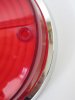
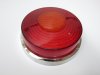
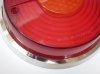
Martin those rear lights are EXEPTIONAL !!!!

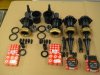
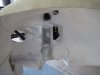
These are a sample of parts to source to match to originalones and I have to admit that Martin is an "superextra sourcer man" !! LOL
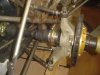
Thanks to him we found rare items like the front orange smal indicators light and front headlights matching to front bodywork space !

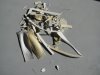
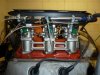
As I was not able to succeed in sourcing( as Martin did)original Hella rear lights I had the opportunity to found similar ones from "tractor stuff" ( Chris should know these hé hé)) and with a machined alu part they match not so badly

This is also part of the fun ; spend some long hours on the net !!!!!
 

Attachments

  • ensemble support feu et joint.jpg
    ensemble support feu et joint.jpg
    204.8 KB · Views: 491
Michel,

Very Nice build, and very nice car also, even if I prefer the 906 shapes...

I tried to send you a PM via this board. Unfortunately, I never received any answer. Sad, as I could have pointed you where to buy the same rear lights... here in France, as did Chris.

Regards

Olivier
 

Hello Chris
I notice you also spend all you"harvested money" in that crazy site LOL LOL LOL

side indicator lights are easy to found as they are still in catalog at some supplier in germany sourced by Martin

Otherwise the more rare to find it is the numerous hours ( and Chris you know what I mean !!) of welding all tube one together ; the fact is with the very accurate 3 D drawing all lasercuts are superb and there is nogrinding at all just tackweld and then welding , welding , welding
The result being so nice afterwords you forget all these hours and enjoy to have aso rare frame !!!
If I get some free time Iwill post if any interest the wip of what was the frame welding evolution.......
 
How chassis started in december 2012 ;
 

Attachments

  • DSC00295.JPG
    DSC00295.JPG
    113.5 KB · Views: 478
  • DSC00293.JPG
    DSC00293.JPG
    125.1 KB · Views: 483
  • DSC00296.JPG
    DSC00296.JPG
    121.4 KB · Views: 480
  • DSC00297.JPG
    DSC00297.JPG
    106.1 KB · Views: 435
  • DSC00294.JPG
    DSC00294.JPG
    121.6 KB · Views: 474
  • DSC00299.JPG
    DSC00299.JPG
    126.7 KB · Views: 456
  • assemblage tubes (4).JPG
    assemblage tubes (4).JPG
    129.3 KB · Views: 434
  • assemblage tubes (3).JPG
    assemblage tubes (3).JPG
    119.8 KB · Views: 425
  • assemblage tubes (5).JPG
    assemblage tubes (5).JPG
    126.2 KB · Views: 429
  • assemblage tubes (1).JPG
    assemblage tubes (1).JPG
    120.2 KB · Views: 485
Hello Chris
Thanks for your comp....
Yes they are done in TU 37 b cold drawn noweld and each end of tbe is slightly engraved laser with number of tube to place it correctly following the 3 D drawing ( same as Marcel and you did with your 917 chassis I guess)
More or less there are 157 different tube to assemble plus the surround of windscreen ( this one is to be done when everytube have been located and the bodywork centered on in the correct position
 

Attachments

  • assemblage tubes (6).JPG
    assemblage tubes (6).JPG
    114.6 KB · Views: 362
  • DSC00300.JPG
    DSC00300.JPG
    122.2 KB · Views: 355
  • DSC01112.JPG
    DSC01112.JPG
    143.4 KB · Views: 494
This is when surrounding tubes where bended and grinded to match to bodywork as closely as possible because when the chassis is achieved and fully paited then you need to laminate both frame and some areas of bodywork
 

Attachments

  • en cours (7).JPG
    en cours (7).JPG
    83.6 KB · Views: 490
  • en cours (8).JPG
    en cours (8).JPG
    71.6 KB · Views: 478
  • en cours (9).JPG
    en cours (9).JPG
    89 KB · Views: 500
Hubbs , front and rear suspension ;
 

Attachments

  • IMG_1141.JPG
    IMG_1141.JPG
    366.7 KB · Views: 566
  • suspension (5).JPG
    suspension (5).JPG
    90 KB · Views: 561
  • arriére (4).JPG
    arriére (4).JPG
    158.1 KB · Views: 605
Michel, those Martin rear lights for 906/910/907/908 are waiting for you as they come from me, send me a post if you like.
 
This week start of bonding and laminating all panels to the chassis ;
 

Attachments

  • IMG_0471 - Copie.JPG
    IMG_0471 - Copie.JPG
    211.1 KB · Views: 515
  • IMG_0473 - Copie.JPG
    IMG_0473 - Copie.JPG
    142.7 KB · Views: 491
Just to help out a little bit Jacques, here are some pictures of the tail lights he had reproduced (plastic injection with metallic molds!).

He had some issues with his last production batch and endend with various quality parts.

So he decided to make 3 categories depending on the level of correctness of the lights:


Perfect ones, good for "Pebble beach" are priced @800€/pair (no pics)


Small defects, mainly on the chromed bezel: 500€ a pair they are shown in the two first pictures

More defects, may be either in injection and chromed bezel: 250€ a pair, , the two last pictures.

I have no interest in this business, other than help out other Porsche nuts! I had a pair of perfect ones in hands, and they are awesome! And when you know how difficult it is to find an original pair, this is a very good option!

Precision, prices are ONLY for the plastic lights. Jacques also sells the base and seals. The best way is to contact him by PM...
 

Attachments

  • 500-11.jpg
    500-11.jpg
    81.5 KB · Views: 348
  • 500-21.jpg
    500-21.jpg
    40.7 KB · Views: 365
  • 250-11.jpg
    250-11.jpg
    72.7 KB · Views: 331
  • 250-21.jpg
    250-21.jpg
    86.3 KB · Views: 366
Last edited:
Long process of triming and fitting corectly all internal panels and then bonding these plus finally laminating strips of clothes to rinforce those "composite weldings"
 

Attachments

  • IMG_0475 - Copie.JPG
    IMG_0475 - Copie.JPG
    116.5 KB · Views: 468
  • IMG_0476 - Copie.JPG
    IMG_0476 - Copie.JPG
    169.8 KB · Views: 533
Hello Fred
Ho yes indeed "fiddly job" !!!
By chance am lucky to get help from my nice wife.
Am jealousing GT40 guys riveting their 2500 "pop" rivets !!!!!
I am using one matt 200 then one or two roving 220 gr stripes already sawn on sides ( these can be sourced in rolls )and finally and 100mm wide or 50 mm stripes of peelply that I strip off day after when cured
Before laminating I apply a"curved chanfrein" of mix of resin low catalysed added with"flocs" to give to the resin an consistance of bonding stuff
In doing this work am using Vynilester resin which to me is much more flexible and stiffer to torsional loads .
 
Hello to everybody
Some fresh news of the 908 project ; after cutting bonding and recuting etc ( LOL) bodywork is finally fit into the chassis
Qite major parts are laminated around tubes so now will start the long and tedious work to trim doors and then doing a finish on all gaps of different parts of this body
 

Attachments

  • IMG_0075.jpg
    IMG_0075.jpg
    114.9 KB · Views: 549
  • IMG_0069.JPG
    IMG_0069.JPG
    153.9 KB · Views: 483
  • IMG_0016.JPG
    IMG_0016.JPG
    232.8 KB · Views: 531
  • IMG_2959.JPG
    IMG_2959.JPG
    221.9 KB · Views: 520
  • IMG_2960.JPG
    IMG_2960.JPG
    161.6 KB · Views: 636
Here's my 3.0SC on the dyno. Early days mapping and setting up.
 

Attachments

  • P1050481.jpg
    P1050481.jpg
    170.7 KB · Views: 400
  • P1050482.jpg
    P1050482.jpg
    227.7 KB · Views: 410
  • P1050483.jpg
    P1050483.jpg
    135.3 KB · Views: 396
  • P1050489.jpg
    P1050489.jpg
    192.1 KB · Views: 387
Back
Top