
You are using an out of date browser. It may not display this or other websites correctly.
You should upgrade or use an alternative browser.
You should upgrade or use an alternative browser.
I did mine in Linex and am very pleased with it. As they said it is a little rougher than the Por 15. I also did the interior of the bonnet and the front clip supports which are hard rubber. They now are a little stiffer. I think it is a great alternative to just paint.

Bill
Bill
Dave Hood
Lifetime Supporter
A co-worker of mine is the former President of Line-X. Their product does add some rigidity. Another use for their product has been to coat the walls of some US Embassy buildings around the world to keep the walls from collapsing from a bomb blast. A testament to the lovely world in which we all now live....
Rick Merz
Lifetime Supporter
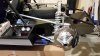
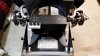
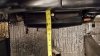
Installed the suspension and brakes with the exception of a couple of bolts and spacers that are needed for the transaxle mount and emergency brakes. I will corner weigh and make final adjustments to the suspension when the car is completed.
Attachments
Lee Patterson
Supporter
Nice work and quick.
Looks very cool. Well done. Love the plated radius rods.
Rick Merz
Lifetime Supporter
Lee, Tru, Jason, Thank you.
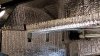
Insulated the front half of the tub and installed the pedal box and steering shaft. I insulated the complete front end to ensure that the air conditioner does not have to work any harder than necessary. A cool car is important to me.
I ran my GTD 40 on the track with the AC on since I would rather change the AC compressor than sweat. I was at Gateway in July for Run and Gun 16 many years ago when after a 25 minute heat I got out of my GTD 40 and complained that my car was too cold in front of another gentleman who was sweating profusely as he replied "you race with the AC on? It uses too much horse power and it's hard on the compressor.", to which I replied "of course, I don't want to get hot and I have plenty of horsepower. If the compressor fails it will only cost about $150 to fix it." BTW the AC compressor never failed even after many track day events and about 20,000 miles of use.
Attachments
Rick Merz
Lifetime Supporter
Tru, It is TempShield® Brand Double Bubble Foil. It has two layers of 1/8" barrier bubble film laminated between two layers of metalized film. TempShield® Double Bubble Foil is designed to be used for water heater, metal and commercial buildings, stud walls, roofing systems, basements, and crawl spaces when reflectivity and higher R factors are required. I use it on my garage door and it works very well to stop the Texas sun from turning my garage into a sauna (my garage door faces West).
I used the same double layer product on two projects...combined foam board insulation with the bubble wrap on a south-facing dark green double garage door. The garage would reach 115* quite easily before the treatment...it has yet to exceed 85* since. The other project was a west wall of my old poured concrete wall home in SW Kansas. It was protected from sun-induced heat by a back porch roof, but when the weather turned cold you could feel the cold radiating into the kitchen on the other side of that wall. On that project I sandwiched more pink foam-board between layers of the double-bubble foil faced product. Now there is absolutely no hint of temperature difference near the wall at all.
It's great stuff...I plan to install some on the inside of the firewall on my Cobra replica to keep it from cooking feet during the heat of the TX summers!
Cheers!!
Doug
It's great stuff...I plan to install some on the inside of the firewall on my Cobra replica to keep it from cooking feet during the heat of the TX summers!
Cheers!!
Doug
I sold my GTD GT40 in 2005 because I wanted to retire in Mexico. That retirement was short lived since my wife was not happy living in Mexico. I returned to Houston where I am the director of maintenance for UTLX Manufacturing.
Of all the cars that I have had I regret selling my GT40 so after reviewing the available GT40's I decided to purchase a RCR GT40. I am happy with my decision and looking forward to my build.
I took 2 weeks off of work to visit family in South Carolina, Michigan and Virginia and to pick up my GT40 from RCR. I was impressed with the quality of workmanship evident in my kit as well as the other projects in various stages of completion in the shop. The shop is just as much of an adult toy showroom as the showroom in front of the shop. I think that in a couple of years I may get the itch to build a GT40R, I was really impressed with it as well.
My GT40 will be built to show well, go fast and be a daily driver (at least once a week). I am not overly concerned with it looking exactly like an original since it is a replica but I will be adding things like brake ducting and other items found on original cars just because I like the functionality of these items.
Build plans are:
Two tone paint, medium to dark blue body with tangerine orange gulf stripe (wheels, engine and transaxle will be painted to match the stripe.
Engine: Levy Racing stage 5 engine with dart block and heads, forged internals 399 cuin internally balanced, 7500 rev, fully race machined, solid roller cam, shaft rockers, custom cam grind, HP pin oiling lifters, aluminum flywheel and clutch and Borla EFI with 58mm throttle-bodies.
Transaxle: RBT continuation of the ZF gearbox with the following ratios, 1st 2.43, 2nd 1.61, 3rd 1.14, 4th 0.826, 5th 0.642 final 3.56.
Wheels and Tires: 17" BRM wheels 8" front with 245/40ZR-17 Hoosier A7's and 12.5" wide rear with 335/35ZR-17 Hoosier A7's.
Link to my LS3 powered 280Z with modified ISMA wide body build article.
Rick's Masterpiece - LS3 Swapped 1977 Datsun 280Z - The Modified Lifestyle | Revvolution
Texas Rally is March 30-April 3 2016
Will be an amazing build to have Ready!!! JK
Looking forward to seeing it! Good Luck!
Lee Patterson
Supporter
Rick
Need a "Rick's build log" fix. Pics man, pics.
Lee
Need a "Rick's build log" fix. Pics man, pics.
Lee
Rick Merz
Lifetime Supporter
Doug, I do not think that I will be on the road by then but I would like to find out more about the rally. Is there a website that I could go to?
Lee, Update just for you.")
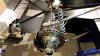
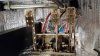
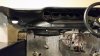
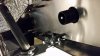
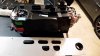
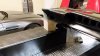
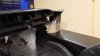
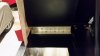
Installed the a/c unit: I used a piece of 1/4" plywood and glued a sheet of .0625 aluminum to both sides to make a bottom for the (2) 1" square tubes used to strengthen the dash area so that I could make a plenum for the a/c unit. I did not want to cut the 1" tubes and weaken the structure. The new plenum will supply air to the dash demister, (2) ball vents and a third vent that will point down in the center of the car. The ends of the plenum were closed off after the bottom was put in place. There is about 11.25" of clearance under the a/c unit which is about 1" less than if I would have cut and removed a section of the 1" square braces and bolted it to the dash and used the RCR supplied plenum. I tested clearance by sitting in the passenger seat and there was plenty of clearance. I hope I never have to sit on that side again, it felt so strange.
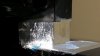
The RCR supplied dash for the right hand drive cars do not go down to the sill, they are about 4" short. I fixed this since I think that the dash looks better if it goes down to the sill and it helps to hide the fuel fill lines. I made a mold using cardboard covered with aluminum foil tape (HVAC tape) I also covered the sill with aluminum tape since the cured fiberglass will release from the tape. After removing the dash with the first couple layers of fiberglass I laid 3 more layers of fiberglass mat to the back side then rough sanded both sides and finished the front side with 2 layers of mat and finish sanded to shape. I am not a professional by any means but the end result will look good. I may do more work on the dash since I want it to look better when the spider is in place, that project will be done a few weeks from now.
Attached the rear bulkhead to the side sponsons. Pretty straight forward just measure and cut the aluminum angle and drill and tap holes to bolt the angle to the bulkhead and the sponsons.
Lee, Update just for you.
Installed the a/c unit: I used a piece of 1/4" plywood and glued a sheet of .0625 aluminum to both sides to make a bottom for the (2) 1" square tubes used to strengthen the dash area so that I could make a plenum for the a/c unit. I did not want to cut the 1" tubes and weaken the structure. The new plenum will supply air to the dash demister, (2) ball vents and a third vent that will point down in the center of the car. The ends of the plenum were closed off after the bottom was put in place. There is about 11.25" of clearance under the a/c unit which is about 1" less than if I would have cut and removed a section of the 1" square braces and bolted it to the dash and used the RCR supplied plenum. I tested clearance by sitting in the passenger seat and there was plenty of clearance. I hope I never have to sit on that side again, it felt so strange.
The RCR supplied dash for the right hand drive cars do not go down to the sill, they are about 4" short. I fixed this since I think that the dash looks better if it goes down to the sill and it helps to hide the fuel fill lines. I made a mold using cardboard covered with aluminum foil tape (HVAC tape) I also covered the sill with aluminum tape since the cured fiberglass will release from the tape. After removing the dash with the first couple layers of fiberglass I laid 3 more layers of fiberglass mat to the back side then rough sanded both sides and finished the front side with 2 layers of mat and finish sanded to shape. I am not a professional by any means but the end result will look good. I may do more work on the dash since I want it to look better when the spider is in place, that project will be done a few weeks from now.
Attached the rear bulkhead to the side sponsons. Pretty straight forward just measure and cut the aluminum angle and drill and tap holes to bolt the angle to the bulkhead and the sponsons.
Attachments
-
 20151129_123306 2048.jpg162.1 KB · Views: 1,121
 -
 20151206_193522 2048.jpg221.6 KB · Views: 1,053
 -
 20151206_193329 2048.jpg171 KB · Views: 1,110
 -
 20151129_130340 2048.jpg116.5 KB · Views: 1,072
 -
 20151129_123446 2048.jpg128.4 KB · Views: 1,177
 -
 20151117_131808 2048.jpg173.7 KB · Views: 1,025
 -
 20151202_180041 2048.jpg167 KB · Views: 1,067
 -
 20151202_180107 2048.jpg139.2 KB · Views: 1,017
 -
 20151204_084249 2048.jpg205.8 KB · Views: 1,108
 -
 20151206_192625 2048.jpg84.8 KB · Views: 1,031
Lee Patterson
Supporter
Picks Rick, pics. Dying out here.
Similar threads
- Replies
- 0
- Views
- 466
- Replies
- 46
- Views
- 9K