Roaring Forties 105

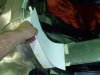
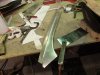
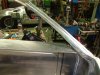
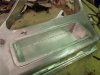
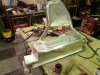
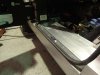
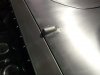
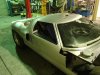
Make patterns for the inside sill.
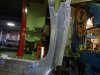
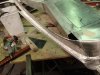
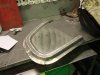
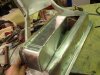
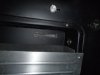
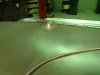
Cut and fit up.
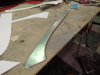
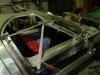
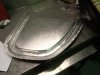
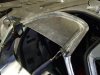
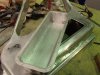
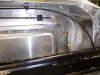
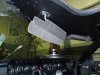
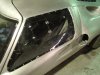
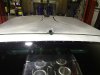
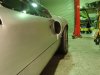
Make the panel in between the inner and outer rear rear pillar skins.

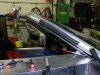
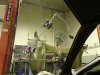
I have actually welded but no pic, I will put it up as I progress.

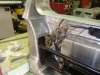
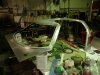
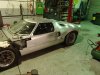
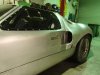
To date it would be about 16hrs on the alloy work.
I am hoping by Saturday afternoon I will have a complete door frame.

Thats it

Jim
 

Attachments

  • P9030077.jpg
    P9030077.jpg
    117.1 KB · Views: 331
  • P9030078.jpg
    P9030078.jpg
    150.4 KB · Views: 329
Moving through the second door
Panels for front pillar
 

Attachments

  • P9070080.jpg
    P9070080.jpg
    161.7 KB · Views: 278
  • P9070082.jpg
    P9070082.jpg
    173.6 KB · Views: 292
  • P9070081.jpg
    P9070081.jpg
    186.8 KB · Views: 293
  • P9070083.jpg
    P9070083.jpg
    161.9 KB · Views: 289
aligning pillar to correct location.
Building join between door and pillar
 

Attachments

  • P9070085.jpg
    P9070085.jpg
    168.1 KB · Views: 284
  • P9070086.jpg
    P9070086.jpg
    162.1 KB · Views: 254
  • P9070087.jpg
    P9070087.jpg
    170.6 KB · Views: 256
Last edited:
door mechanics, levers and locks, I used a bike cable for the release.
I will probably get it skinned next week then I will move onto the front clip.

Jim
 

Attachments

  • P9210095.jpg
    P9210095.jpg
    156.8 KB · Views: 339
  • P9210096.jpg
    P9210096.jpg
    159.2 KB · Views: 358
  • P9210097.jpg
    P9210097.jpg
    196.6 KB · Views: 322
Back again.

I finished the other door, I wont bore you with that as its same as the other side.
I have been finishing areas on the door mechanics which took such a long time.
It took days of back and forth getting things to the happy stage.

I wanted to get detail things out off the way before I do the front clip.
I am sort of over it at this point but I will keep at it.
I have an appreciation for tradesman that do this day in day out, having to try to get gaps and fit is difficult.

Again its not perfect but I am taking a liking to the not so perfect as it is giving the car real character that is growing on me.
Its almost a year since I drove the car on the road last, that I miss.

I removed the roof and painted the inside, fitted visors int lamp and camera cables.
Excuse the dust in the photos but its a work in progress.
 

Attachments

  • PB080009.jpg
    PB080009.jpg
    173.4 KB · Views: 271
  • PB160043.JPG
    PB160043.JPG
    456.7 KB · Views: 277
I remade the seal panels to suit the new doors, I polished the alloy to give some contrast.
Stuck a badge on them so I dont forget.

Fitted out the pockets and lined them with neoprene to stop stuff from sliding around.

I had more shots of the inside but the focus seems to have struggled with the the dark interior.

The inner door lever is made from spare throttle body levers, when I made the throttle bodys I made extras so I put them to use.
 

Attachments

  • PB160017.JPG
    PB160017.JPG
    440.4 KB · Views: 313
  • PB160041.JPG
    PB160041.JPG
    421.9 KB · Views: 271
Last edited:
I designed all the window hardware sometime ago, I had it laser cut is 316 ss.
The parts are very small and require patience to get it together.
Some parts are welded but the welds are all hidden.
The window is scratch resistant policarb.
This is the 3rd set of windows I have made for this car, the first set I didn't like the flip window location, the second don't fit the alloy doors so this is the 3rd.

The last pic is the window folded back in and the front top latch then hooks into a rear latch to hold it open.
I have had the system on the car for about a year and it works well.
The reason I run the door at the front is it allows you to put your arm out the window to adjust the mirrors.
 

Attachments

  • PB160018.JPG
    PB160018.JPG
    447.7 KB · Views: 330
  • PB160025.JPG
    PB160025.JPG
    452.7 KB · Views: 268
  • PB160024.JPG
    PB160024.JPG
    427.7 KB · Views: 270
Painted under the rear window.
Ignore the rear clip to roof height , it fits I just need to reset it.

Made the rear screen, same policarb.
All the screws are stainless, I got hold of 120 square trim clips for sheet metal (automotive).
I drill a 6mm hole then file out a square hole with a file, the clip is square and pushes into the hole, when the screw goes in it tightens up the clip in the hole.
It took some time and effort but worth every hole.

I didnt want screws in the alloy as it will become an issue later on.
 

Attachments

  • PB160028.JPG
    PB160028.JPG
    441 KB · Views: 293
  • PB160029.JPG
    PB160029.JPG
    435 KB · Views: 285
  • PB160030.JPG
    PB160030.JPG
    444 KB · Views: 292
Last edited:
This is my camera, again I remade what I had.
I actually didnt want to make it to subtle, if you cant hide it make it stand out I recon.

I had 2 goes at making this because I wanted it in one piece except for the face where the lens is.
In the end it was simple.
 

Attachments

  • PB160031.JPG
    PB160031.JPG
    388.8 KB · Views: 259
  • PB160032.JPG
    PB160032.JPG
    426.5 KB · Views: 267
  • PB160033.JPG
    PB160033.JPG
    435.5 KB · Views: 254
Currently I have 3/4 of a car these are just pics of the stage I am at.
Another couple of days work and I would be ready for the front clip.

I got the door locks of ebay, I wanted them because they look period.
I spent about 2 days re engineering a few things inside the doors just so I could fit them.
The stupid thing is I wont ever use them because I have central locking and rarely lock the car anyway.
But they look good.


Thats all.

Jim
 

Attachments

  • PB160034.JPG
    PB160034.JPG
    484.2 KB · Views: 344
  • PB160035.JPG
    PB160035.JPG
    462 KB · Views: 324
  • PB160036.JPG
    PB160036.JPG
    468.6 KB · Views: 313
  • PB160038.JPG
    PB160038.JPG
    445 KB · Views: 279
  • PB160039.JPG
    PB160039.JPG
    438 KB · Views: 319

Randy V

Moderator-Admin
Staff member
Admin
Lifetime Supporter
A long time admirer of your work here Jim...

I was cruising back through time in your build and curious if you had thought of any suitable water traps for the front NACA ducts. I made mine from Fiberglass (which I know you shun, but don't have your metal working skills yet) and did fashion what I tought might be suitable traps, but I wanted to see some of the other ideas here..
Your build is inspirational to say the least..
 
Thanks Rene

Randy in post 99 pic 2 I had a slip type shutter, it was always a problem and would stick.
What I ended up making when I went to 2 ducts was a small box under the panel with a cable operated door.
I wondered about the water as well so I built the door in the side of the box giving me the option later on to put a drain hose in.
When the door is closed and you have no air flow the water doesnt get up the duct so I never put the drains in.
If you want to use the air ducts in the rain I would be putting beads of sealer on the floor and sides of the inside ducts (like speed humps) then drill say a 1/4 hole here and there it maybe enough or put the drain in the control door box.
I dont think you will need it.
The ducts are worth doing I ended up with the 2 and cables left and right.
They are the best thing for air flow.

Jim
 
Last edited:
Back
Top