

You are using an out of date browser. It may not display this or other websites correctly.
You should upgrade or use an alternative browser.
You should upgrade or use an alternative browser.
Roaring Forties 105
- Thread starter Jim C
- Start date
Hi Jim
that is incredible, I wish I would be able to do the work you do, I am buying air pressure dangling tools right now and various hammers, but it will be a long way to go to get roughly to the things you do...
that is incredible, I wish I would be able to do the work you do, I am buying air pressure dangling tools right now and various hammers, but it will be a long way to go to get roughly to the things you do...
Cut and rolled the headlamp apertures.
Made the top panel against the screen.
Linked all the gutters up.
Put the naca ducts in the top of the guards.
Tomorrow I start down the side of the guards.
Then give areas a touch up.
Centre bonnet then im done , I have not driven the car for 13months and I miss it.
If I do alright on the week end I will post up in the next week or so.
Jim
Attachments
Actually Axel I was looking at your door skins, they look good, Its hard not to crease or get lines in the skin.
I also checked out all the tools around your shop while I was at it.
Axel
If you want to metal shape, lots of good stuff on these 2 sites and they are a real good bunch of guys .
All MetalShaping - Powered by vBulletin
MetalMeet - for Metalshaping Enthusiasts & Professional Metalshapers
Sign up and become a member
Jim
Last edited:
Thanks Jim
I try to do the metalwork as good as possible to avoid thick layers of body filler, the doors were easy to do cause they are cylindrical!
And thanks for the links, will check the sites and might become a member!")
I try to do the metalwork as good as possible to avoid thick layers of body filler, the doors were easy to do cause they are cylindrical!
And thanks for the links, will check the sites and might become a member!
Actually Axel I was looking at your door skins, they look good, Its hard not to crease or get lines in the skin.
I also checked out all the tools around your shop while I was at it.
Axel
If you want to metal shape, lots of good stuff on these 2 sites and they are a real good bunch of guys .
All MetalShaping - Powered by vBulletin
MetalMeet - for Metalshaping Enthusiasts & Professional Metalshapers
Sign up and become a member
Jim
Last edited:
Hi Jim, This the first time I have seen your build log and I,m blown away by the workmanship in that alloy body. I am asking "Why" and at same time answering "Because its so cool" and I doubt that many if any others have one. How do you intend finishing it Paint or polish. I saw a "Kirkham Cobra" at a show I when to a few weeks back, it had a fully polisihed alloy body and it looked amazing. The reason I ask "Why" is I'm just a stickler for original and just believe if your building a "Replica" to make it as close as possible to the real thing and I was glad to see the R/H gear shift just little things like that count IMHO. But I take nothing away, I think the alloy body is awsome and now I found this build I will be following it. Great work, cheers Leon.
Leon
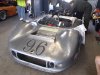
I to like original, when I started building this car it was going to be that but as time progressed I relaxed that in a few areas but still stick to the plan in general.
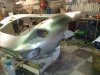
The finish
When I started the body I was always going to paint it so in a few difficult areas I didn't spend a lot of time plenishing out some of the marks, I had a few friends look at it over a beer and said you cant paint it and you need to leave the work marks don't make it pristine as it makes it interesting.
I cant do perfect so leaving a few things to give it an aged look was not hard.
I found if I use 120 grit I can put some stripes a moustache and roundels.
Like an old fighter plane with rivets and damage history.
Why.
Several reasons, I have had a fascination with this skill for years and have never done anything serious to test myself, mainly because a car needs to be worth the effort if you want to make a body for it, I think the 40 is and Im glad I did.
I want to build a P4 so I needed the practice.
I thought it would be different, not just another gt40.
I thought this car was OK but know I have done the body I really like it ,and it has taken on a whole new character.
A friend of mine calls it dirty and sexy.
The pics are of an experimental run some time ago.
Jim
I to like original, when I started building this car it was going to be that but as time progressed I relaxed that in a few areas but still stick to the plan in general.
The finish
When I started the body I was always going to paint it so in a few difficult areas I didn't spend a lot of time plenishing out some of the marks, I had a few friends look at it over a beer and said you cant paint it and you need to leave the work marks don't make it pristine as it makes it interesting.
I cant do perfect so leaving a few things to give it an aged look was not hard.
I found if I use 120 grit I can put some stripes a moustache and roundels.
Like an old fighter plane with rivets and damage history.
Why.
Several reasons, I have had a fascination with this skill for years and have never done anything serious to test myself, mainly because a car needs to be worth the effort if you want to make a body for it, I think the 40 is and Im glad I did.
I want to build a P4 so I needed the practice.
I thought it would be different, not just another gt40.
I thought this car was OK but know I have done the body I really like it ,and it has taken on a whole new character.
A friend of mine calls it dirty and sexy.
The pics are of an experimental run some time ago.
Jim
Attachments
Hi Jim, I tend to agree with your mates, it does have that historic look to it and I really like the stripe treatment, it's suttle but efective, the number rondel had me thinking for a second as at first it looked like a huge Gurney Bubble, then I clicked it was a Rondel, I'm a panelbeater by trade (not practiced for over 30yrs) and in the very late 70s early 80s I worked in a custom shop and did all the panel work so made a lot of Roof turrets for Ford Pops door skins and the likes so I know how much work there is in what you have done, My biggest (and best) achievment was a full restoration of a 55 Chevy. I had to make a complete Floor pan from the fire wall to the rear panel and the customer wanted it to look original so I had to make every fold and swage, then the kicker was it was a 4 door and I made it into a 2 door piller coupe so had to make new doors and rear 1/4s I wish I had taken photos..
Anyway back to your car, there is an original McLaren M1C over here that is bare alloy and they have left the body "aged" and it does look good if a little rough for my taste. I know I'm only looking at Photos but my guess is your body looks like it wouldn't take much to get it good enough for a glossy brush finish, not a full on polish but a brush stainless look and then with the stripes and rondels polished in, Just a thought.
Cheers Leon.
Last edited:
After all your outstanding work Jim I think it'd be almost criminal to put paint over it. I like the naked look and the stripes and roundels are even more dramatic. If you're like many of us who have "female" cars I can think of no other reason then that to keep such a stunning "female" body totally naked. Just my .02.
Jim your right ,they are all female.
Leon , some things I cant fix. The rear clip is not a metal forming shape in some areas.
Or if you where going to make a metal body the rear clip would not be as complex.
When you look at a P4 you can see it was made to shape not to be made in a mould.
You cant get a dolly or hammer it to sort it.
You do what you can
The McLaren you mentioned.
Jim
Attachments
Last edited:
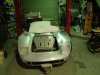
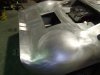
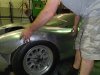
Been a few months so I will put up some of the progress.
Had a major f**k up, it cost me plenty of time to fix but I am on track again.
After I had the front clip on for about a week I kept thinking it looked to low over the tyres.
In my head I was thinking wheel travel was an issue, I did more measuring and what had happened was the rear profile on the buck was about 25mm to high, what this does is it increases the radius from the screen to the headlamp.
I had a choice ,cut it off or see if you can fix it, I like a challenge and to a degree I needed to teach myself a lesson.
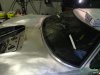
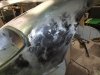
I annealed the tops of the guards with the oxy torch to get them soft, I needed to do this because I wanted to stretch the area from the headlamp to the fuel caps and not effect the windscreen gaps and the aperture for the centre bonnet as all these where set.
I then gridded the panels and made profiles to check the areas I was working , 8 profiles in total 6 across the panel and 2 down.
I used a sandbag on the outside and a wooden mallet was the weapon of choice on the inside.
The annealing process was performed about 3-4 times before I got it in the ball park.
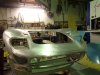
The first pics are after I hit it with a guide coat of black paint then a sweep with a body file.
I sat on it for a week to pic the right approach.
Had a major f**k up, it cost me plenty of time to fix but I am on track again.
After I had the front clip on for about a week I kept thinking it looked to low over the tyres.
In my head I was thinking wheel travel was an issue, I did more measuring and what had happened was the rear profile on the buck was about 25mm to high, what this does is it increases the radius from the screen to the headlamp.
I had a choice ,cut it off or see if you can fix it, I like a challenge and to a degree I needed to teach myself a lesson.
I annealed the tops of the guards with the oxy torch to get them soft, I needed to do this because I wanted to stretch the area from the headlamp to the fuel caps and not effect the windscreen gaps and the aperture for the centre bonnet as all these where set.
I then gridded the panels and made profiles to check the areas I was working , 8 profiles in total 6 across the panel and 2 down.
I used a sandbag on the outside and a wooden mallet was the weapon of choice on the inside.
The annealing process was performed about 3-4 times before I got it in the ball park.
The first pics are after I hit it with a guide coat of black paint then a sweep with a body file.
I sat on it for a week to pic the right approach.
Attachments
How it works with straightening something out you tap the big highs down and bring all the lows up, you sweep with a body file to see how you are going but this was going to take time and to keep filing was not in the plan as the panel would thin out eventually, I may only do 3-4 sweeps on a panel but not this one.
I had adhesive backed sandpaper so I cut out 3mm craft wood (MDF) to suit, that would be my file as I need to make it contour the panel and work the guide coat.
I got online a bullseye hammer, you put the top foot over the dents and pull the handle.
Most of the time I machine gun the panel in areas because the lows where big.
Sometimes a hammer and a sandbag gets the big ones up.
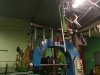
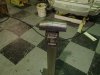
The hammer collection has grown so I made a rack that runs around the top of the English wheel.
I have made at least half the hammers, to get in places that hammers don't get in.
I had adhesive backed sandpaper so I cut out 3mm craft wood (MDF) to suit, that would be my file as I need to make it contour the panel and work the guide coat.
I got online a bullseye hammer, you put the top foot over the dents and pull the handle.
Most of the time I machine gun the panel in areas because the lows where big.
Sometimes a hammer and a sandbag gets the big ones up.
The hammer collection has grown so I made a rack that runs around the top of the English wheel.
I have made at least half the hammers, to get in places that hammers don't get in.
Attachments
Last edited:
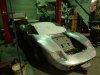
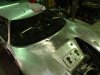
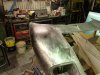
The L/H guard I had not attached the side at this point so it was only the top I had to deal with.
The R/H had the side attached when I realised I had the problem so I had to reshape the radius over the side and also reduce the radius to raise the curve, hard to explain but its a
3D thing.
The guide coat and sand to find high spots would happen 8-10 times or till you are happy.
Anyway 14hrs on the R/H and 8 on the left.
My hands from pulling the bullseye hammer where f**ked I don't mind telling you.
This is the result.
Attachments
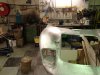
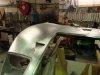
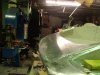
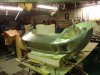
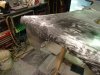
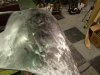
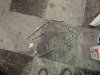
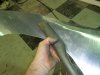
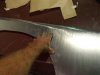
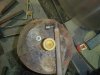
A few people ask how you go about it when they see the car at work so I took some pics of the making and attaching the L/H side.
pic 1 First I take a pattern and cut out the sheet, leave a little on it.
pic 2 wheel the latch area
pic 3 - 4 I put the top radius on using a post dolly and a wood slapper.
pic 5 where the panel transitions out of the flatter area and up into the radius and arch area it needs help to get it into shape.
6 I mark the inside and hit it with a mallet to put shape in the area.
7 after its beating
pic 8 then I wheel out all the wall nuts and get it looking right.
pic 9 you keep going back to the car and checking the fit.
keep adjusting till it fits.
Attachments
-
 P4120006.JPG454 KB · Views: 252
 -
 P4120008.JPG417.2 KB · Views: 248
 -
 P4120009.JPG479.7 KB · Views: 255
 -
 P4120010.JPG439.9 KB · Views: 282
 -
 P4120012.JPG415.6 KB · Views: 235
 -
 P4120017.JPG464.8 KB · Views: 242
 -
 P4120018.JPG476.5 KB · Views: 238
 -
 P4120021.JPG462.6 KB · Views: 265
 -
 P4120028.JPG453.2 KB · Views: 364
Last edited:
Thanks James.
That got welded on but I never took pics .
It takes all day to fit a panel to within 1/2 mm max gap at any point then weld and clean.
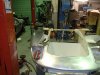
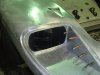
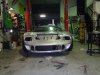
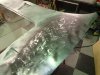
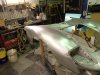
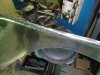
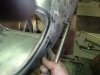
I took a bunch of pics of the front corner panel, these are always work as it has 3 corners coming into it and when you weld it causes a lot of shrinkage and not being a large panel it gets pulled around plenty, so you have to stretch it up to get the shape back into it to make it look right.
The aim is to make it flow off the other panels, it has to flow off the headlamp the top and side guard.
This is after a guide coat, the weld along the guard you can see the other starts at the h/lamp end of the weld and travels down, I have already cleaned it.
That got welded on but I never took pics .
It takes all day to fit a panel to within 1/2 mm max gap at any point then weld and clean.
I took a bunch of pics of the front corner panel, these are always work as it has 3 corners coming into it and when you weld it causes a lot of shrinkage and not being a large panel it gets pulled around plenty, so you have to stretch it up to get the shape back into it to make it look right.
The aim is to make it flow off the other panels, it has to flow off the headlamp the top and side guard.
This is after a guide coat, the weld along the guard you can see the other starts at the h/lamp end of the weld and travels down, I have already cleaned it.
Attachments
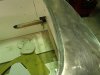
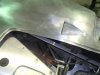
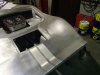
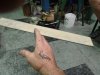
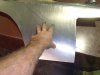
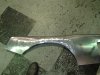
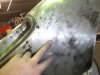
To get the majority up I used one of the hammers I have made and a donut dolly, its just a piece of plastic with the centre taken out of it, if I place that on the outside and tap on the inside it does not move the whole panel it just moves the metal inside the donut area, this brings up the lows.
Once it is close I use the bullseye hammer and work all the other areas over and over till you are happy.
1 panel being worked
2 donut dolly and one of my hammers.
3 bar hammer, these hammers allow me to get up between the headlight and guard to get the low I am pointing to.
You place it in the area then hit a hammer onto the bar as close to the end as you can and you work dents up.
4 finished
Attachments
Ian Anderson
Lifetime Supporter
Him
As usual I am in awe of your talent
Are you going to connect up the NACA ducts and make them functional?
Ian
As usual I am in awe of your talent
Are you going to connect up the NACA ducts and make them functional?
Ian
Similar threads
- Replies
- 139
- Views
- 18K