

You are using an out of date browser. It may not display this or other websites correctly.
You should upgrade or use an alternative browser.
You should upgrade or use an alternative browser.
Roaring Forties 105
- Thread starter Jim C
- Start date
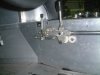
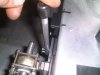
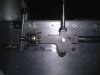
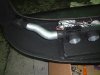
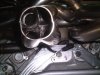
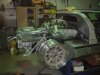
Made the gear lever and linkages.
Firstly made the housing and shaft to get it to exit on the driver’s side.
Brackets to mount rose joints then I filled in the gaps.
Made a housing on the back with a sperical bearing to allow for the shaft motion.
I made a rev lock out it is in the form of a bolt action and it worked out well.
The small lever is sprung loaded and allows you to move it either side of the block.
Attachments

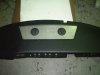
This pic does not do the dash justice.
It turned out nice but was way more work than I thought.
One Saturday I decided to get it ready for covering I was still on it 4 Saturdays later.
It was to long in the front so I cut that of and put a new lip on it.
It would not go in as it was to tight between the front pillars so I cut the corners off.
The out side edges that mount to the hinge pillar area were out of square by 18 mm.
A friend of mine was helping so we drew a few lines picked up a saw and just started cutting.
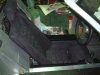
Made a plenum for the heating to go into the back it was a little tricky as it has to clear all the instruments and the chassis.
The plenum allows me to pump straight into from the heater a /cond and it goes to the vents from their.
This has allowed me to turn side and floor vents off and pump everything to the screen.
The top grill I had laser cut to suit 2 Toyota vents.
These allow me to direct onto the screen and shut off if required.
It turned out nice but was way more work than I thought.
One Saturday I decided to get it ready for covering I was still on it 4 Saturdays later.
It was to long in the front so I cut that of and put a new lip on it.
It would not go in as it was to tight between the front pillars so I cut the corners off.
The out side edges that mount to the hinge pillar area were out of square by 18 mm.
A friend of mine was helping so we drew a few lines picked up a saw and just started cutting.
Made a plenum for the heating to go into the back it was a little tricky as it has to clear all the instruments and the chassis.
The plenum allows me to pump straight into from the heater a /cond and it goes to the vents from their.
This has allowed me to turn side and floor vents off and pump everything to the screen.
The top grill I had laser cut to suit 2 Toyota vents.
These allow me to direct onto the screen and shut off if required.
This pic does not do the dash justice.
It turned out nice but was way more work than I thought.
One Saturday I decided to get it ready for covering I was still on it 4 Saturdays later.
It was to long in the front so I cut that of and put a new lip on it.
It would not go in as it was to tight between the front pillars so I cut the corners off.
The out side edges that mount to the hinge pillar area were out of square by 18 mm.
A friend of mine was helping so we drew a few lines picked up a saw and just started cutting.
Made a plenum for the heating to go into the back it was a little tricky as it has to clear all the instruments and the chassis.
The plenum allows me to pump straight into from the heater a /cond and it goes to the vents from their.
This has allowed me to turn side and floor vents off and pump everything to the screen.
The top grill I had laser cut to suit 2 Toyota vents.
These allow me to direct onto the screen and shut off if required.
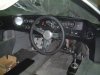
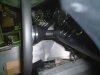
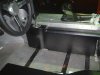
Had the dash covered.
The instruments are VDO and I had them refaced to Lucas.
Chrome bezels replace the black, you cant tell.
A good friend made the steering shroud out of Delrin , he told me I was not smart enough to make it so he would do it for me.
He made it an extremely tight fit around the column ,he had me put it in boiling water then fit it over the tube, it is on so tight it will not budge and it looks perfect (thanks Jake)
Another friend (thanks Stuart) offered to do the wiring and has done a fantastic job.
Milspec style plugs and the part that got me is other than ground wires he has not repeated any colours.
The centre console and gear selector panel I had covered (vacuum formed).
Attachments
Wheels are ordered.
The seats I gave to an upholsterer 12mths ago and I have had to take them back as he has not touched them, all to hard I think.
Will build the exhaust soon and I am expecting to fire the engine in Jan -Feb
That is it for the moment
Jim
The seats I gave to an upholsterer 12mths ago and I have had to take them back as he has not touched them, all to hard I think.
Will build the exhaust soon and I am expecting to fire the engine in Jan -Feb
That is it for the moment
Jim
Your work on this car is absolutely stunning! I wish I could see this car in person. I think I could learn a lot from your attention to detail.
Thanks BOB
Thanks Dean all the detail work is the reason it is dragging on.
My wife has told me I am my worst enemy.
Thanks Dean all the detail work is the reason it is dragging on.
My wife has told me I am my worst enemy.
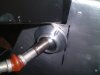
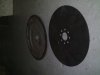
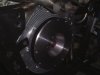
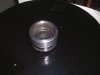
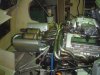
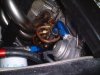
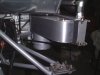
I drew up the conversion plate and flywheel and had Flatchat(Cris) make it and he did a fine job.
I made the drive plate as it was flatter than the ford item.
The bearing I messed around looking for something that would suit my clutch but it was not going to happen.
The Audi bearing is flat and my clutch p/plate requires a radius bearing face so I made a snap on extension to fit the original bearing then used Loctite to bond it on.
Sometimes the simplest solution gets over looked but i worked out fine.
Attachments
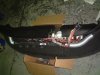
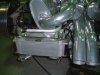
Built the exhaust.
I did a piece in the how to section on making these collectors.
I didnt take enough shots of the system being built, you get busy and you just dont.
These are before coating.
2 cats
tripple pass mufflers to get its db for RTA requirements.
I passed the pipes under the cats to try to give it some reasonable look.
Attachments
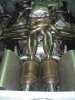
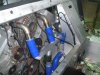
I am going for the IM240 (our emissions test in Australia for ICV)
For emissions I need to run the air injection to get the readings down.
This all had to be worked into the design.
A manifold on each side with 4 pipes, one to each exhaust pipe.
On the end of the manifold is a vacuum operated reed valve that is controlled by the ECU.
For emissions I need to run the air injection to get the readings down.
This all had to be worked into the design.
A manifold on each side with 4 pipes, one to each exhaust pipe.
On the end of the manifold is a vacuum operated reed valve that is controlled by the ECU.
Attachments
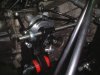
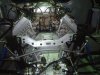
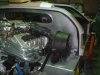
After finishing the exhaust I realized that to pull the gearbox you have to pull all the pipes because the c/member between the shocks drops into the chassis from the top.
This seems an ok method until you start to fill the spaces in.
My solution was 2 alloy blocks,2 alloy plates with spacers.
This can be dismantled in the car with the exhaust on.
Take the rear mufflers off remove the member and the box can come out.
This seems an ok method until you start to fill the spaces in.
My solution was 2 alloy blocks,2 alloy plates with spacers.
This can be dismantled in the car with the exhaust on.
Take the rear mufflers off remove the member and the box can come out.
Attachments
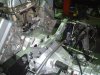
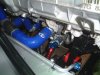
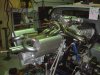
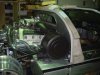
The EGR will be controlled by the ecu.
This info was passed onto me so I am going to give it a go as I have nothing to loose.
The theory is cool the exhaust gas pre sending it into the intake manifold.
It will help drop the NOX,this is one of the gasses that the threshold has been lowered in the IM240 test so I will try anything if it will help.
I will be running the EGR gas through an oil cooler to drop its temp
The cooler has an independent fan as on the dyno it will get little air flow.
I am going to cover the cooler on the dyno to see what the reaction is just for interest sake.
Attachments
Last edited:
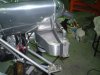
The air filter I looked at for a while and made the decision that it wasn't worth making.
I got my hands on a 2nd hand air box out of a Toyota L/Cruiser 80 ser.
I cut and modified the outlet ,filled holes , cut off brackets ,made new brackets , repainted and it only took about 12 hrs.
Its a good size filter and to be honest I don't mind the way it looks , it has an old school look about it.
Attachments
Well the wheels are finished.
The manufacturer increased the casting die so the off sets could be played with on the front.
They have been moved out to give a flatter look ( not for everyone but Im ok with that )
The suspension mods require it.
My choice was 17" but because of one thing and another they ended up 16".
I will now have to reduce the OD on the front disks ,cut the caliper brackets of my uprights and move everything inward.
This has turned out a good thing ,less unsprung weight and I get a baggy tyre as I prefer the look and the ride .
I will post a pic of the fronts when I fit them up.
Attachments
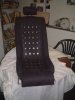
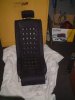
After 2 years the seat are finally finished.
The 2nd upholsterer after several pep talks and some of my best motivational speeches to date.
I selected a foe swade ,black and I have to say he did a great job.
Thanks Mike they look very classy.
The 2nd upholsterer after several pep talks and some of my best motivational speeches to date.
I selected a foe swade ,black and I have to say he did a great job.
Thanks Mike they look very classy.
Attachments
Last edited:
Similar threads
- Replies
- 139
- Views
- 18K